

Einstein dwarf
By riste sekuloski.
Introduction
In this article, ill try todo cover the creation of my einsteindwarf character from the idea todo the ready for animation, final character. I dont consider myself a great modeler (or anything great, for that matter), but ill try todo cover as much of my creation process as i can and (much more importantly in my humble opinión) todo point todo the resources that i have used that have made it posible. I have made an efort todo make the tutorial about the action constraints which is (imho) rarely used but very powerful Blender característica. Also, ill make einsteindwarf available todo the community (without the textures, if you dont mind). Along with it ill bundle some of the actions that i have used in the tutorial and explain how you can use its Rig for your own characters. I have gone todo great lengths todo make a Rig that is easily adaptable todo most humanoid characters (i have managed todo do it in less than a hour). So por favor, Bear with me.
My history with Blender
I have learned how todo use Blender out of stubbornness. I dont know how my experience with Blender compares with anyone elses. I had sen Blender for the first time years hago (probably when it first became open source). It came with a magazine that i was subscribed to, which always had nice shareware and freeware selections on its CD. I had always had a god time trying out diferent freeware programas (i am writing this using open Office and i do most of my texturing using the Gimp) and i had todo give it a try. I had some previous experience with 3d and i thought that i could easily find my way. Oh, how i was wrong. I mean, who in the right mind would select objects with the right mouse button? I have pressed diferent buttons here and there, managed todo render the default Cube, added a sphere somewhere on the screen (previously i clicked wildly across the screen with the left mouse button) and that was about it. I was quite sure that i couldnt make anything in Blender - the interfaz was so diferent, so i let it go.
During the next few years i saw numerous great looking still images that had the name Blender attached todo them, but those were stills, and i was sure that anyone fanatical enough can do a still image that looks fantastic on any programa. It just takes a lot of tweak. And then came Project orange. Someone on one of the art forums that i am a frequent Reader of, mentioned that a bunch of wackos made a 12 minute movie using some free 3d app. I downloaded elephants dream (i opted for a Mid-quality download, which tok a while) and watched it, and again, and again, and it was not only because i didnt understand a thing that happened (i mean, who did?) but because of unbelievable visuals. Details, details, details, meshes of amazing complexity, backgrounds and characters that were absolutely comparable with any profesional production and some really great animation. A nd all of that done in a restricted time frame and by six guysí and with Blender? That thing that i couldnt move a Cube in? Give me ha break. I have decided that it couldnt hurt if i give it a try, so i downloaded Blender again and again it hurt, not being able todo actually do anything was a humiliating experience, but now i had additional motivation and i made a search for documentation.
Blender novato todo pro made a lot of diference - suddenly i underestod how things moved around and with the tab key i was able todo finally edit my Cube. And edit i did. Compared todo any app that i have tried, Blender has the fastest modeling pipeline. It compares favorably with anything out there. Second thing that got me going was the character animation tutorial from the Blender summer of documentation. It contains everything todo get one started in the right direction. So i followed instructions and i made my versión of the gray guy. As a learning experience i decided todo UV Unwrap the guy. Boy, that was an experience by itself. I have read about them, but one cannot know how amazing the Blender UV Unwrapping tools are until you have true hands-on experience. All of the sudden an operación that is comparable todo dental extraction without anaesthetics turns into pleasure. I have Even made several UV setups, todo try for the best. Anyone who has done any UV Unwrapping anywhere happily declares it finished whenever it fels god. But in Blender i had the urge todo make it god with capital g.
Einsteindwarf: the idea
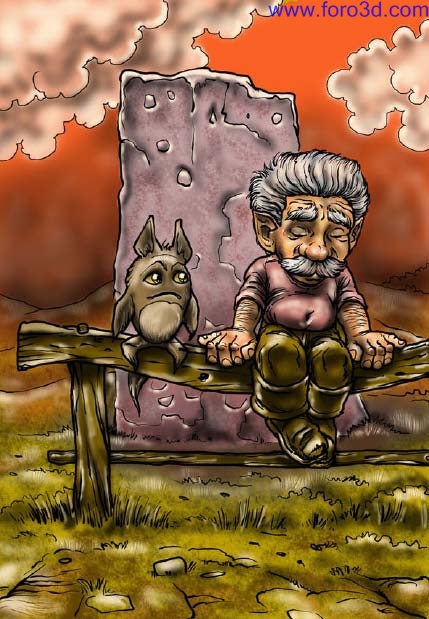
After that i decided that i was ready todo try todo model and Rig my own character. In my humble experience, the surest bien todo get discouraged in any 3d Endeavor is todo try todo make a model of a realistic human being first. So i smartly opted against it, y loked th rouge bunch of my drawings and i came up with this:
Comment: this is a drawing first made on paper, scanned, inked and colored digitally (if there is digital color, it is only lógical todo have digital INK).
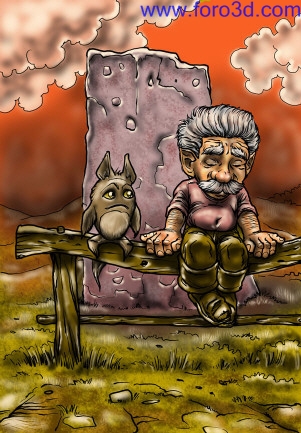
This Little guy has some feeling about him that i wanted todo try todo replicate in 3d. I have decided up front that ill go with more a realistic versión of the character and then modify it todo a more cartoony versión. So, y went on and drew another, more realistic sketch. I cannot emphasize enough the importance of previous sketches of the character before trying todo actually model it. I havent used any rotoscopes for the modeling for one simple reason: i had no idea how it could be done, but i knew that i can make it work, because i had pretty god idea how the character would look.
Note: not that i am world greatest expert on the matter, but i fel that anyone who is at all serious about any 3d has todo have at least better than average 2d skills. There are several reasons for that:
1 Whatever you make in 3d, unless it is computer aided design ends up as flat art.
2 knowing drawing reduces the time of making a god postura by a factor of ten. And god posturas are what makes 3d animation read.
3 you have todo make 3d model of the object in your head before youll be able todo transfer it into drawing. After that, transferring it into 3d object is much easier.
4 anyone can draw. By some Lucky chance i found a bunch of my drawings from the time when i decided that i am going todo be an artista. I remember, y was thirten at the time and i had such a lovely memory of my first attempts, until i saw them again thre years ago. They were beyond terrible. So, if i learned, anyone can learn todo draw. Of of the top of my head, y can recommend two amazing resources: drawing on the right side of the brain (cant remember the author), and fun with the Pencil by Andrew loomis. Second book is years (probably decades) out of print but it can be easily be googled, and it is fun. It contains the shortest and the best course todo learn the basic of drawing and have great time in the process.
One other thing that i found this drawing useful for, is that it tells something about the character personality and his feeling. And animation is all about the feeling. It a los made me think about the story behind it and it helped me come up with the idea for a short animation with this character.
Einsteindwarf: the modeling.
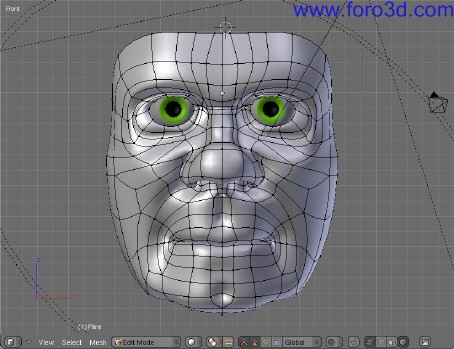
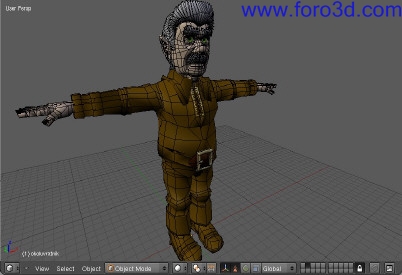
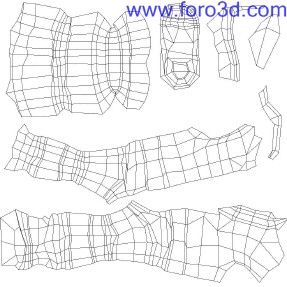
Comment: those are wireframe screenshots made very early in the modeling process. Although i am fanatical about saving my incremental file versións, this is probably my first saved versión of the model. That is how fast modeling in Blender is. First of all: better face tutorial at blenderartists forum and adriánne facial modeling video: they are an absolute must, they contain everything which is important and they are free. Watching the video and reading the hilo Will save you a lot of grief later. There are a los a number of other tutorialesthat Will teach you about the importance of the loops and making the Mesh deformable for animation. Lok no further than the Blender documentation and the blenderartists forum. Of course, blenderart magazine is col todo ;-) about the modeling process that i used: i have started with a subdivided plane, y erased half of it, used a mirror modifier, a Subsurf modifier with optimal draw turned on and that would be it. The rest of the modeling process is made with basic extrusións (e key), selecting four vértices (Control + left mouse button) and making Faces (f key). An alternative for making Faces is: when in Edge selection mode, select two opposite Edges and press f - it sabes two mouse clicks.
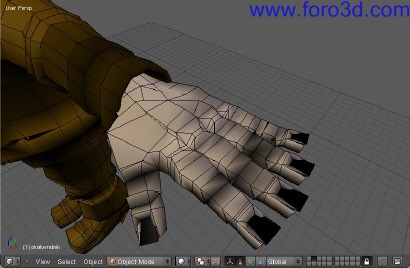
I have used the Knife tool several times (select Faces mode: Control + tab, 3 key then selecting the actual Faces with the brush selection tool (b + b), pressing k key, drawing the Cut with the left mouse button and pressing enter. That would be it. Uh, and a lot of vertex pushing. I have decided todo model the Hair and the mustaches for two reasons: i found that particle Hair is relatively complex todo máster and modeled Hair renders much faster. Ironically though, the Hair and the mustaches are the most complex parts of the model. They contain as Many vértices as the rest of the model. (when i finished the face, Hair and mustaches, y noticed that the finished character has an uncanny similarity with my father face. Very Strange and unexpected inded. But, the subconscious works in mysterious ways. Of course, my father does not have those pointy ears).
Modeling of the body was a variation of the modeling of the gray guy body from the Blender summer of documentation, of course with increased complexity todo Suit my character.
Comment: finished Mesh with superimposed wireframe. Note the number of vértices in the Hair and mustaches. Alos note the terrible topology of the hand Mesh. Some modeling purists might critique the elegance of the Mesh, but i havent sen any rendering troubles with it and that is what counts in the end.
Materials:.
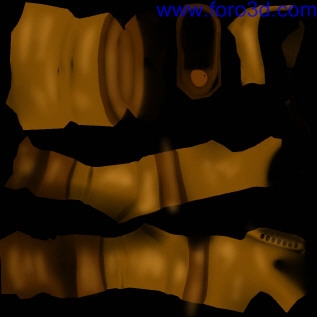
I have todo admit i have no idea about materiales in Blender. I dont know how they are made from the various types of noise, y have just the faintest idea what the Shaders are about, y have todo make an enormous number of experiments todo make color ramps work, so i opted for the obvious choice: i used materiales from elephants dream as a starting point and i adapted them for my neds (adapting means that i changed a máximum of one or two settings). But i know how todo use image textures and that should sufice.
Comment: rendering before texturing. The Mesh has only materiales which have ben donated by blenderheads from around the world.
Uv Unwrapping and texturing:
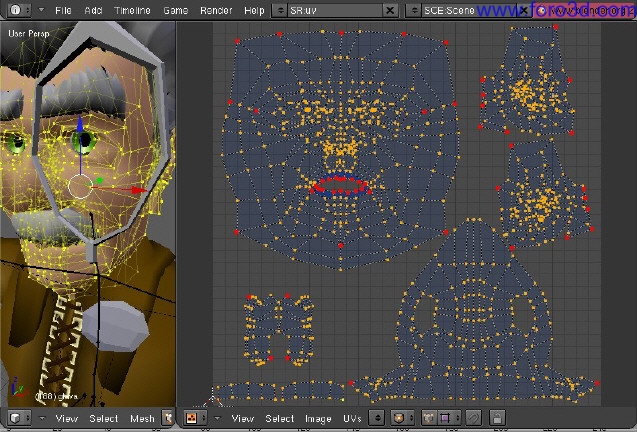
I have decided todo make sepárate UV maps for the face, the hands, body and Hair. For the same reason, they are sepárate meshes. It has ben explained in Many diferent places, but ill repeat the basic procedure:
1 in Edit Mode select the Edges that you want todo be the seams of the Mesh and marque them using Control + e (in Edge selection mode with occlude background geometry button pressed).
2 press u in 3d view, select Unwrap and if you are very Lucky, that it.
3 most of the time, nobody that Lucky so some tweak is usually required: select parts of the Mesh using l (selects connected vértices) in the uv/ image editor and position them properly using translate and rotate (g and r respectively). In some cases, youll want todo scale up important parts and scale down those that dont require much space (soles of the bots, for example).
4 now comes the fun part: pin the parts of the Mesh that you are happy with (p) and then select live Unwrap transform from the UVS menú: move some of the pinned vértices and enjoy the magic. You can always pin some more vértices (p) and unpin (select, Alt + p) others. This makes it posible todo increase the proportion of the important parts of the face compared todo the unimportant ones. Usually Unwrapping as it is makes peripheral parts of the face relatively bigger compared todo the central (and important) parts: lips, no sé, eyes. So this makes it posible todo increase their size and make better textures with the right amount of details.
5 when you are reasonably happy with the UV map, you can export it as a wireframe (UVS, scripts, save UV face Layout) and go on todo painting textures.
6 i like todo add one more step: i usually make two more maps by baking color (texture only) and Ambient Occlusion maps (Control + Alt + b). I find the Ambient Occlusion map especially useful because it contains additional información about the form of the Mesh.
Comment: note the number of pinned vértices (red).
Comment: exported UV map and AO baked rendering make two layers in my painting app. I usually set AO and UV map todo multiply over the color map that i am going todo Paint. Of course, the UV map is made invisible in the final image.
7 7. Lucky seven. Painting of the textures is fun. Again, one neds at least some drawing experience todo be able todo pull it of. I have used the Ambient Occlusion map as a base for the color map because it gives them a realistic Dirty feeling. Youll notice that my color maps are very simple. That is because i am using Bump maps todo add necessary realism todo my textures.
Comment:final color map for the Clothes.
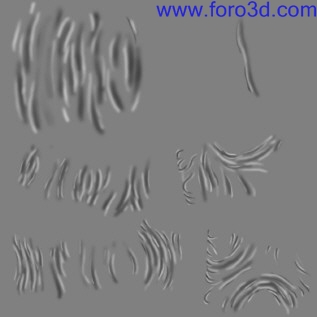
8 Bump map. Always remember todo start with 50% gray map for the Bump maps. That is because 50% gray is neutral Ground for them. Everything lighten than 50% Will stick out and darker Will cave in. The thing todo remember though is this: Bump maps (nor in blenderspeak) does not change actual geometry and when sen from profile, surfaces Will be sen for what they are: flat. An alternative for this is todo use displacement maps, which i did for the Clothes, but i have noticed that the displacement modifier slows down animation considerably, and After some experimentation i found out that using a Bump map for the Clothes looks almost exactly the same, but animates and renders much faster. Youll notice that the facial Bump map has a small amount of noise which represent pores of the skin. However, y had todo replace the noise with featureless 50% gray at some places where the pores are not that visible: no sé, cheks and ears. Facial wrinkles are the colest todo draw. Just remember todo use some reference as a basis and then go Wild. (i did)
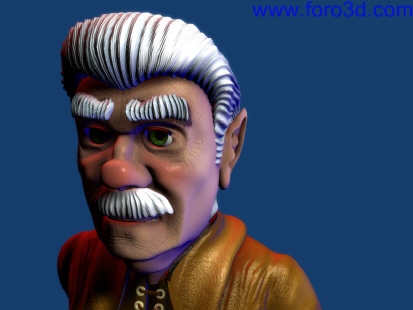
Comment: facial texture with high specularity, so that wrinkles are more noticeable.
Comment: initially i have used this map as displacement, but it turned out that it renders much faster as a Bump map and looks almost the same. Also, there is another Bump map that gives a leathery texture todo the model (lok for leather material at blenderartists forums)
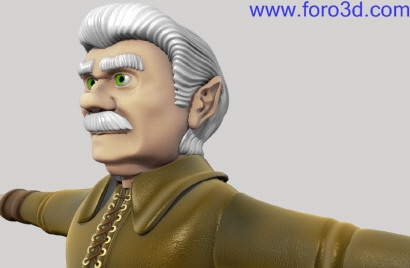
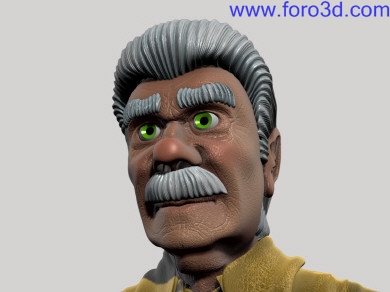
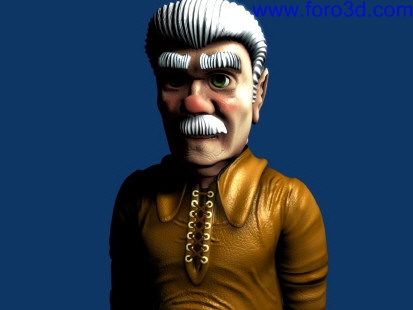
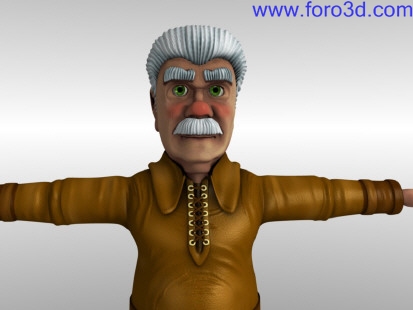
Comment: finished, textured character in diferent lighting conditions.
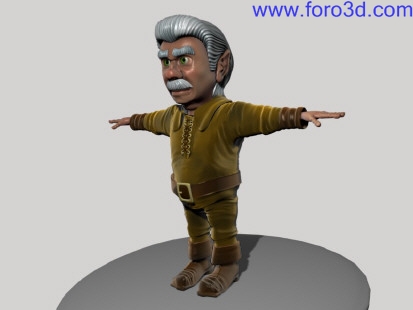
Comment: character modification made with rescaling of some parts of the Mesh. It was fun.
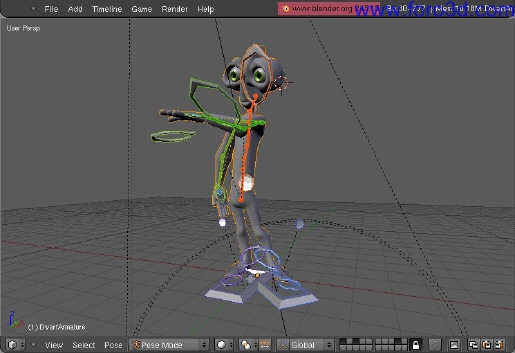
Armature:
Rigging of characters is an art of its own. It is a complicated and long procedure and i guess that is why large companies in the animation industry have technical directors todo make their rigging. Luckily for me, Blender artists have created several great rigs todo analyze and learn from: Bassam Kurdali, Calvin and Jason Pierce were my benefactors here. I have used parts of their rigs todo make my Frankenstein monster Rig that i am using. Of course, y had todo experiment and make changes on my own here and there (and those are probably the worst parts of the rig. I have todo say that Calvin facial Rig was a true revelation. It virtually eliminates the ned for shape keys and gives a great amount of control with a small number of controlling Bones. Also, Many gracias todo Bassam who is the daddy of several enormously important rigging breakthroughs in Blender. After i managed todo compile some sort of useful rig, y had todo go todo the most dreaded part of the rigging process, and that is the painting of the bone weights. This is the part that tok most of the time.
It probably tok 50% of all of the time that i spent creating the character. Weight painting is a process that is very prone todo mistakes and a los the part that requires the most of trial and error learning. I had todo learn todo hide parts of the Mesh because it is the easiest thing todo accidentally weight Paint some Distant part of the Mesh and wonder for hours why moving the fet causes Wild Deformations of the head. I shudder todo think about it.
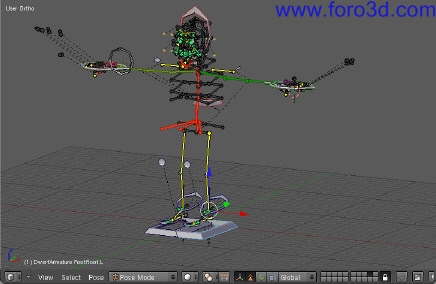
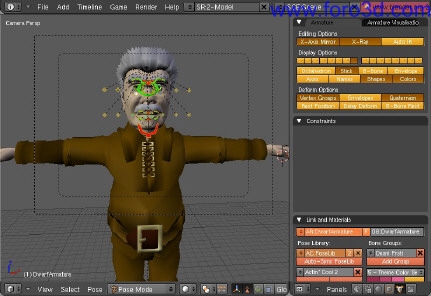
Comment: all the Bones in einsteindwarf armature. Loks scary, huh?
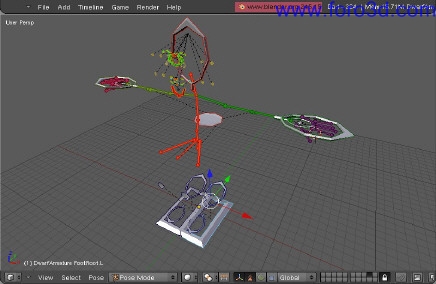
Commnet: luckily, those are controller Bones. Not so Many of them, and youll probably use most of them very rarely.
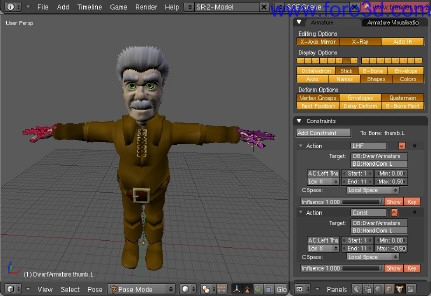
Action constraints:
Although i was pretty happy with the level of control that the final Rig provided i wasnt that happy with the ned todo move at least six Bones todo make a smile, for example (eight if you count in cheque controls that i added for better facial expressions). Also, a simple blink takes moving four Bones and that is additionally complicated if one wants todo make an offset blink (a blink in which one eye closes and opens slightly faster than the other). Not todo mention the making of a fist: it takes moving and scaling of at least five Bones and they have todo be positioned very carefully or they Will not look natural. After some experimenting, y have found that action constraints may be the answer todo this problem. They are pretty easy todo set up and ill go into them at length, for the reason that i havent sen a tutorial that properly explains their use.
Facial expressions:
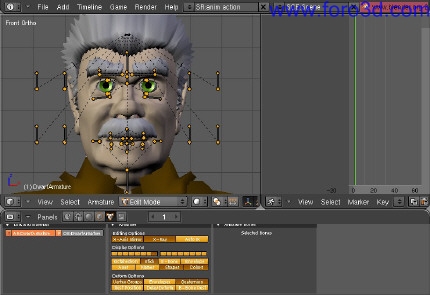
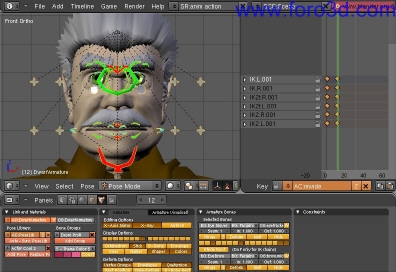
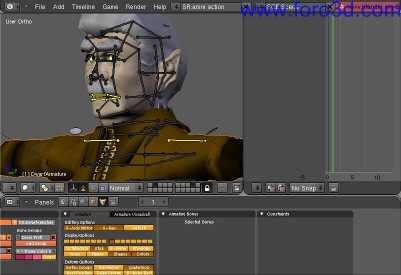
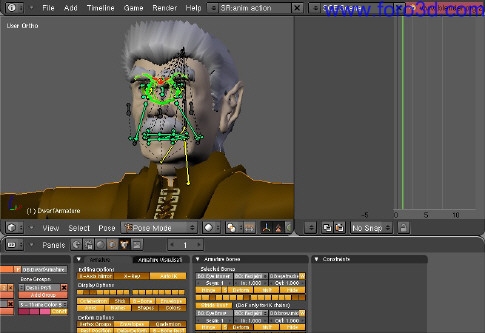
1 i have set up 8 control Bones on the sides of the head (children of head bone) that i have used for control of the facial expressions. I have set up all the controller Bones for the facial expressions on the bone layer 8.
1 in postura mode, the setup looks like this (note: bone objects for controller Bones do look familiar ;-) - I havecopied them from Calvin Bob facial rig)
2 set up your actions:
- make sure all the Bones are in their rest position (pose mode, select all (a), press Alt + g, Alt + r, Alt + s)
- make a new action (take care not todo duplicate an existing action, but make a new Empty action). Name the action. (use a short descriptive name because youll have todo type it again later)
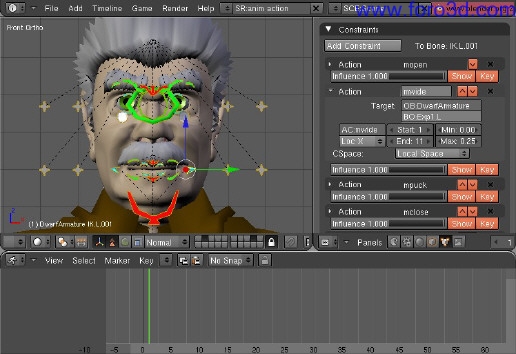
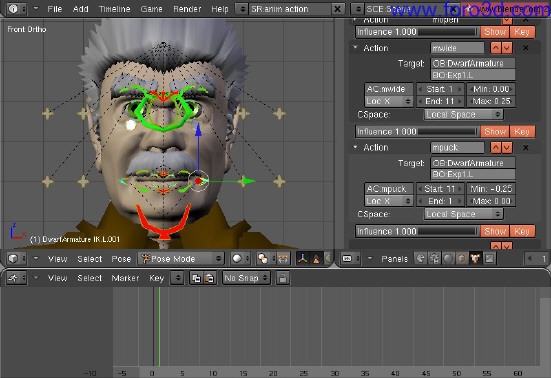
C go todo frame the when the action ends (i have used frame 11, but you may make the action longer or shorter), postura Bones (dont worry if you go overboard with the expression - it Will make posing more flexible later) and key all the Bones that were posed. I have named this action mwide - Mouth wide.
de return todo frame 1 and deleete the enlace todo the action datablock (clik on the x on the right side of the action name) (note: you dont have todo return todo frame 1, but youll have todo return the Bones todo their rest positions - youll save time this bien and start from the step 2).
E repeat for all the actions you plan todo use (dont worry if you miss some action, you can come todo this again later).
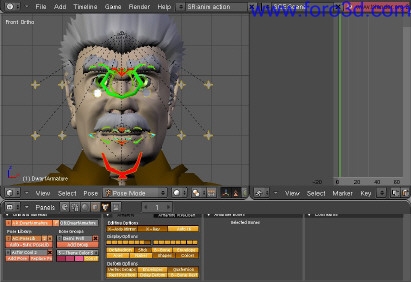
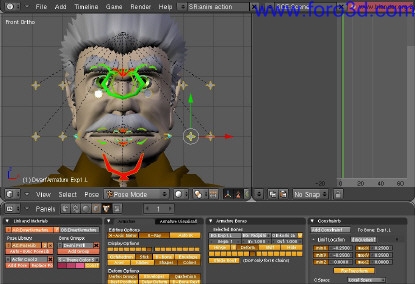
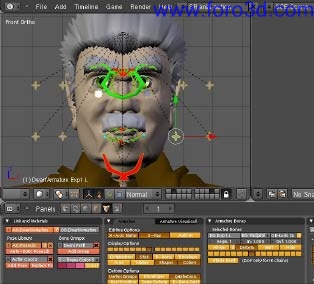
6 decide how todo connect various expressions with control Bones: for example, y have decided that the first bone on the left side of the face Will control opened, closed, wide and puckered mouth poses. (note: note the movements of the bone and changes in the expression. Alos note that transform orientation of the controller bone is set todo normal.)
7 start setting action constraints:
- a select your favorite bone - youll going todo use it todo set all your action constraints - i prefer a bone on the left side of the mouth, but that is just me.
- b add constraint - actions.
- c fill in the Fields:
1 target: name of the armature (dwarfarmature).
2 bo: name of the controller bone (exp1. L).
3 ac: name of the action (mwide, in this case).
4 start and end (starting and ending frames of the action).
5 Loc x: means that x location of the controller bone controls this action. (you can se the axes of the controller bone from the transform orientation of the bone if it is set todo normal).
6 min, max - movements of the controller bone (in Blender units) that switch between frame 1 and 11 (in this case it means that frame 1 is at the rest position of the bone and 11 is 0.25 Blender units todo the right) - you can use negative values (for the pucker pose, which is opposite of the wide mouth pose).
4 repeat this for all the actions: i had 8 mouth actions and two controller Bones and it tok me about 20 minutes.
5 now comes the tricky part (save the model first).
6 select one by one all the Bones that have ben used in some of the facial expressions. Leave the bone with action constraints todo be the last one selected (note: you can a los select the Bones that were used in some of the expressions, but were not used in others - it doesnt really matter. Just dont select toes or other non - facial Bones, and of course, dont select expression controller Bones that were used todo control action constraints).
7 press Control + c, select copy constraints (all)
8 that all - you may try moving controller Bones todo se if everything is right.
- if things dont move your way, make the necessary changes at the first bone and then repeat copy constraints - it Will overwrite old ones with the new setup.
- it is very easy todo make a mistake and overwrite constraints of the constrained bone with the Empty one - that why it is absolutely necessary todo save the model before copying of the constraints.
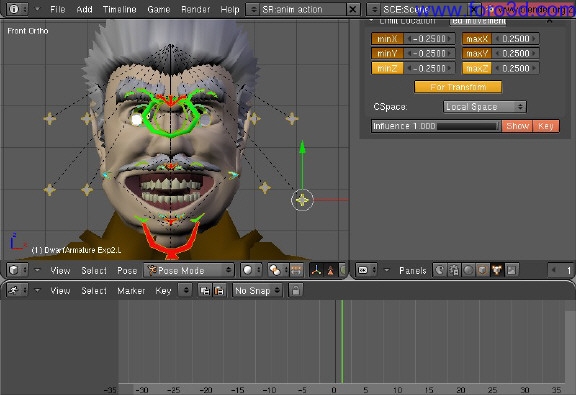
9 9. You may or may not (depending of the preference) want todo add limit location constraint todo the controller bone (as sen in images (action constraints 004.jpg - 007)) - but it makes it much easier if you do.
Ive done my best todo try todo explain the process as Simply as posible. I hope that this makes sense. If not, fel free todo devour the model and find out how it works.
An additional benefit of this setup is this: you may sum the movement of two actions: opened and wide mouth for example: (action constraints 011.jpg). Or you can go Wild and use two controller Bones and mix four expressions: open, wide, smile, show teth.
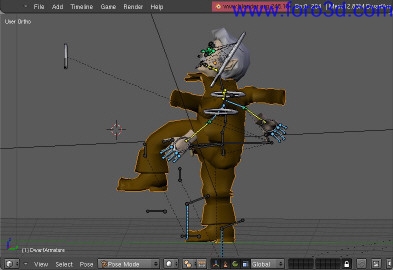
Hand movement:
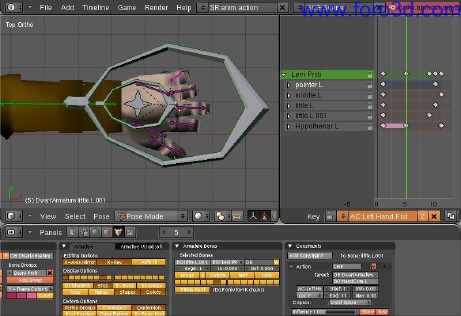
Now i am going todo describe another important aspect of action constraints: try and make fist with your hand: unless you are making conscious efort todo make it otherwise, your fingers move at diferent rates: usually you Flex your pinkie first, than your ring finger, thumb comes last. Also, fingers are lightly flexed in the rest position - and again, Little finger is mostly flexed, etc.
If you take a look at the action left hand fist, (action constraints 013.jpg), youll notice that all fingers are keyed at frame 1 and that only the middle finger is keyed at frame 11. Other fingers are keyed depending on the speed at which they Flex when making the fist. (by the way: hypothenar is the fleshy mound on the palm of the hand above the pinkie. Thenar is, as you may have guessed already - the fleshy mound above the thumb). This makes it posible todo make the fist when the controller bone for this action constraint is moved todo the end of the range, but makes the hand rest position when you move it slightly.
Ill just add that the hand controller bone is in the middle of the hand and it controls spreading and flexing of the fingers.
Bone layers:
Bone layers todo remember: bone layer 1: body postura controls. Bone layer 7: individual finger controls (and thenar and hypothenar controls) - it is most probable that this layer Will stay unused, unless you ned really subtle hand movements. Bone layer 8: facial controls.
armature part two:
After going th rouge all this i was still not happy with the bone weights. I felt that they can be improved upon, but it was so hard. Comment: my first experiment with bone heat bone weighting. Scary. And then, Brecht came up with the creating bone vertex groups from bone heat. Why then and not a year earlier? Ive tried this option with simple models and it worked great. Happily, y tried it with einsteindwarf and it loked terrible. Whenever i moved any bone he just went all over the place. Why? Of course, the solution was simple: After some head banging at the wall i realiced that all of the Bones were deform Bones. So, y tok my time todo look th rouge every single bone and make the decisión if it deforms the Mesh or controls other Bones. After finishing that process i gave it another try: i removed the parent of the head Mesh, selected it, selected the armature, pressed Control +, selected: armature, selected: create vertex groups from bone heat and voila. I had perfectly weighted facial Bones in thre seconds. It went the same with the body. So, the process that tok me ten or so full workdays was now finished in less than a minute. Of course, sometimes the Mesh deformed strangely - for example, rotating of the nek a los caused movement of the bak of the head and parts of the jaw, so i had todo add a few more deform Bones which were used todo estop the Mesh from unnecessary movements. (they prevent bone heat from the Distant Bones)
Gray Bones (bone layer 9) are such (preventing) Bones. Depending on their location, they are children of head bone, jaw bone and thorax (spine4) Bones. This may look complicated, but all of this tok less then 20 minutes todo setup.
Armature part thre (dwarf armature todo you):
Creating vertex groups from bone heat has one col side effect:
1 open your humanoid Mesh. (no armature, por favor).
2 import (shift + f1), object, dwarfarmature.
3 append, dont enlace.
4 select the armature, enter Edit Mode, make all of the bone layers visible.
5 select x - axis mirror of the armature and edit the armature todo suite your Mesh, following those simple rules:
- legs have todo be vertical.
- hands ned todo be horizontal.
- facial Bones should be inside the head Mesh.
- try todo avoid resizing of the facial Bones, especially of the mouth Bones, but this is not an imperative. If you do so, maybe youll ned todo modify the actions with facial expressions. Also, in that case, youll probably ned todo change the rest length of the Bones that have a stretch todo constraint applied todo them (some of the green Bones on bone layers 2 and 3.
- try todo make lips Bones accommodate the form of the mouth área of the Mesh as close as posible.
- eye Bones ned todo have the origin in the middle of the eyeball 6
6. Make the armature parent todo the Mesh selecting bone heat option.
7 7. That it.
Note: you may ned todo add or erase some of the preventing Bones. Youll ned todo do this if you notice funny Deformations during the testing. This all may sound complicated, but i have accommodated dwarfarmature for several meshes and it always tok me less than an hour (including the testing). In one case, everything was done within 20 minutes.
Note 2: i found that the easiest bien is todo select all the Bones, move and scale them as necessary, then todo deselect the Bones that i am happy with (key b (as in select), then deselect the Bones with key Alt depressed).
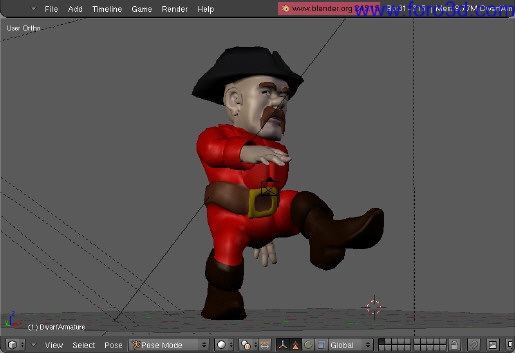
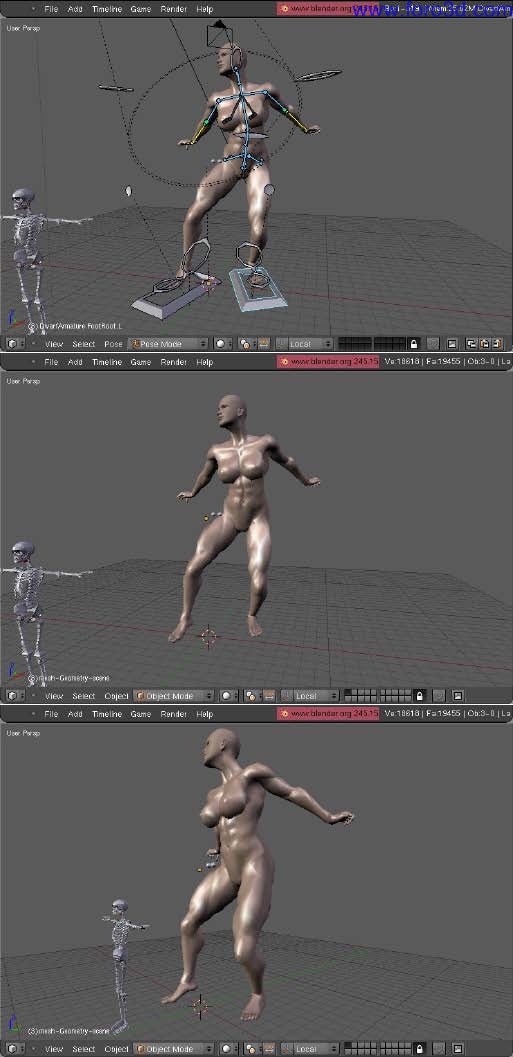
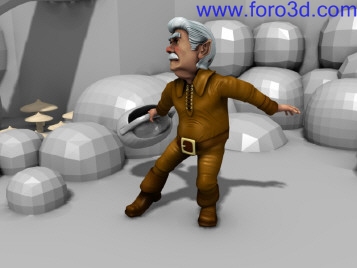
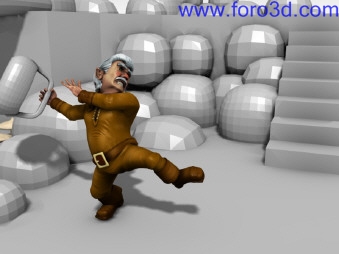
Here are thre very diferent examples: two characters with funny body proportions and one anatomically correct character created with Makehuman. It is important todo say that posturas are from the shared postura library created with einsteindwarf.
Animation:
I have noticed a funny thing: most of the aspiring animators stay at the rigging phase. I have todo say that i am (or hopefully was) one of them. For example, when i found out that this Rig can be applied todo various diferent characters with minimal modifications i went and i rigged those thre characters, and a few more - some of them already had excellent rigs, then i went on and imported my characters from my previous 3d app - animation: master, and of course, they neded todo be reworked. Alos i felt that i could make much better meshes for the controller Bones, and then i realiced that i am running away from the thing that i actually ned todo do: animating. I am afraid that Many of the 3d artists continúe todo make better and better models, they improve their texturing, they make better rigs, and for whatí so that they can animate one day. Because of this, y have decided not todo use particle Grass, not todo texture my backgrounds, but todo make the scene as simple and as son as posible and todo start animating, which i did. This is my character hábitat and i hope that ill have some quality animation todo show very son.
Note: i am actually very new todo actual animation, especially in Blender, but i have found thre amazing animation resources:
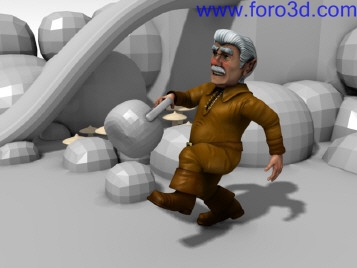
Disney animation - an illusion of life by Frank Thomas and Ollie Johnson, animators survival Toolkit by Richard Williams and LightWave 3d [ character animation by Timothy Albe. The first two books are well known classics, but the latter is an amazing book that i stumbled upon accidentally: i dont have LightWave, but i found it secondhand and it was so cheap that i couldnt resist (i am Weak todo all the things 3d). The second part of the book is treasure chest filled with explanations, exercises and challenges. If you look at the einsteindwarf youll probably recognize some of the posturas in the postura library from the book. This book has educated me and motivated me immensely and i cannot recommend it enough.
Comment: one of the exercise posturas modified for my character.
Last words: this has ben a very long article. It actually tok some thre months todo finish. I hope that you survivald it todo the end and that youll not ned thre months todo read it. I have tried todo cover some of my thoughts and experiences while creating this character, y have a los tried todo make a small tutorial of one of the Blender features that is not used very often but which i find very useful. I hope that youll like the character that i am sharing with you (por favor dont use the Mesh for commercial purposes and credit me if you use it for non-commercial ones). Pléase inform me if you use the Rig for your own characters and send me ha copy if you improve upon it.
Happy blending.
Riste sekuloski ristesekuloski@gmail.com http://www.ristesekuloski.blogspot.com/
www.blenderart.org.
×
 Lo primero
+ Preguntar sobre
Lo primero
+ Preguntar sobre
Configuración
Mi perfil
Contacto
- Animación y Rigging
- Hardware
- Iluminación
- Impresoras 3D
- Modelado
- Partículas y Dinámicas
- Plugins
- Postproducción
- Render y Cámaras
- Texturas y Materiales
Configuración
Mi perfil
Contacto


 Citar
Citar