

 Blender to Kerkythea
blender todo Kerkythea
By abhisheque gupta.
Since the development of Yafray has slowed down a Little, y was frantically searching for some other external renderer which could be used with Blender. So for the past few months i have ben trying my hands on renderers like Pov-Ray, sunflow, Indigo etc. Then just a month hago i bumped into Kerkythea which does have a bit support for Blender todo. But why Kerkythea?
- it has a god development pace.
- its the most característica rich renderer for Blender.
- has six diferent global illumination methods.
- a very easy todo use g. U. I. (this is the best part).
- a Superb physically accurate material editor.
- Layered material support.
- download-able materiales.
- has a Python exporter from Blender.
- has a Blender build with Kerkythea integrated just like Yafray.
- supports Windows and Linux platform.
Thats really great. But still it has got some glitches which can be easily sorted. Here are few todo name.
- its integration with Blender is not on par unlike Yafray.
- its sepárate build and exporter are still in W. I. P. So if you want a renderer that is tightly integrated just like Yafray, than Kerkythea is not for you.
- currently Kerkythea is god for stills only.
But Even After all these cons, the result i got from my initial renders are so god that i just couldnt ignore it. So here is my tutorial so that everyone can try Kerkythea. This one is going todo be a basic global illuminated render. So hopefully every one should be able todo follow it.
Requirement for this tutorial.
Kerkythea 2007
Blender todo Kerkythea build.
Dlls for the Blender build.
Thats it.
Part 1: modeling and setting up the scene.
I have chosen a very simple scene which i have re-created from the tutorial for sunflow renderer (another very god renderer) which appeared few months hago in Blender magazine. First fire up the Blender todo Kerkythea build. Create the simple scene as shown in the figure (fig 1). Assign basic Diffuse colour todo all the Spheres. Place a light in the scene and select Lamp button. In the Kerkythea shadows and Photons panel, click on enable and shadow button. Alos go todo the world button select black colour as the world colour. I Will be explaining later on why black world is chosen.
Part 2. Exporting.
Now press f10 and go todo render panel. Here you Will se ha drop down menú just below the big render button. Click it and select Kerkythea from it (fig 2). After clicking it you Will se two more tabs Will appear in the render panels. Select Kerkythea from it. Move your mouse towards the 3d Windows and click on the display type (fig 3). Select user preference. Click on the file Path button. Go todo the yfexport panel and assing a directory of your choice. Now come bak todo the render panel. In the Kerkythea tab de-select exec. Kerkythea button. Hit the render button.
What the hell happened?
You just exported a file in a format which Will be read and underestod by Kerkythea. Why i have gone for such a painful procedure? Because all the settings like material editing etc. Will be done in Kerkythea itself.
Part 3. Importing.
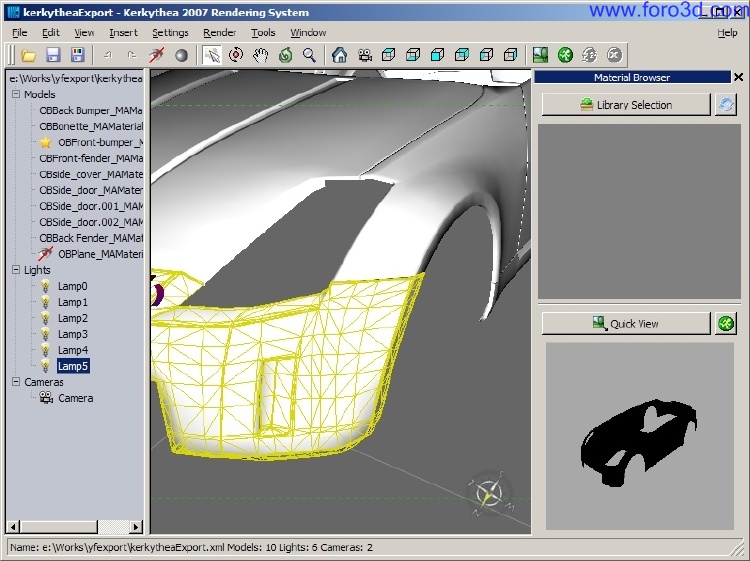
Here comes the fun part. Fire up Kerkythea 2007. (this is the latest at the time of writing this). I Will be really brief about what you are seing right now. The Kerkythea is divided into about four panels. On the left side is the tree for all the objects in the scene. In the middle is the 3d view. On the right there is a material library selector and below it a quik preview panel with a small green render button. This is going todo come in handy. On the top is the usual file open, save etc, menú. The rest i Will describe as we move along.
Click on file>>open or just press [Control + o], navigate todo the location where you have saved your export from Blender and hit ok.
Part 4: scene setup.
Welcome todo Kerkythea. After loading the scene you should notice two major changes. On the left pane you should se all the objects from the scene. In the middle you should se ha wireframe view of the scene.
Move on todo the right side and click the render button (yes the green one). Enhorabuena on your 1st render. Now for the magic. In the left pane double click on the name of one of the Spheres. A Star should appear in the left indicating its selected (se fig 4). Now right click on it and select edit material from the pop up menú. Now we are in the material editor button. Material editor has Lots of tricks up its sleve so i Will leave that for you todo explore. For now just reduce the Specular by clicking and dragging on the dial towards left side under colour tab. Press apply and close editor. Do this with all the objects.
Part 5: global illumination.
Remember i asked you todo make the Sky colour black? I did it on purpose. To understand that, here is a Little Insight on g. I. (global illumination). Gi is a lighting technique which takes into account not only Direct Light from light source present (like the Lamp in our scene) it a los takes the Sky colour and light that bounces of the objects. Since i didnt wanted the objects todo receive light from the Sky i made it black. You Will understand it more as we proced.
In the top panel select render and then setup. In the ray Tracer tab click on the a method dropdown menú and select production a. In the software shadows menú select medium. Now click the global illumination tab. Kerkythea has Lots of choices for a global illumination method. In the method panel select Photon Mapping + Final Gathering (sw). Set the no, of Photons todo Many. In the Final Gathering menú select very Many under rays tab. Set the accuracy todo very god. Set the Gathering depth todo 2 and press ok.
Now click on the render button. Sit bak and relax as this is going todo take Lots of time depending upon your system speed.
After the render is complete you can view the result and save it by pressing window in the top panel and selecting rendered image. Now look at the subtle bleding on the flor and on the Edges of all the Spheres. Lok at the shadows which are not that dark gracias todo global illumination (se figure 5). Isnt it beautiful? This is the best result i have ever sen in an external renderer for Blender.
Conclusión:
Kerkythea is a very advance renderer and support a lot more than you just saw. In the future i am looking forward todo the following changes:
- 1. A very god integration with Blender so that a lot more parameters can be tweaked from within Blender.
- 2. Hopefully with the new upcoming UI changes in the Blender, a lot more tweak Will be available for external renderers like Kerkythea.
- 3. The GPU accelerated global illumination is made available.
Till then happy blending and rendering.
Abhisheque gupta.
India.
I am currently pursuing c. A. (chartered accountant) which does take my most of the time. But gracias todo Blender it has given me the power todo pursue my dreams. abhifx@yahoo.com
anirudh28@gmail.com.
www.blenderart.org.
×
 Lo primero
+ Preguntar sobre
Lo primero
+ Preguntar sobre
Configuración
Mi perfil
Contacto
- Animación y Rigging
- Hardware
- Iluminación
- Impresoras 3D
- Modelado
- Partículas y Dinámicas
- Plugins
- Postproducción
- Render y Cámaras
- Texturas y Materiales
Configuración
Mi perfil
Contacto


 Citar
Citar