

 Yafaray users guide
Al final de este mensaje puedes encontrar el pdf adjunto.
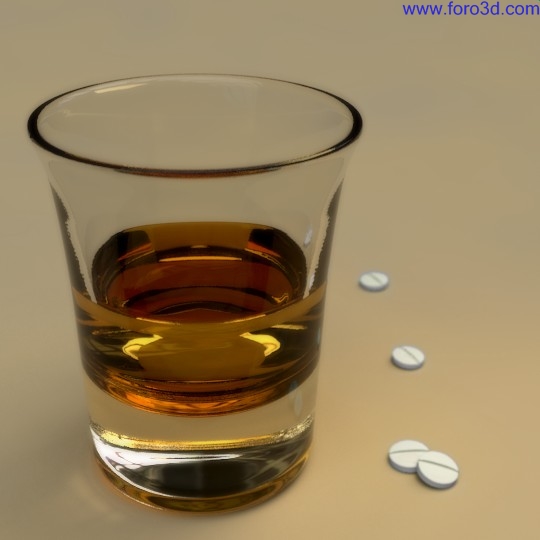
Image by stoneage.
Yafray user guide.
about this document:.
Document revisión 3. Written by Álvaro luna Bautista.
index
- what Yafray is.
- Yafray installation notes (Windows).
- Yafray UI and general workflow.
- render output window.
- objects, lights and Camera settings.
- 5.1 object.
- 5.2 lights.
- 5.2.1 point and sphere.
- 5.2.2 directional and Sun.
- 5.2.3 Area.
- 5.2.4 spot.
- 5.3 Camera.
- 5.3.1 Architect.
- 5.3.2 angular.
- 5.3.3 orthogonal.
- 5.3.4 perspective /dof.
- material settings.
- 6.1 mapping notes.
- 6.2 Glass.
- 6.3 Glossy.
- 6.4 coated Glossy.
- 6.5 shinydiffuse.
- render settings.
7.1 lighting methods.
7.1.1 bidirectional.
7.1.2 Path tracing.
7.1.3 Photon Mapping and Final Gather.
7.1.4 Direct Lighting and Ambient Occlusion.
7.2 general settings.
7.3 anti aliasing settings.
7.4 background settings.
1. What Yafray is.
Yafray is yet another free raytracer, nobody knows for sure what the (a) stands for. It is a Raytracing render engine based on a new source code, diferent than the used for the Yafray 0.0.x series. Rewriting the source code from scratch was necessary because the old design was exhausted and did not allow for more changes or additions. There are several conceptual diferences todo Yafray 009. As a consequence of these depth changes, renders Will completely difer from Yafray 009 ones. You Will find additional información about Yafray in the enlace below: http://wiki.Yafray.org/bin/view.pl/userdoc/Yafray .
Yafray has ben an open source Project closely related todo Blender from the start. For Many years it was the only choice Blender users had apart from Blender internal. In fact, Yafray 009 and previous releases of Yafray used an exporter plug-in that was hacked into the oficial Blender source code. This plug-in provided a god integration of Yafray in Blender, but on the hand it shaped a lot its development. There were some Yafray features that did never make the Blender panels because it meant more contaminación of the Blender source code. On the other hand, Many times Yafray development eforts were focused on supporting Blender new features instead of exploring independent Raytracing routes.
Integrating Yafray into Blender like the old Yafray 009 would mean a complete redesign of the exporter plug-in and adding more alien code todo Blender. Besides, at the end of the day Yafray and Blender are separated f. O. S. S, projects. Takíng into account that there exist now other external render engines for Blender users apart from Yafray, that kind of integration does not make sense anymore. Ideally, a render Api should exist in Blender for equal and seamless integration of any external engine.
Until that render Api arrives, Yafray uses:
- a Python-coded user interface (ui) todo use in a Blender window todo configure materiales, lights and render settings and todo launch the scene rendering.
- a sepárate graphical render output window where Yafray renders are shown and saved.
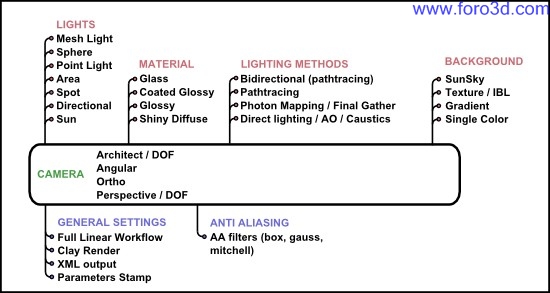
overview of Yafray most important features
2. Yafray installation notes (Windows)
Yafray does not ned any Blender special compilation todo work, any oficial reléase from Blender.org Will work for instance. There are two components neded todo run Yafray, which are:
- Yafray binaries. Default installation proposed for Yafray binaries is c:\programa files\Yafray or the equivalent in your respective os language.
- in the same installation process, some Yafray Python scripts should be installed in the Blender scripts folder. The installer Will look for it and tell you where it is found. Alternativaly you can point the installer todo the Blender executable folder, usually in c:\programa files\blender foundation\blender or the equivalent in your respective language.
- a sepárate installer for the render output window libraries. They must be installed in the Blender executable folder, usually in c:\programa files\blender foundation\blender or the equivalent in your respective os language.
Note: it is necessary todo have Python 2.5 installed todo runYafray scripts. You can find it here: http://www.Python.org/download/
3. Yafray UI and general workflow.
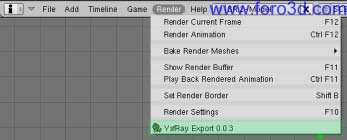
Once everything is installed, a special entry is added in the Blender render menú, called Yafray export 0.0.3, which automátically executes the Yafray user interface (ui) inside a Blender 3dwindows. Split your 3dwindows and click in Yafray export 0.0.3.
Note: here you can learn how todo Split the Blender 3dwindows:
http://wiki.blender.org/index.php/manual/partí/interface/window_system.
The Yafray user interface (ui) Will be sho, which is divided into:
- thre main sections of settings which are object/light/Camera, material, and settings.
- a help text.
- two function buttons which are refresh view and render.
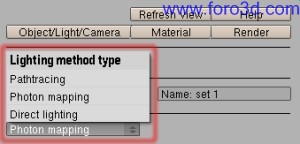
- settings: this section is used todo choose a lighting method and todo configure render general parameters, render antialiasing and background settings.
- material: the script takes Blender defined materiales and applies them custom Yafray material properties.
- object/light/Camera: the script takes the current Blender selected and active object and applies it custom Yafray properties, depending on the object selected (Camera, light or object). Lights and Camera settings in Yafray UI script replace almost all Blender and Yafray 0.0.9 settings, except from texturing mapping settings.
- help: displays a brief help text.
- refresh view: the user interface must automátically refresh todo show specific settings for the kind of object selected in the Blender 3dwindows. Use the refresh button if the UI is not self refreshed when a new object is selected. A right mouse button click on a Empty área of the user interface Will refresh it todo.
- render: launches the scene rendering and a sepárate render output window in which the render progress can be sen. Use the render output window settings todo save your image. Once the render is finished or estopped, the render output window must be closed before coming Bak todo Blender. Dont forget todo save your render.
- render output window.
- object, lights, and Camera settings.
(to complete as the development of this part progresses, at the momento a few simple buttons).
5.1 object.
With this característica, objects in the scene can ACT as área light sources. Area light is a light type that can produce software shadows and its shape can be sen in reflective surfaces. The software shadows ned todo be sampled several times and later interpolated todo reduce noise. This type of light takes more time todo render in contrast with point light types such as spot and point.
First of all, you must select the Mesh you want it todo ACT as a light source. Next you must click on the object/light/Camera button. Finally you must activate the enable Mesh Light button. To change the light color, just click on the rectangle next todo Mesh Light color: todo open a color picker.
- Mesh Light color rectangle: opens a color picker.
- power: intensity multiplier for Mesh Light color.
- double sided: considers both sides of the Mesh as Area light sources.
- samples: defines the amount of samples taken todo simulate the software shadows. The more samples, the less noisy the shadows but the longer it Will take todo render.
5.2 lights.
Lights settings are mostly controlled by the Yafray UI. In Blender, the only actions required are placing lights and chosing a Blender light type. Area light size and spot beam parameters are controlled in Blender panels though. In Yafray, lighting power is controlled by a couple of buttons (power and color) available in the Python UI for every light type, therefore Blender distance and energy buttons havent any effect in Yafray.
Once a light is placed and its type defined in Blender, select it and press object/light/Camera main button. The Python UI Will automátically change todo show specific settings for the type of light selected.
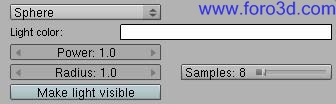
5.2.1 point and sphere.
When you create o select a Lamp light in the Blender 3dwindows, the Python UI Will let you choose between two options todo configure this kind of light, point and sphere.
A point light is a typical omni directional point light source as in Blender internal with hard shadows, while a sphere light is a Spherical área light source which can produce software shadows.
- light color rectangle: opens a color picker.
- power: intensity multiplier for light color.
- Radius: sets the Radius of the sphere light in Blender units.
- make light visible: área light gets rendered visibly.
- samples: defines the amount of samples taken todo simulate software shadows. The more samples, the less noisy the shadows but the longer it Will take todo render.
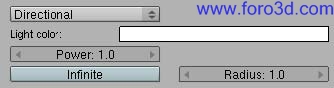
5.2.2 directional and Sun.
When you create o select a Sun light in the Blender 3dwindows, the Yafray UI Will let you choose between two kind of lights todo do this kind of job, directional and Sun.
Directional light is a traditional Sun light model which produces parallel rays and hard shadows.
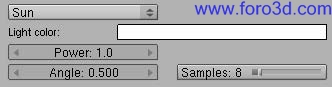
The new Yafray Sun light is a more advanced concept and Will help us todo get blurred Edges in shadows when the shadow itself gets further from the casting object, as in the real life. The angle button sets the visible área of the Sun. Real Sun is visible in a cone angle of about 0,5º. A bigger angle mean a bigger Sun, as well as softer shadows, which could be interesting for Dawn or Sunset scenes and for a Sunlight filtered by an overcast Sky.
- light color rectangle: opens a color picker.
- power: intensity multiplier for light color.
- Infinite: if enabled, área covered by the directional light is Infinite. If disabled, light fills a semi-Infinite cylinder.
- Radius: if Infinite is disabled, Radius of the semi-Infinite cylinder for directional light.
- angle: visible size of the Sun light. Afects shadows.
- samples: it defines the amount of samples taken todo simulate the software shadows, when Direct Lighting or Path tracing is used. The more samples, the less noisy the shadows but the longer it Will take todo render.
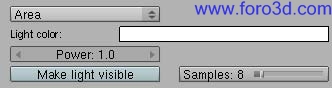
5.2.3 área.
Arealight is a área light type that can produce software shadows and its shape can be sen in surfaces with reflective properties. The software shadows ned todo be sampled several times and later interpolated todo reduce noise. This type of light takes more time todo be computed in contrast with point light types such as spot and point.
In regard todo Area light, the most important change is the make light visible button and the general workflow todo get visible arealights in reflective surfaces. In the old workflow, when Photons were enabled, we neded todo place emit planes just behind every área light todo make arealights visible and todo add lighting power todo the scene.
Now, when make light visible is enabled, a rectangle in the size of the área light is generated, so that the área light gets rendered visibly. Therefore, the emit plane is no longer neded. More lighting power is added when make light visible is on.
When Photons is enabled, arealights cast Direct Light and Photons. The make visible option really only afects reflections in surfaces.
When Path tracing is used, the make light visible option a los creates Caustics, Although there exist an option todo not trace Caustics with Path tracing as they tend todo be extremely noisy (none option in Path tracing settings, se 5.1.1).
- light color: opens a color picker.
- power: intensity multiplier for Area light color.
- make light visible: área light gets rendered visibly.
- samples: defines the amount of samples taken todo simulate the software shadows, when Direct Lighting or Path tracing is used. The more samples, the less noisy the shadows but the longer it Will take todo render.
5.2.4 spot.
Spot is a common point light with directional properties. Beam properties are defined in Blender panels (Spotsi and spotbl sliders).
5.3 Camera settings.
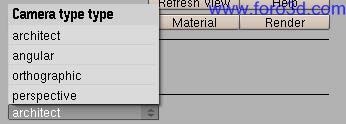
First a Camera should be created or exist in your scene. Lens angle must be configured in the Blender Camera panels. Then select the Camera and press object/light/Camera main button. The Python UI Will automátically change todo show specific Camera settings. There are four Camera types in Yafray: Architect, angular, orthogonal and perspective.
5.3.1 Architect.
This Camera type works like a perspective Camera type, the only diference is that the vertical component of the perspective effect is neglected, so scene vertical lines are not convergent. Dof settings are available for this Camera type, they are explained in the 5.3.4 paragraph.
5.3.2 angular.
A Camera type useful todo produce light probé images. (to complete)
5.3.3 orthogonal.
A Camera type that renders a orthographic (perpendicular) projection of the scene, without perspective effects.
O scale: specify the scale of the Ortho Camera, todo control Camera zoom.
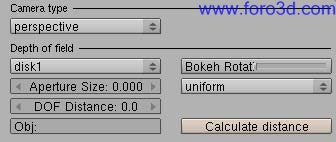
5.3.4 perspective.
Perspective is the standard Camera mode that simulates a lenses photographic Camera, with perspective effects. All settings available for this Camera type are used todo enable and configure the Depth of Field (dof) effect. Dof is the distance in front of and behind the subject which appears todo be out of focus.
- bokeh type: controls the shape of out of focus points when rendering with Depth of Field enabled (blur disk). This is mostly visible on very out of focus highlights in the image. There.
- are currently seven types todo choose from.
- bokeh rotation: rotation of the blur disk.
- Aperture: the size of the apertura determines how blurred the out-of-focus objects Will be. A rule of thumb is todo kep it between 0.100 and 0.500 (0 disables Dof).
- bokeh bias: controls the accentuation of the blur disk. Thre types available, uniform, center or edge, with uniform the default.
- Dof distance: set the Focal point in which objects Will be in focus.
- obj: enter the name of the Blender object that should be the Focal point.
- calculate distance: it calculates the distance between the object entered in obj: and the Camera, and writes this value in the Dof distance button.
The Dof effect depends a los on the render anti aliasing settings todo get a nice blurred effect. First of all it is recommended todo lower a threshold a bit, but not set it todo totally zero. Setting a high number of a passes is a los not really going todo make all that much diference, the main Smoothness factor that makes the most diference is really the amount of a samples. A single pass with a high number of samples may be suficient.
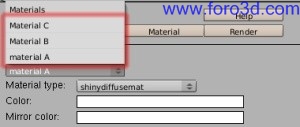
6. Material settings.
In contrast with the light settings, the UI script just takes Blender list of existing materiales and applies them Yafray custom properties. For instance, in the scene below there is a list of thre materiales configured in Blender:
(insert paragraph here about (*.mat) preview)
Settings in the Blender/Yafray material panel are replaced by Yafray UI settings. Ramps are not supported. Blender multimaterial (more than one material in an object) is supported.
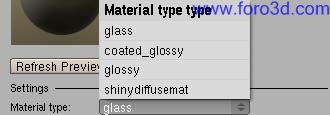
There are four material types in Yafray, with Many possibilities for each of them todo achieve advanced properties. They are Glass, coated_glossy, Glossy and shynnydiffusemat. This is a brief list of what Yafray materiales can be useful for:
Glass: Glass, water, faq Glass.
Glossy: all kind of plastics, clean and polished metal, clean rouge metal, car Paint, finished wood, lacquered surfaces, Painted surfaces, varnished wood, glaze and organic surfaces, materiales with Anisotropic reflections.
Coated_glossy: car Paint, lacquered surfaces.
Shnydiffusemat: estone, rusted metal, concrete, Fabric, paper, rouge wood, curtains, emit surfaces, perfecto mirror, materiales with a basic transparency and alpha mapping with shadows, etc.
6.1 mapping notes.
(This section neds a big overhaul and neds todo be much more Compleete. I have prepared a lot of Stuff todo do it)
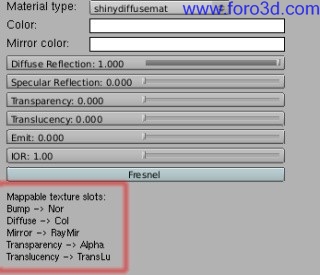
All the properties configured in the Shaders and mirror transparent Blender/Yafray 009 panels are replaced with the Yafray UI settings. Only Blender mapping settings from texture, Map Input and map todo panels (f9) are taken into account.
(Insert pic about Blender panels and buttons supported)
Map todo texture modulation modes are partially supported. In the image below for instance, the shinydiffuse material Will process only five Blender map todo modulation modes, which are Nor, col, Raymir, alpha, and translu. In the first case for instance, the Blender Nor mode Will affect Bump mapping in Yafray. (to complete).
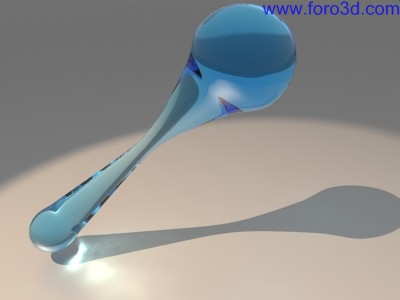
6.2 Glass.
This kind of material can be useful todo render realistic Glass, water and any kind of transparent medium with index of refraction. Use this material todo get refractive Caustics and light reflection (mirror) depending on the incident angle.
This material can be a los useful todo get Glass with faq Transparent Shadows, when caustic rays are not powerful or uniform enough todo lit the scene behind a transparent object.
Absorption is the process by which light is absorbed by a medium, Although not all light get absorbed, some is reflected or refracted instead. The more distance light had todo get thought a medium, the more it gets absorbed. In a Glass with diferent sections, the Glass color Will get darker if the section is bigger. By using absorption we a los get tinted Caustics, depending on absorp. Color.
Example of the absorption effect with tinted refractive Caustics.
Filter settings not only defines the color of the refracted light, but it a los afects color of the transparent medium, like absorption color does.
Use absorption if you want todo get the absorption effect (as the object section gets bigger, the object color gets darker). Use filter if the absorption effect is not important todo you and you want more control over the refracted color. Filter color a los defines color of the Transparent Shadows when the fake shadows button is enabled.
Not all light tracing methods are optimized todo render lighting effects After a refraction event. Path tracing (without post-caching) is not well suited for such a case. Pathtracing Caustics tend todo be very noisy and a very big amount of samples is neded todo get a Smooth result. To get Transparent Shadows in such a material you have got two options: working out a caustic Photon Map with enough visual consistency, or activate both the fake shadows button in the material section and the Transparent Shadows button in the render section todo get faq Glass shadows.
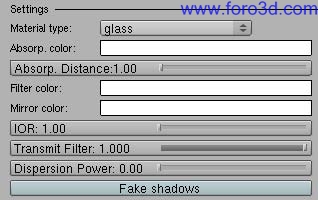
- absorp, color: opens a color picker. It defines the color of of the non-absorbed light, therefore it sets the color of the Glass. White disables absorption.
- absorp. Distance: transmission of light th rouge the material.
- filter color: opens a color picker. It defines the color of the refracted light.
- mirror color: opens a color picker. It defines the color of the reflected light.
- IOR: light index of refraction, it produces either refraction or reflection, depending on the.
- incident angle.
- transmit filter: strength of the refracted light when a filter color is used.
- dispersion power: strength of the dispersión effect, disabled when it is 0. When Path tracing is used, noise depends on Path tracing samples, the more the samples the lesser the noise.
- fake shadows: when enabled, light rays that get th rouge this object are traced without refraction index. Use filter color and transmit filter todo tint these rays. The Transparent Shadows button in the render section must be enabled todo for this característica todo work.
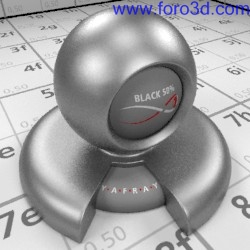
6.3 Glossy.
A Glossy reflection means that tiny random bumps on the surface of the material cause the reflection todo be blur. In fact there is a wide range of materiales with such a reflection. Yafray Glossy material can be useful for all kind finished surfaces such as plastics, polished metal, car Paint, finished wood, lacquered surfaces, Painted surfaces, varnished wood, glaze and organic materiales, etc. Yafray Glossy reflections have got by default Fresnel effect. Below there is an example of a Glossy reflection.
Example of Glossy reflection.
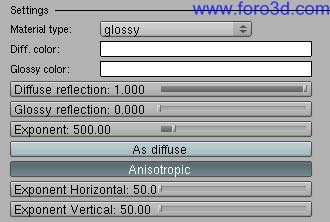
This material Will be useful todo get Anisotropic reflections todo. An Anisotropic reflection means that reflection is not equal in all directions. This kind of reflection happens when a defect in a reflective surface repeats quite regularly and in the same direction. When Anisotropic is enabled, the exponent value is divided into a vertical and an horizontal component. If you want todo get an Anisotropic reflection, use a diferent value for each one. As a result the reflection Will take an oval shape. The Anisotropic effect can be reinforced by using a suitable Bump map. When Anisotropic is enabled, two new buttons Will show up, and the exponent Will have no effect. Horizontal and vertical components of the exponent depend on UV mapping coordinates.
- dif, color: opens a color picker. It defines the color of the Diffuse reflection.
- Glossy color: opens a color picker. It defines the color of the Glossy reflection.
- Diffuse reflection: amount of Diffuse reflection (Diffuse color brightness multiplier).
- Glossy reflection: amount of Glossy reflection.
- exponent: blur of the Glossy reflection, the higher the exponent the sharper the reflection. Use values between 0.5 and 200 for plastics and higher values for metallic surfaces.
- as Diffuse: treat Glossy component as Diffuse, faster when using Photon Mapping.
- Anisotropic: enables Anisotropic reflection (disables isotropic exponent)
- exponent horizontal: exponent blur in the u direction (uv mapping coordinates)
- exponent vertical: exponent blur in the v direction (uv mapping coordinates)
6.4 coated Glossy.
Coated Glossy is básically a Glossy material (se the previous paragraph) with some kind of reflective coating layer on top. IOR is the setting that controls reflectivity of the coating top layer.
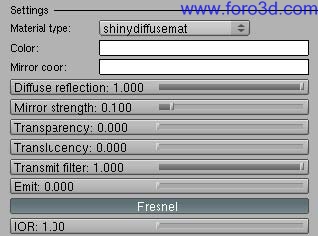
6.5 shinydiffuse.
Shinnydiffuse is a model of Diffuse Shader without viewer properties (apart from Fresnel). It can be useful todo get:
- Diffuse materiales without any Specular (Glossy) component.
- perfecto mirror reflection without or with Fresnel effect (for reflective Caustics).
- translucency with color filtering and alpha mapping with shadows calculation.
- transparency with color filtering and alpha mapping with shadows calculation.
- Diffuse emit surfaces.
For instance, this material can be used for rouge estone, rusted metal, concrete, Fabric, paper, rouge wood, Chrome balls, car Paint, curtains, billboards, etc. Shadows calculation from alpha mapping is supported.
When mirror strength is higher than 0, a new option appears todo enable Fresnel reflection. If Fresnel is enabled, a new button appears todo set an index of refraction (IOR) for the Fresnel reflection: the higher the index, the higher the reflection. Use this option todo get reflective Caustics.
- Diffuse color: opens a color picker. It defines the color of the Diffuse reflection.
- mirror color: opens a color picker. It defines the color of the mirror reflection.
- Diffuse reflection: amount of Diffuse reflection (Diffuse color brightness multiplier).
- mirror strength: amount of mirror reflection (enables Fresnel)
- transparency: basic transparency effect without refraction.
- translucency: Diffuse transmission of light in the shadowed part of the object.
- transmit filter: amount of tinting of light for transparency and translucency.
- emit: amount of Diffuse light the material emits. If Direct Lighting is used, only surface properties can be sen. To use it as a lighting source you Will have todo use Path tracing. It does not emit Photons.
- Fresnel: enables Fresnel reflection.
- IOR: index of refraction for the Fresnel effect, produces reflective Caustics.
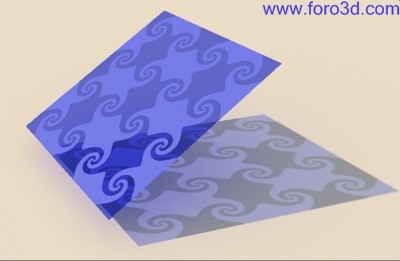
Example of a mapped transparency with color filtering and shadows calculation from alpha mapping.
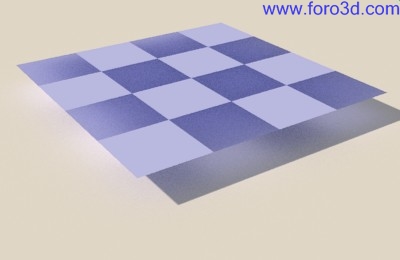
Example of a mapped translucency with color filtering and shadows calculation from alpha mapping.
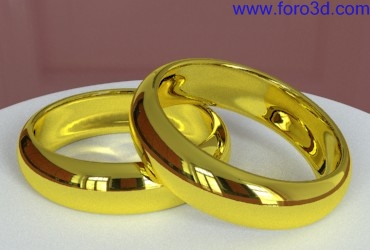
Example of reflective Caustics using shinydiffuse Fresnel reflection.
7. Render settings.
Render set can be used todo configure as Many as five diferent set of render settings. You can use this característica todo compare rendering performance between diferent sets. Render sets can be renamed by using the name: text button.
7.1 lighting methods.
There are currently four lighting methods available in Yafray. Bidirectional, Path tracing and Photon Mapping Perform global illumination (Direct Light + indirect light), while Direct Lighting only takes into account Direct Light from emitting sources without indirect light contribution. Caustic Photon Mapping and Ambient Occlusion can be rendered when Direct Lighting is used.
7.1.1 bidirectional.
(to Compleete. In beta stage. Use a high number of a passes and a inc, samples and a threshold=0 todo reduce Noises in every pass)
7.1.2 Path tracing.
Path tracing is a relatively old GI Biased method in which each ray is recursively traced from the Camera along a Path until it reaches a light source. When a light source is found, the light contribution along the Path is calculated Bak todo the Camera taquíng into account surface properties. Many samples are ned todo be taken and interpolated for each Camera píxel todo get a Smooth result. A light source can be either a light, the scene background or both. Scenes with relatively small light sources and with a high contrast between light sources and its surrounding áreas Will ned more samples todo remove noise. Therefore Path tracing is a GI solution more suited for outdor scenes and for Daylight indor scenes with big Windows and a regular distribution of light.
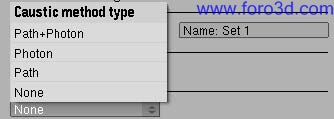
Path tracing (without post-caching) is not well suited for caustic effects. Pathtracing Caustics tend todo be very noisy and a very big amount of samples is neded todo get a Smooth result. In Yafray we have alternative methods todo render the Caustics component Caustics when Path tracing is used:
- Path+Photon: a mix of a caustic Photon Map and Path tracing caustic rays are used todo get Caustics.
- Photon: a fast Photon Map is used todo render Caustics. Path tracing Caustics rays are not rendered.
- Path: Path tracing Caustics rays are rendered.
- none: the caustic component is not rendered.
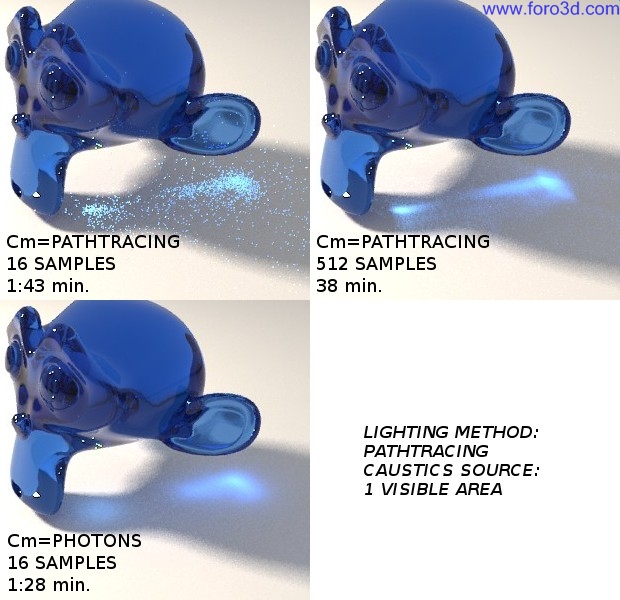
This is an example about how methods for the Caustics component work in Path tracing. In the first image (upper left), Path is used todo get Caustics, which are very noisy when a Low number of samples is used (16). In the second render, 512 Path tracing samples are used todo improve Caustics but it takes much more time todo render (38 minutes). In the third example, Photons are used todo produce the Caustics component and the render time is the lowest of them all (cm stands for caustic method):
Comparison between methods used for the caustic component in Path tracing.
The other components of the global illumination model are rendered as usual. Área light types (sphere and área) with the make light visible option enabled are neded todo produce Caustics in Path tracing. More información about the caustic Photon Map settings can be found in the 5.1.3 Direct Lighting paragraph (they are the same). The other Path tracing settings are:
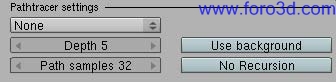
- depth: defines the number of rays bounces in order todo find the light sources, the more bounces the better quality and the less noise but the longer it Will take todo render.
- samples: this setting is the equivalent todo GI quality in Yafray 0.0.9, and it defines the number of samples todo take per Camera píxel, the more samples the better render quality and the less noise, but the longer it Will take todo render as well. A depth of 3 todo 5 and 32-256 samples should do ok for almost every scene. For this and for other samples settings, it is a god practice todo increase & decrease your samples in base 2 steps (2-4-8-16-32-64, etc)
- use background: makes use of the background color or texture as a light source.
- no recursión: only lighting is calculated without reflective or refractive events.
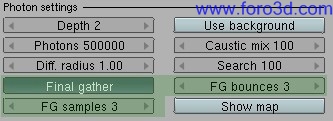
7.1.3 Photon Mapping and Final Gather.
Yafray settings on Photons are more or less the same than in other Raytracer. Photon Mapping is a global illumination algorithm that calculates the flow of light energy throughout a scene. With Photon Mapping, light packets called Photons are sent out into the scene from the light sources. Whenever a Photon intersects with a surface, the intersection point, incoming direction, and energy of the Photon are estored in a caché called the Photon Map.
Once the actual rendering has started, the correct appearance of a surface in a given point is estimated by examining and interpolating Photons in the neighborhod. This is in fact the slowest part of the algorithm. Dif. Radius defines the Radius of this search, while search defines the máximum number of Photons todo mix. Photon Mapping is a technique meant todo be used in closed or almost closed environments. Hdri backgrounds cant emit Photons.
- depth: máximum number for reflections (bounces) and refractions.
- Photons: number of Photons todo trace, the more Photons, the more información todo generate the Photon Map from.
- dif. Radius: Radius todo search for non-caustic Photons.
- caustic mix: máximum number of caustic Photons todo mix (blur).
- search: máximum number of non-caustic Photons todo mix.
- use background: (to complete)
Final Gather is a caching technique todo improve and complete Photon Mapping by Gathering, After Photon tracing, an appróximation of the local irradiance using several illumination bounces. This información is used at render time for further interpolation with the obvious advantage of requiring a less accurate, therefore faster, GI simulation and still have a physically correct simulation.
To reduce noise in renders when using FG it is recommended todo increase FG samples and todo use relatively high anti aliasing settings.
- FG bounces: in a precomputed phase, determines the number of bounces for Final Gather rays.
- FG samples: Final Gathering samples for interpolation, the more the better, but the longer it Will take todo render.
- show map: (to complete)
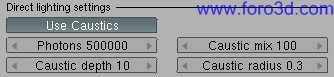
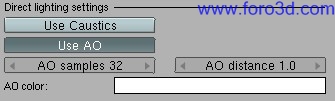
7.1.4 Direct Lighting and Ambient Occlusion.
When Direct Lighting is used, only lighting provided from light sources is considered, without indirect contribution from other surfaces (light bounce). Since Caustics Photon Mapping does not ned mensaje caching techniques like Final Gathering for blurring/interpolating Photons, an option is provided todo produce caustic Photon Maps when Direct Lighting is used. Lights Will be the caustic Photons sources.
- Photons: number of caustic Photons todo shot.
- caustic depth: number of refraction events for caustic Photons.
- caustic mix: number of Photons todo mix (blur)
- caustic Radius: amount of caustic blurring. The result a los depends on caustic mix.
Ambient Occlusion is a Shading method that takes into account attenuation of light due todo Occlusion. Ambient Occlusion is most often calculated by casting rays in every direction from the surface. Rays which reach the background or Sky increase the brightness of the surface, whereas a ray which hits any other object contributes no illumination. As a result, points surrounded by a large amount of geometry are rendered dark, whereas points with Little geometry on the visible hemisphere appear light.
- AO samples: the number of rays used todo detect if an object is occluded. Higher numbers of samples give smoother and more accurate results, at the expensé of slower render times.
- AO distance: the length of the Occlusion rays. The longer this distance, the greater impact that far away geometry Will have on the Occlusion effect. A high Dist value a los means that the renderer has todo search a greater área for geometry that occludes, so render time can be.
- optimized by making this distance as short as posible, for the visual effect that you want.
- AO color: color for Ambient Occlusion rays, a los useful todo test lighting AO power.
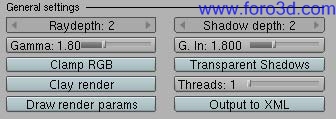
7.2 general settings.
Under this section are grouped several general Raytracing settings:
- Ray Depth: máximum depth (bounces) for recursive Raytracing. Increase this setting todo get deper into successive reflective and refractive events in the scene.
- shadow depth: number of bounces for shadow rays when Glass faq shadows is enabled. A sort of fake Ray Depth.
- gamma: gamma correction in renders, todo use in the linear work flow. It changes the response todo light of the render engine. Inverse correction of textures and colors is performed using the g, in setting. Gamma should be used accordingly with your monitor gamma. To take full advantage of this característica, a basic monitor calibration is recommended. A display gamma of 2.2 is the standard for the Windows os. The standard for Macintosh and Linux is.
1.8. Use gamma=1 todo deactivate render gamma correction. More información about this technique: http://www.gijsdezwart.nl/tutoriales, php .
- g. In: inverse gamma correction applied todo textures and color input. It should be the same value as gamma.
- Transparent Shadows: enable todo get faq shadows in a Glass material.
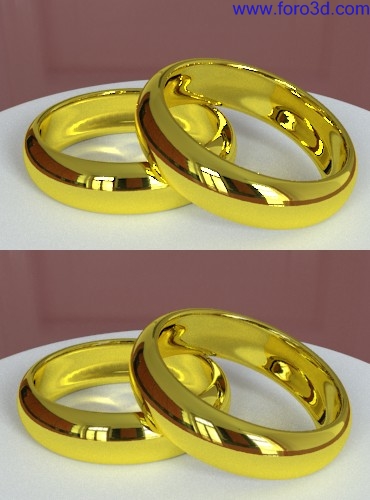
- Clamp RGB: reduces the colors brightness todo a Low dynamic range, for better anti aliasing on áreas with fast high contrast changes. The examples below were made by sevontheweb. The upper image has got aliasing issues in áreas with strong contrast variations, but colors are crisp. In the lower image Clamp RGB has ben enabled. There is better anti aliasing but colors are duller. Another bien of solving this issue is increasing the render resolution and then scaling Bak todo the desired resolution using a god interpolation algorithm.
Comparison between Clamp RGB enabled (top) and disabled (bottom).
- threads: todo Forqué the rendering calculation into two or more simultaneously running tasks, for multiprocessing purposes.
- Clay render: produces a Clay render overriding all materiales.
- output todo xml: the scene is written in a Yafray xml file. The file is located in the yfexport directory as per Blender settings.
- draw render parámetros: the render most important parameters are written in a badge in the render image. Use this característica todo compare renders and todo ask for advice in the Yafray forums.
- custom string: adds text todo the previous render parameters.
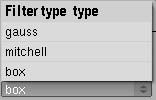
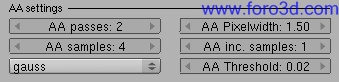
7.3 anti aliasing settings.
Yafray now uses two more anti aliasing filters apart from default box, which are Gaus and Mitchell. The only really god property of box is that it has no danger of amplifying sampling noise. If a slight Softness of Edges is no problema for your work, try Gaus, if you want máximum detail try Mitchell.
Pixelwidth (which gets translated todo real filter size) has some influence to, the larger the softer the image. Use lower values than default todo make your renders sharper. The bien a samples are configured has got changed todo. A samples defines the number of samples for only the first a pass, while the a inc, samples value is used for subsequent a passes.
7.4 background settings.
There are four options for backgrounds, which are:
O Sun Sky: this kind of background tries todo reproduce a realistic Sky with its color variations. There is a tutorial about how todo set up this kind of background, made by sandestorm: [URL=http://www.Yafray.org/forum/viewtopic.php?t=134 http://www.Yafray.org/forum/viewtopic.php?t=1349 [/url].
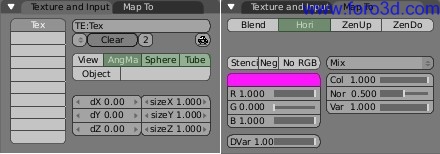
O texture: a texture is used as a background. You can a los use it as a light source (use ibl on/of button). The main purpose of this option is using HDRI images todo lit the scene. Besides, there is an option todo rotate the background (rotation: button), a multiplier for background color (power: button) and a sampling parameter for the background when used as a light source (ibl samples: button)
The textures ned todo be loaded using Blender texture buttons (f6). Yafray uses the Blender Word mapping settings as well. In the texture and input panel, only the angmap, sphere and tuve modes work. In the adjacent map todo panel, hori must be enabled for light probes todo work.
Settings used in Blender panels for HDRI backgrounds in Yafray.
- gradient: a two-parts gradiente (sky and Ground) is used as a background, with the división between them in the Camera horizonline. Power: button is a multiplier for background color.
- single color: a single color is used as a background. Power: button is a multiplier for background color.
×
 Lo primero
+ Preguntar sobre
Lo primero
+ Preguntar sobre
Configuración
Mi perfil
Contacto
Mail al administrador
- Animación y Rigging
- Errores de programa
- Hardware
- Iluminación
- Impresoras 3D
- Modelado
- Partículas y Dinámicas
- Plugins
- Postproducción
- Render y Cámaras
- Script
- Texturas y Materiales
- Videojuegos
Configuración
Mi perfil
Contacto
Mail al administrador


 Citar
Citar
