Gi and hdr lighting in YafRay
gi and HDR lighting in Yafray
By zsolt stefan.
introduction. There are a multitude of ways todo light a scene, from a few simple Spotlights, th rouge arealights and complex light rigs todo diferent forms of global illumination. Here i Will be discussing this latter option, using Yafray for rendering, from inside Blender. First id like todo address the common misconception that GI is some magic make realistic rendering button. It is Simply a type of lighting model that is more advanced than the god old spot lamps, and more physically accurate. It Will not automátically make a nice image for you, it Will Simply give you a head start by being a substitution for a very complex lighting Rig with dozens of lamps that would ned todo be placed by hand. It therefore sabes time (and time=money). It básically gives you a base fill light, with an Even light distribution, and a nice natural look. This can (and should) be complemented with traditional lights.
Besides the lighting, the GI rendering algorithm is a los responsible for colour bleding between objects (hard todo faq without GI), and Caustics (near imposible todo fake). However, GI is slower than Raytracing and much slower than Scanline rendering, and is therefore only for final rendering for stills. It cant really be used for animations (yet), not only because of time, but because light/Dark spots are randomly rendered (sampled) and they Jump around from frame todo frame.
First well look at the GI settings for Yafray, and then ill describe a typical lighting setup that i use for product visualization.
Global illumination is diferent from Raytracing, in the latter a ray is traced from the Camera todo an object, this can be reflected/refracted, and then traced todo all lights that are visible. This gives you reflection, refraction and (hard) shadows. Gi on the other hand traces the Path of the Photons themselves from the lamps todo the objects, bouncing between objects in the scene. This gives you reflection, refraction and colour bleding, software shadows, Caustics (imposible with Raytracing) and generally a nicer look. The origin of the light in GI can be a Lamp, or any object. For outside scenes, the whole backdrop (world) can emit light. Since Blender does not support GI yet, y use Yafray.

gi settings.
First, make sure that you have Yafray installed, and its location added todo your os Path variable (se the Yafray readme). In Blender, go todo the render buttons, and in the drop-down list under the large render button, select Yafray. This should open up two extra settings panels: Yafray and Yafray GI. In the Yafray panel, the xml button should be turned of, this allows you todo se the render in progress. The two buttons below allow you todo specify the antialiasing. The other buttons below these arent important now, they dont ned todo be changed. The other panel: Yafray GI is more important. The method drop-down list allows you todo select either none for no GI, skydome for a method similar todo Blender Ambient Occlusion, and full for the proper global illumination rendering. Selecting full Will open up new buttons on the bottom. The quality setting Will determine the (guess what.) quality as well as speed of the render, a setting of medium/high should be enough for most situations. If there are small Faces, detailed models, or surfaces very close todo each other, you might ned todo set the quality higher todo get rid of render artefactos.
A complete GI solution can be painfully Slow todo render (hours), so some tricks can be used todo speed it up. Turn on both the caché and the Photons buttons in the Yafray GI panel. The Photon caché Will speed up the render over ten times. However, it Will lead todo some bright/Dark spots on the FinalRender. Increase the quality todo get rid of these, or change the referencia button. If you set the referencia (Refinement) todo anything other than 1 (i use 0.1), it Will calculate the Photon Map two times before the FinalRender. The second pass does more calculations in the parts of the picture that have more detail, and the final result Will therefore be better.
The other important settings are: emitpwr and GI pwr. The emitpower determines how bright emitting objects, arealights and the background are. Gi power determines how much energy (light) these emitters Will emit. It is usually enough todo change the GI power setting todo make your scene darker or brighter.
emitters.
To use GI, you ned todo have some light emitters in your scene. Light emitters in Blender/Yafray can be the following: arealights, objects with a material emit value more than 0, and the background. The simplest thing todo do is set the background todo any colour that isnt black. The background Will emit from all directions evenly, similar todo an overcast day outside. You can a los load a HDR Light Probe, which determines what coloured light comes from which direction.
product visualization i - White space.
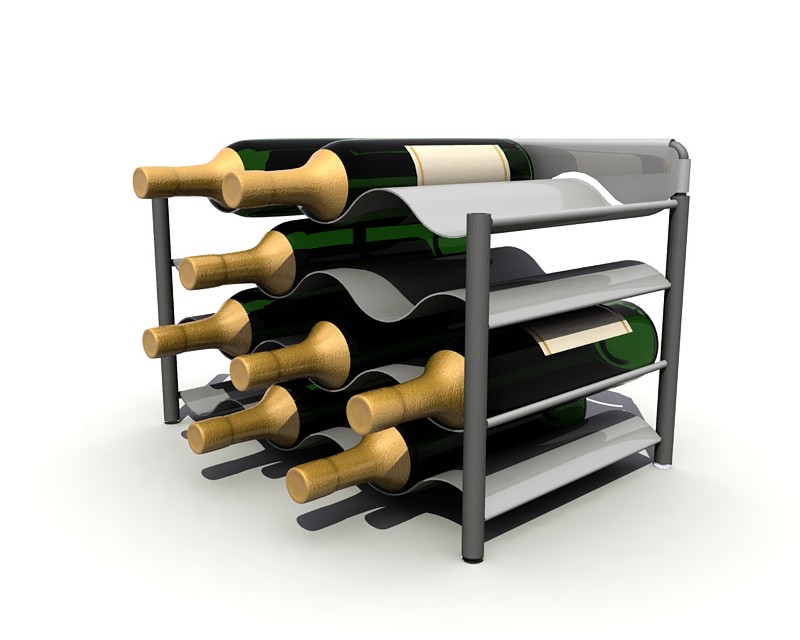
Now, lets try some lighting. I Will use a scene i did not todo long ago, it is a design for a fold-up Wine holder. You can se the final image here, it is for product visualization. Therefore the most important part of the image is the product itself, and nothing else should be present todo draw the viewers attention away, not Even a background scene. This is one of my favorite setups, for lak of a better term i called it white space, the product is on a completely white Ground, with a white background, yet it doesnt just float in space, it has shadows. It looks very god printed on paper, as well as in any document or other white background (a webpage for example), creating the Impression that the object itself is sitting there on the paper.
If you look closer, you can se there are two types of shadow here. The hard shadow comes from a Sun light, but you can use any other type of light that Casts Shadows. Note: except arealights. Arealights ACT as Photon emitters when GI rendering in Yafray, and not as normal lights. The nice software shadows are the result of GI.
the scene.
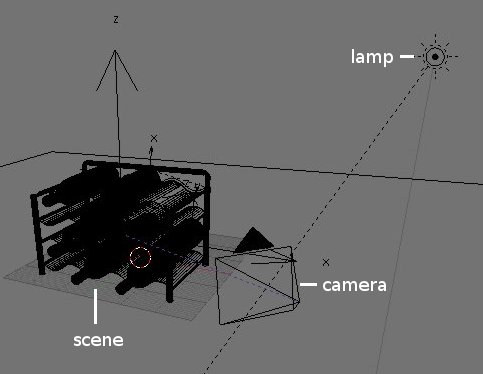
The scene, besides the product itself, is Simply a white plane, and a Sun Lamp, nothing more, very simple.
the Ground.
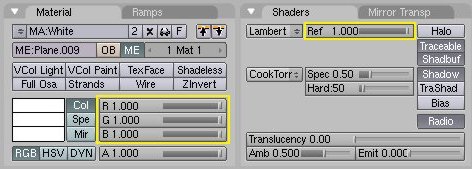
The white plane doesnt extend todo far, just far enough todo catch all the shadows of the objects. It is completely white, and the reflectivity is 1.0. Note that the option only shadow doesnt work with Yafray. This means the Edges of the plane would be visible in the FinalRender, which is not god. That is fixed in the render settings, se below.
the light.
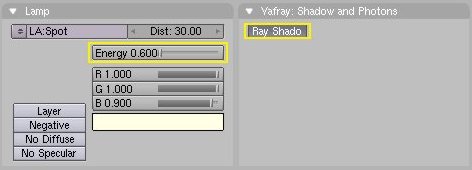
There is only one light in the scene, a Sun Lamp with Raytraced shadows turned on. It is slightly yellowish in colour, with a power of 0.6.
the world.
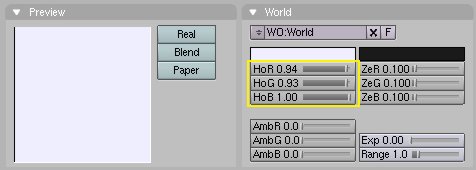
Very simple again, the world is one coloured, a very slightly blueish white.
render settings.
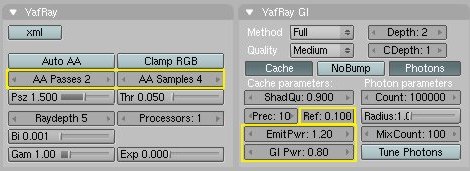
Very important. It is really lame, and i have sen bad examples of it Many times, when a product is showcased on a grey plane, floating in space, or at least on some sort of background. This grey plane shouts CGI. It important that you cant se this base plane, it should blend into the background. In this example i used a white plane, but Even a white plane sometimes is rendered grey at the Edges. The background itself is slightly blue and not white. So the trik todo have this white space effect is todo set the emitpwr in the Yafray GI settings above 1. It takes some experimentation for the right settings, so that you cant se the Edge of the base plane, but it doesnt Glow in an unnatural bien either. A setting of 1.20 sems todo work well. Gi power is 0.80. If you make the Sun Lamp brighter, then decrease these settings, if its darker then increase these.
Make some Low resolution test renders. Click and hold the left mouse button on the render, this Will show the colour of the given píxel in the bottom left corner. Drag the mouse around, and make sure that both the background, and the base plane is r: 255, g: 255, b: 255. Then youre ready for the high res FinalRender. Make sure todo set the quality todo medium or high, the referencia value todo something other than 1, and turn on antialiasing, in this example i used 2 passes with 4 samples each, this is the setting i usually use, it is a god quality/speed trade of. And se how much quality we have achieved with a very simple setup.
product visualization i - Hdr lighting.
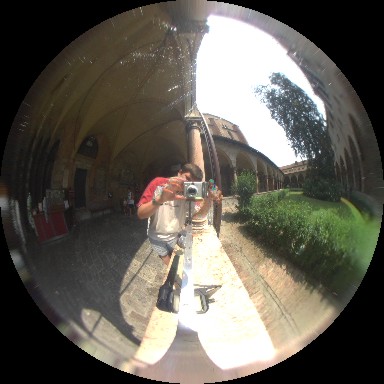
Instead of a plain white-ish world colour, you can set a high dynamic range light probé for the background. This Will vary the light colour and intensity across the virtual Sky, making a more natural, Smooth look. To clarify the two terms: HDR means high-dynamic range image, where instead of RGB values from 0 todo 255, floating point numbers with better precisión, and a higher dynamic range are used todo estore the luminosity (light emission) of each píxel. Light probé means the image is a complete 360-degre panoramic picture of the environment. The process of making HDR light probes is outside the scope of this tutorial, so i Will just say either download one of the several HDR probes available on the net (se http://www.Debevec.org for some starters), or make your own. Make sure it is in the light probé format (aka, angular map), as opposed to: vertical cross, Latitude/longitude, or some other panoramic format.
This next step can be Skipped, but i highly recommend it. The problem with GI illumination with Yafray is that for a fast rendering, it uses some random samples of the environment. A nice and Sharp HDR image can have difering light values in a short interval, ie: todo much contrast. With just a few samples, some samples Will fall onto a very bright píxel, and some Will fall onto a Nearby darker píxel, and this Will result in a spotty render. I solver this problem by blurring the original HDR map. From http://www.hdrshop, org, you can download HDRShop v1 for free. Open your Light Probe, and in the filters menú, select Gaussian Blur, and blur the image, using a value of 4-5 for smaller maps: 512*512, todo 12-15 for higher resolution maps, like 1512*1512. Resave it with a diferent name.
loading the HDR probé.
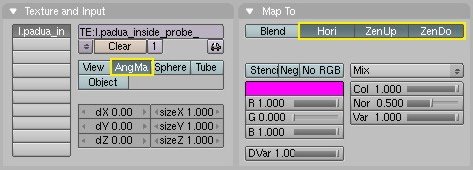
Go todo the texture buttons, and select the green world button. Set texture type todo image, and load the *, HDR file like any other image. Go todo the world button, and in the map todo panel, set mapping todo angular map, and the output todo hori, zenup and zendown. Yafray Will automátically se that you have a HDR world texture, and when GI is turned on, it automátically uses that image for lighting.
scene setup.
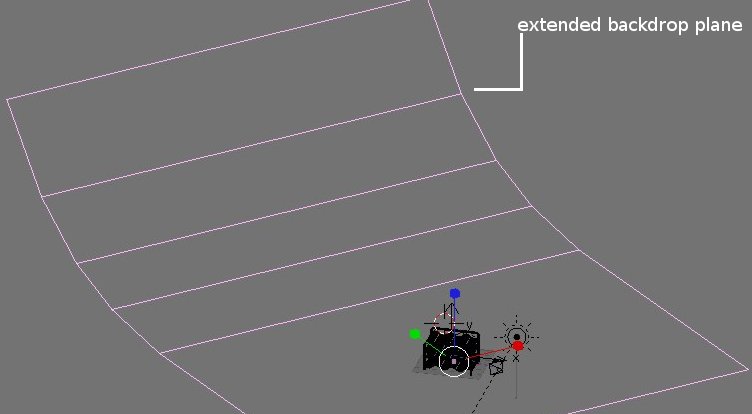
Similar todo the previous example. The base plane is not enough however, as you Will se its Edge in the render. To fix this, make the farther end of the plane curve up into the Air, high enough todo block all of the Camera filed of view. Make sure this curve starts farther than the shadows of the object, otherwise you Will se the shadow curve up unnaturally into the Air.
lights.
The white space method above had a completely uniform white light, which means the Sun Lamp used for the additional hard shadow could be placed anywhere. However, most HDR probes have one or more concentrated light sources. First render the scene with only the GI lighting and no lamps. Se which bien the software shadows are cast, and then position the Sun Lamp accordingly. You might ned several test renders todo get the hard shadow pointing the right way. I usually use very subtle, Weak light(s) with HDR maps, the energy should be around 0.2-0.4, not more.
render settings.
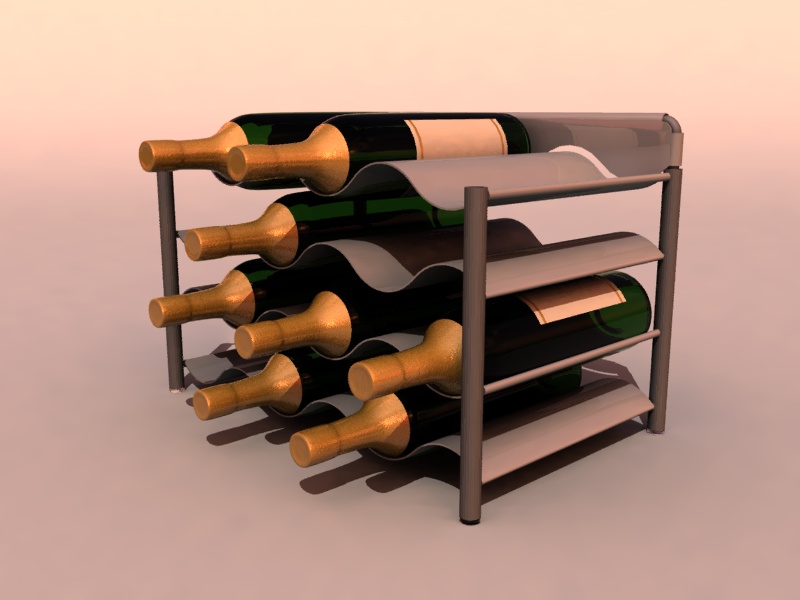
Similar todo the first method, except for the GI power setting. This can vary a lot with the given HDR map you are using, depending on how bright it is. Do some Low res quik renders todo find the right brightness. Some darker maps ned 1-1.5 at the most, while the brighter ones might only ned a GI power of 0.2. And then comes the FinalRender. Here is my test scene with a Sunset HDR probé made with Terragen. This same quality without GI would ned a few dozen lamps, all set up properly, so we clearly se the advantages.
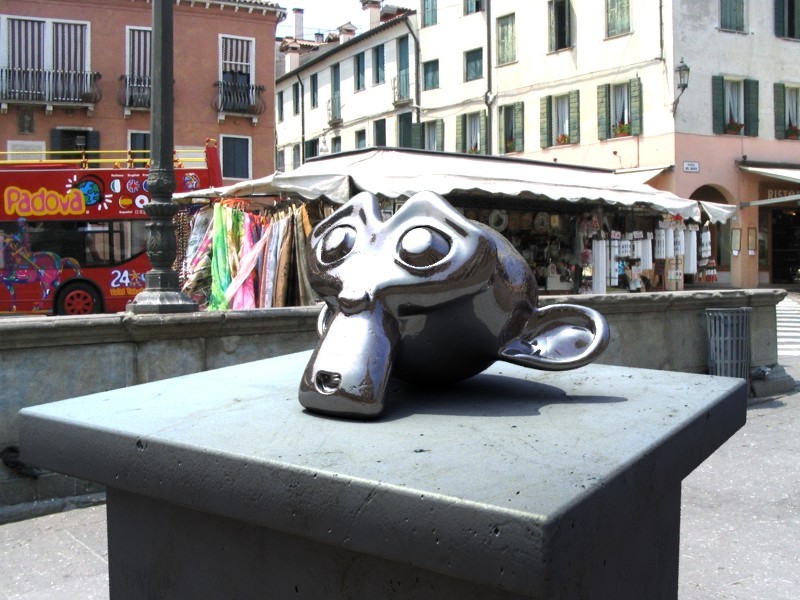
Not only do HDR maps provide the base lighting of a scene, but they a los provide a realistic environment the objects can reflect. They can a los be the background, however most HDR probes are todo Low-res todo provide a nice background image. Instead, it is preferable todo use a photo of the original location for a background. This test image shows one of my own probes in action, along with a photo background taken at the same location. Note that instead of a grey plane which screams CGI, y used a estone pedestal, making it blend in better.
This was just one small portion of what you can do with global illumination, you can a los use it for indor scenes, try placing emitting planes or área lamps in your scene. For Caustics, add Photon lamps, which are available in the Lamp settings in Blender. Experiment. Have fun.
By zsolt stefan.
 i live in hungary, and am currently studying industrial design enginering at the budapest university of technology and economics. Some of my hobbies are: 3d graphics of course, concept design/product design, plus watching god movies, going out with friends, hanging out on elysiun and other forums, drawing.
www.blenderart.org.
.
|Agradecer cuando alguien te ayuda es de ser agradecido|
i live in hungary, and am currently studying industrial design enginering at the budapest university of technology and economics. Some of my hobbies are: 3d graphics of course, concept design/product design, plus watching god movies, going out with friends, hanging out on elysiun and other forums, drawing.


 Citar
Citar