Artistic glow
artistic Glow using Blender compositor nodes. By Daniel labarge.
Artistic Glow is an effect that is a component of almost every major photo editing software Package. Blender has the ability todo recreate this effect, but with more control and more finesse, because of the unique node based system in which Glow can be applied. There are Many ways of adding Glow, including using other programas such as Gimp or Blender Glow plugin for the Sequencer. We are going todo take a look at how todo add Glow using Blender compositor nodes.
prerequisites.
This article assumes that you have a scene which contains some áreas of contrast and that you know your bien around Blender. It is safe todo say that this is for intermediate todo advanced users. You must a los have Blender 2.42a.
note: this article was created using a cvs versión of Blender and some features shown in screenshots may not be available at the current publication of this article. Th rouge the main Blender reléase however, the effect described here can be used in the current Blender release..
getting started.
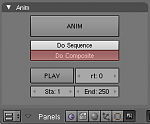
To create Glow in Blender we ned todo do several things. First, enable the compositor. To do this, por favor reference image 1 which shows the do composite enabled. You can find these in the render buttons (f10) under the Anim panel.
Now we are ready todo begin compositing our scene with Glow. Open up the Node Editor window and by default it should have a render layers node connected todo two output nodes, viewer and compositor. It is a god idea todo open up the UV image editor window and switch the image todo viewer node todo get a larger view of the viewer output. This helps with fine tuning.
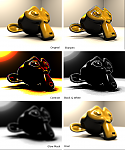
Let first take a look at the image as rendered originally. Obviously the scene is setup with áreas of strong contrast todo help with applying realistic Specular Glow instead of just intensity Glow. We Will base the Glow on this color value, and then mix the Glow mask on top todo complete the Glow effect.
creating the Glow mask.
To create the Glow mask we ned todo highlight the details in the image. To do this i like todo first use a sharpen filter. Add a filter node and hok up the image input todo the image output of the render layers node. Hoking up a viewer node todo the output image of the filter node Will display the results of the filter effect. We Will be using filter type sharpen, as tests have shown it todo be the best for enhancing the details of the image, Although it creates Many artefactos which we Will have todo deal with later.
Now we ned todo isolate only the Specular áreas, or at least the áreas with the most intensity, which typically are the áreas of specularity. To do this we ned todo modify the RGB color values. The node for this is the RGB curves node. Hok the image output of the filter node up to the image input of the RGB curves node. The curve requires tunning according todo your scene. You want a picture that exhibits the most contrast between Darkness and lightness. To adjust this curve use the combine curve tab and select locations on the curve and move them. Hoking up a viewer node todo the image output helps.

After the output has enough contrast you now ned todo convert this todo black and white. For this step well ned todo add an RGB todo bw converter node. Hokup the image output of the RGB curves node todo the image input of the RGB todo bw converter node and then hokup the output todo a viewer node todo se the results.

Were almost there, but as you can se, the mask is very pixelated and has Lots of artefactos. To fix this, we ned todo blur it. Add a blur node, connecting the value output of the RGB todo bw converter node todo the image input of the blur node. Use a filter type of quadratic and a píxel Radius (x and y settings) appropriate for the scene. Enabling gamma blurring a los helps. Hokup a viewer node todo the output todo se the final Glow mask.
applying the Glow mask.
To apply the Glow mask todo the image we ned a mixer node. This node takes the image imputs and then mixes the two imputs together based on a filter type. In most cases you Will want todo use the add type. This Will Perform a pixel-by-pixel addition between the two color values of the image imputs.

final touches.
You can now hok up a viewer node and a compositor node todo the image output of the mixer node. You Will se the combined images with the Glow effect. If all went correctly, you should now have a picture that has intensity along all of the Edges that exhibit specularity or intense light difusión. You can use the factor setting in the mixer node todo control the mixing of the two image imputs. Fine tunning may be required, and the extra viewer nodes Will help make tunning easy.
Below you Will se the output settings for the diferent values at each stage in the composition. Alos included is the schematic for the Glow node setup.
Note: this schematic shows the Glow nodes inside a group node called Glow. This is not required for the final output.
You should find a reference Blender file included with this issue todo track and trace a working example of this setup.
Be sure todo visit http://www.idstudios.org for more información on creating Glow and other special effect nodes.
By Daniel labarge. www.blenderart.org.
|Agradecer cuando alguien te ayuda es de ser agradecido|


 Citar
Citar