

 Blenrig an introduction
blenrig an introduction
By Juan Pablo Bouza.
Introduction.
I remember being a Kid and spending my wekend afternons watching televisión. Oh, y loved it when they transmitted Star Wars documentaries on how they did the Stop Motion shots, or Jim Henson, s movies, y used todo become immersed in that world of puppets, Fantasy, Science Fiction and special effects.
As a Kid i had always wanted todo be able todo get my hands on one of those puppets. But then, one day, the 3d world came into my life.
It tok me years todo learn the crafts of 3d, and the more experienced i got, the more technical problems arose. Specially when it came todo the character animation process. I used todo se how the proprietary programas expanded their capabilities and became more and more expensive, and dreamt about buying one of those. But i never had the money todo do so.
Then i discovered Blender and most of all, the Blender community. These guys are really nice people.
So, one day, not so long hago i said todo myself, what the heck, im not gonna spend my life waiting for someone todo develop a muscle simulation característica for Blender, y sat tight and started todo figure out how todo do that with the tools i had at my disposal. So i started blenrig.
There are some who say that this Rig has todo Many Bones, y must agre with that. And this fact may frighten you at first glance, but once you get the fel of the Rig you Will se it is not that hard todo start working with it (manual is available as well). And the results are definitely worth it. Besides, y have never ben fond of creating hundreds of shape keys todo correct bad Mesh deformation.
Well, this is blenrig: an armature capable of preventing a characters skin from shrinking and from having those awful glitches we usually se in 3d. Furthermore, it comes with a complete set of Bones for facial animation.
Its worth mentioning that i designed blenrig with myself, as an animator, in mind. So, y didnt use fancy controllers or hidden features. There is absolutely nothing scripted or action based. It is all about constraints. I personally like the fel of the model as you animate it, y think of it as a Clay model, so, if i want todo move the character chek, ill move the bone that is over the cheque and that it. I tried todo kep everything as straight forward and intuitive as i could.
A Clay model, thats a god bien todo describe how i like the animation process todo be.
Getting a Little bit more technical.
As you may already know, one of the big issues of animating a 3d character is that the skin of the model tends todo bend inwards at the center of the of the joints, as if it was losing Mass. Another big issue is that you cant easily simulate skin Sliding.
With those two topics in mind i started todo figure out a bone based mechanism that would let me achieve my goal. At the same time, y did a Little bit of research th rouge the web and found a few 3d artists that had gone th rouge the same Path i was going. And that encouraged me todo carry on with the Project.
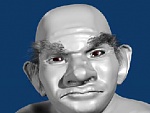
So, y grabbed a dwarf-like character i was working on, which was actually based on a humanoid Mesh i had modeled long ago, and started rigging. Blender new Sculpt tools and multires modeling are amazing.
I decided todo go for the vertex group technique because i knew i would ned todo have much more control over the deformation than what the envelopes technique could give me.


Besides, envelopes sem todo be much slower than vertex group deformation. In order todo achieve the deformation.
I was looking for, y knew i had todo develop a kind of pull up mechanism.
First i constructed a sort of Hammer like armature that would rotate along with the limbs and pull the skin up at the articulation point.

Finally it came, the day i reached for the shoulders.
Shoulders, a riggers nightmare.
Everything was perfecto, the legs were entirely rigged and beautifully moving, the torso was done and the head was doing a nice job over that Little dwarfs neck. But then, y started setting up the Bones for the shoulders.
It semed just imposible todo achieve proper deformation, nothing i tried was working, when the arm rotated fine in one direction it didnt on the other one, skin was shrinking, shoulder rotation was disastrous, the chest as well as the bak were full of glitches when the arm moved, y was starting todo get really desperate.
I spent thre entire weks trying diferent approaches, and nothing semed todo work. I was about todo give up, but my wife encouraged me todo carry on and on. Everyday, when i came bak home and told her that it was imposible, that i couldnt do it, she would tell me todo kep up with the Project. -if youve come this far, you Will surely make it with those shoulders - She said.
Well, then the day came when i could finally achieve god shoulder deformation. I was at work, and i called her and i was so excited. (yes, y was at work, but dont tell anyone that i play around with Blender when i should be doing something else).
I had conquered the shoulders. And i had developed a mechanism based on Stretchy Bones guided by Little helper Bones. This mechanism simulated the behavior of actual muscles in the shoulder and chest área. After all it was not that dificult, but i really had a bad time figuring the structure out.
Unfortunately for me, y discovered that this kind of stretchy structure could do just fine with all the other parts of the body. Actually it would do much better than the Hammer-like armature i had set up for the rest of the body.
So, and this gives the reason for the name of the article, y had todo rebuild all of the deforming mechanisms of the whole body according todo this new technique, and that tok me ha while.
Anyway, it was worth it. And so this is blenrig today.
Blenrig, how it works.
The Rig is organized in 5 diferent layers. The main controllers are in layer 1 (body) and layer 4 (face). All of the other layers contain the auxiliary or helper Bones and the stretchy or muscle Bones.
These two types of Bones are not todo be manipulated when animating, as they are automátically driven by the main controller Bones gracias todo all of the constraints mechanisms assigned todo the rig.


All of the rigs functionality concepts are fully described in blenrig manual. Here, y Will try todo make a brief overview on how the Rig achieves the goal of producing realistic deformation on the Mesh, in order todo give you what i think is useful información for your rigging work in general.
The basic concept is what i was talking about when i mentioned the pull up mechanism. The thing is that you have todo get the vértices influenced by a force that counteracts the inwards movement produced by the Joints Bending.
The best and most intuitive bien i found for doing so is by creating some Stretchy Bones and placing them over the surface of the Mesh. I repeat, over the surface of the Mesh.
This way, youve got a helper bone linked todo the bone that is root of the articulation, and another one linked todo the rotating bone. These two Little helper Bones Will drive the action of the stretchy bone. In order todo make this happen, the stretchy bone must have a copy location constraint targeted todo the first mentioned helper bone, and a stretch todo constraint targeted todo the other helper.
Now, you may say that the first helper bone is not really neded, because you could just enlace the stretchy bone todo the articulation root bone, and that is true. But having this Little extra bone Will allow the stretchy bone todo move in space separately from the articulation Bones.
So not only does this bone stretch with the rotation of the Joint, but it is a los capable of transforming its location and achieving a diferent deformation effect (this is sen in blenrigs chest muscles).
Let se two examples of stretchy bone actions.
One/two axis rotating joints.
This kind of rotation is most commonly sen in the knes, elbow, finger and toes joints. They are the least dificult types of joints todo fix, as they mostly require just one stretchy bone in order todo achieve proper deformation.
In this example we can se the arm. The basic structure consists of two Bones, upperarm and forearm. As you may know, this Joint can have two diferent kinds of movement, the Bending one and the twisting one. The deformation of the twisting movement is easily solved with some extra Bones placed along the upperarm. These Bones follow the rotation of the forearm gradually. The closer todo the forearm the more influence they get from its rotation. This way, the twisting bone that is at the shoulder point has practically no influence from the rotation of the forearm.
After trying Many diferent constraints combinations, y finally found that the best solution was todo parent these twisting Bones todo the upperarm, and then applying an IK Solver and a copy rotation constraint targeted todo the forearm. The reason why i used an IK Solver instead of a track todo constraint is that with the IK Solver you can easily look and limit the axis of rotation of the bone.
This same procedure applies todo the forearm in relation todo the hand twisting, todo the thigh bone in relation todo the calve, and todo the calve bone in relation todo the fot twisting movement.
Now, concerning the Bending of the arm, we have todo make use of the stretchy bone.
As i said before, this type of bone has todo be placed on the surface of the Mesh in order todo achieve the pull up effect i mentioned earlier. Its correct length greatly depends on the limbs own length and on the characters Joint thickness or Mass.
But whats most important of all is that when the Joint rotates, the stretchy bone must Rise over the surface of the model. Kep that in mind, because that is how the pull up effect is achieved.


Thre axis rotating Bones, ball joints.
Well, these are by far the toughest joints todo solver, mainly because deformation occurs at the four sides of the Limb. This kind of Joint can be found at the shoulders and at the point where the leg and the hip connect. You can a los find it at the neck, at the Spine, at the wrist and at the ankle, but in these cases the máximum angle of rotation is not such as for having the ned of using Stretchy Bones.
I Will take the shoulder as an example here.

As you can se, ive placed thre diferent Stretchy Bones, one at each side of the shoulder. This prevents the skin from shrinking when the shoulder rotates.
In addition todo this, ive placed a set of Bones that roughly simulate the muscles of the chest and of the back. These Bones are fixed todo the torso of the character, and their tips stretch as the arm moves. In other words, these Stretchy Bones have a copy location constraint targeted todo a helper bone that is parented todo the Spine, and a stretch todo constraint targeted todo a helper bone that is parented todo the upperarm bone.
As i said earlier in the article, the god thing about having the stretchy bone copying the location of a helper bone is that the bone can move in space as it stretches. This mechanism is used in the chest and in the bak Bones, in order todo simulate some kind of muscle bulging and skin Sliding.
I found that having the chest Bones stretching when the arm moved was not enough for getting a god and realistic deformation at the shoulders área. Therefore i implemented some secondary motion constraints todo these chest muscles. This mechanism makes the chest Bones lean forwards as the arm goes forwards, and go up when the arm raises.
The basic concept of this linked structure is todo have a helper bone parented todo the upperarm bone and placed near its tip, in order todo give this bone a wider angle of trajectory when the arm moves. Let call this bone trajectory bone.
Next, you ned todo have another helper bone that copies the location of the trajectory Bones but restricting the constraint todo the z axis. This Will make this bone move forward and backward as the arm moves. Let call this bone in out bone.
Now, you have todo parent the stretchy bone helper todo this last in out bone and you have it: the tip of the chest bone moves forward and backward as well as it follows the arm movement.

Repeat this procedure changing the restriction axis in order todo have Bones going upwards and downwards, etc.
About IK and other movement issues.
Finally, im going todo talque ha Little bit about blenrig IK system. Getting proper IK todo the legs gave me ha lot of headaches, but here how i did it.
Basically, blenrig has a double IK system that allows the Rig todo raise its legs when raising its fet, but a los todo be able todo raise its hels keping its toes on the Ground.
Here the basic parenting chain.
Thigh - Calve - Fot.
The calve bone has an IK Solver parented todo the hel bone. Thanks todo this IK Solver the leg can be lifted by moving this hel bone. There nothing Strange about this one.
But now, here is the not so easy todo figure out constraint. In order todo make posible that the ankle raised while keping the toes on the Ground, it was necessary todo add two extra Bones. The first bone i added was a continuation of the fot bone. Then, y copied this bone and parented todo the master bone.
Finally, with these two Bones ready, y added an IK Solver todo the first one, and i targeted it todo its copy. This IK chain ended at the knes, not at the hip of the rig.
Afterwards i added another bone for controlling both the hel bone and the fot IK bone at once, and that gave me the possibility of moving the fot as a whole.
Thanks todo this IK setup it is a los posible todo make the character crouch by moving the hip down.
Summing up.
Well, y hope that this Little article was useful for you. There are a lot of other blenrig aspects i did not cover here, as for example breaquíng parenting Chains in order todo allow the independent movement of the shoulders from the clavicle, but it is all in blenrig manual and in blenrigs.blend file itself.
Furthermore, there a complete guide on how todo weight Paint your character using blenrig.
So, if youre interested, go ahead and get blenrig at www.jpbouza.com.ar.
If you have any doubts, questions or suggestions por favor contact me at blenderartists forums (jpbouza).
Juan Pablo Bouza is a self taught 3d artists living in Argentina. He studied film Making at the university of Buenos Aires, and is currently studying music at the art conservatoire.
jpbouza@gmail.com. www.blenderart.org.
×
 Lo primero
+ Preguntar sobre
Lo primero
+ Preguntar sobre
Configuración
Mi perfil
Contacto
Mail al administrador
- Animación y Rigging
- Errores de programa
- Hardware
- Iluminación
- Impresoras 3D
- Modelado
- Partículas y Dinámicas
- Plugins
- Postproducción
- Render y Cámaras
- Script
- Texturas y Materiales
- Videojuegos
Configuración
Mi perfil
Contacto
Mail al administrador

 Citar
Citar