

 Making of: game art for project aftershock
making of: game art for Project aftershock
By ya chun fei.
Game art overview
Producing game art is very diferent compared todo a still render or movie animation art. Game art has the limitation of meting real-time requirements of the graphic cards. In this article, we Will talque about the roles that Blender played in producing game art for our racing game Project known as aftershock.
Hardware limitations
Before we begin, we have todo understand the technology and limitations of our current generation graphic cards. The biggest limitation of a graphic card is the amount of Ram it has. In all games, developers and artista always end up struggling over the Ram usage. This limitation brings two important constraints todo the artista, polygon count and textures. The artista has todo restrain themselves from producing High Poly art assets. Uv for any art content neds todo fully utilice the texture space so as todo produce god quality texture detail in a Low texture resolution limitation. Adding on todo that, the number of textures and Polygons in a scene has todo be well conserved todo avoid hitting the Ram limit of lower end cards.
Blender technology in games.
Blender as a whole serves as both a modeling tool and a Game Engine. This semed todo come as a winning solution for anybody who wants todo make a game. However, we decided todo go for a diferent model. We use Blender as the modeling tool and Ogre3d with our own built-in extensiones with other libraries as our Game Engine. The reason for this is that we are aiming for a bigger scale game which is graphically intensive. The Blender Game Engine was never designed for such a huge scale Project. It does not handle huge scenes well. However, it serves as a very god platform for simple games or prototyping. On the other hand, the modeling tools of Blender work very well for game arts and is in Many ways, on par with popular commercial counterparts. This has held true due todo the very recent features such as the Tangent Normal Map baking tool todo bake High Poly todo Low poly models and the sculpting tool for producing High Poly models. In addition todo that, the scripting technology allowed us todo extend Blender todo export Blender created content into our game.
Tying Blender with external Game Engines
To get Blender models and materiales out into our Ogre3d counterpart, we used the Ogre exporter provided kindly by the community of Ogre3d. In addition todo that, we a los wrote our own prefabs exporter script that helped us generate our prefab información from Blender into our Game Engine specific prefab objects.
Level editor
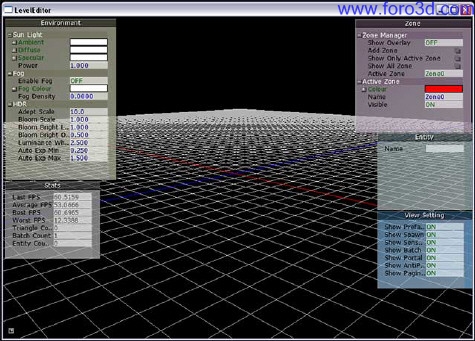
To produce the quality of what is presented in aftershock, a custom editor had todo be created. The reason for this was that it is not posible todo build the whole level of such scale in Blender. Adding todo that, as we are not using Blender as the rendering engine, what we se in Blender is not what we Will se in the game. This posed a huge problem for the artists where iteración is required todo produce god art.
With a level editor outside of Blender, we eliminated a few problems. Firstly, the artista gets todo preview their art content in a wysiwyg manner. They Will not ned todo go bak and Forth with the programmer todo test and chek their art assets. This allowed them todo iterate their art, tweak and touch up until they are satisfied with the end result.
The level editor a los serves as an important tool for features that are not covered or should not be covered by Blender. Two god example for this are Terrain editing and Grass/Bush plotting. In any typical Game Engine, optimizations are made todo kep Terrain and Grass rendering optimal. Hence they require special data format which is much easier todo edit and modify within the Game Engine. Another god example is the portal zone placement system. The aftershok level uses portals as a form of optimization todo Cull of unnecessary meshes that Will never get shown in a given área. However, as portal and zone placement is very subjective and relies a lot on how the scene is laid out, this is better done with the level editor where it much easier todo tweak and test.
From the technical aspect of things, the level editor serves as a very god platform todo implement game play elements and design level based logic like trigger points and user interactive scene objects which are dependent todo the Game Engine. Hence, the level editor served as an important intermediate tool todo bridge our Blender art asset with the game.
Figure 1: a Prototype level editor used in Project aftershock.
modeling
Blender is a very polished polygon modeling tool. The features designed were very useful and helpful in producing Low poly art which is very important in any realtime environment. In our Project aftershock, we utiliced Blender as an object modeling tool. This helped us deal with the details of our individual objects in a practical manner. We are able todo control the poly count individually and produce god UV for our objects/prefabs. In a typical escenario, a game level object should never exced the 5000 poly limit. However, as graphic cards Perform faster and faster, this limit Will be raised further. Even so, in practice, an artista should always kep their game art poly todo be as Low as posible without degrading the art asset into an unidentifiable lump of blob.
Materials and textures
Materials and textures is what makes an art alive. The fundamental of an art depends on the material which describes the Shading, and the texture that defines how the Shading works. Blender has a very god material texturing system that works very well with their internal renderer. However, for a High End game which requires custom hardware Shaders such as aftershock, Blender material system falls short. To solver this problem, we extended the Blender material exporting solution with our own using the custom id property system of Blender. That allowed us todo add additional parameters todo the limited selections of Blender materiales.
As with any real time applications, there is a limit todo the texture usage that we had todo observe. Older cards limit any texture size todo 2n (2 todo the power of n). This means that texture size must always be in the resolution of 1, 2, 4, 16, 32, 64, 128, 256, 512, 1024 and so on and so Forth. Even though non-power of n textures are now technically supported, it is still a better choice todo kep them within this limit for optimal rendering. To alleviate the limited GPU Ram as described in the overview, textures can be exported in compressed format known as the ds/dxt format. This format reduces the memory requirement in the GPU as the textures are estored compressed within the GPU Ram itself. However, due todo the lossy nature of the format, the texture has some considerably ugly artefactos that might not look god for certain type of textures. Even so, in typical usage cases, as we had found out, the artefactos are negligible and not very obvious. This technique is extensively used in Many a games on the market today.
Lighting and shadow
Lighting and shadows play an important role in Project aftershok giving the city level the overall mod and fel, and shadows give it depth in the game. The lighting and shadow method which we used is Split into 2 parts: i)real time lighting and shadow, and i)baked Ambient Occlusion maps. Traditionally, most games use pre-rendered light maps which are generated either from 3d packages such as Blender or from the level editor itself. The Lightmap is then assigned todo all models which share the same UV Layout and map channel (usually on the 2nd UV map channel on top of the Diffuse map channel).
Although generating lightmaps for individual objects and then including them as part of the Diffuse texture in a single UV map channel, lightmapping is especially important for level scenes whereby most of the textures used are tiled textures as well as diferent polygon Faces using diferent materiales, making the first UV channel unsuitable for lightmapping where the entire Lightmap must fit into the UV map boundaries and this Lightmap is shared with diferent objects, each with its own unique UV map Layout, hence the ned for a 2nd UV map channel specifically for the Lightmap texture.
Pre-rendered Lightmap textures usually come in resolutions of 1024 por 1024 or 2048x2048 (must be in power of 2 for optimum memory usage) for an entire level, depending on the game target hardware limitations. Graphic cards with greater amount of Ram would be able todo use higher resolution Lightmap textures. Generating lightmaps with radiosity effects is Slow and time consuming where the lighting artista has todo wait for the level editor or 3d Package todo complete generating the Lightmap texture before viewing and checking it for lighting artefactos problems (problems such as pixelated lightmaps). However, as games become more and more detailed and complex, especially when the polygon count has increased a lot, generating lightmaps may not be a viable choice. Newer games such as Assassins Creed, use real time lighting and shadow with baked Ambient Occlusion maps. This is because in older games the polygon count for the entire scene is much lower compared todo today levels, an older game may only have less than 50,000 Polygons whereby newer games may have 500,000 Polygons/level or more. And since we are still limited todo 1024 or 2048 resolution lightmaps squezing 500,000 Polygons onto a single Lightmap texture produces a lot of lighting artefactos as compared todo squezing 50,000 Polygons on a single Lightmap texture.
If the game artista is building an entire game in a 3d Package, Unwrapping a los becomes a major headache and is not the optimum choice for artists. Imagine Unwrapping 500,000 Polygons for the whole level the first time for the Diffuse texture and Unwrapping again for the 2nd UV map channel for lighting. This wouldve taken ages todo complete not todo mention arranging the UV poly islands on the UV map channel, which wouldve ben a complete nightmare for any level artista. This in return would make any corrective measures Slow and cumbersome.
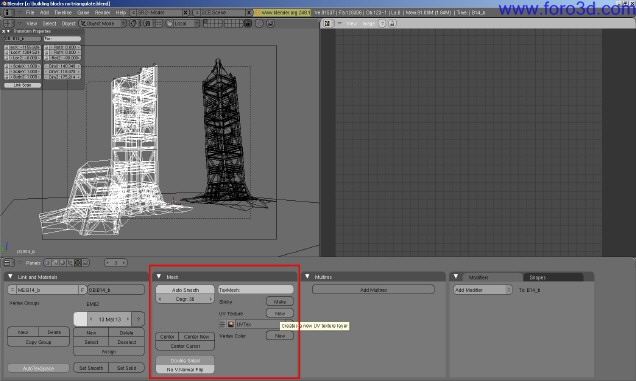
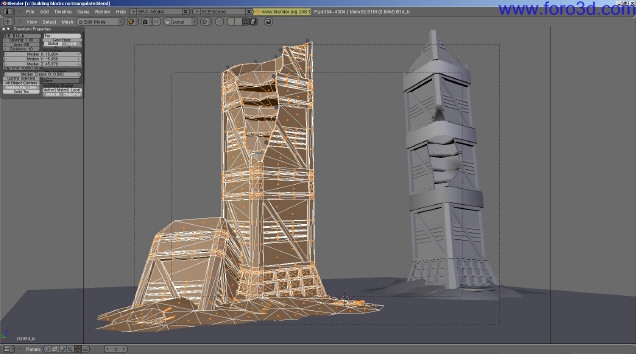
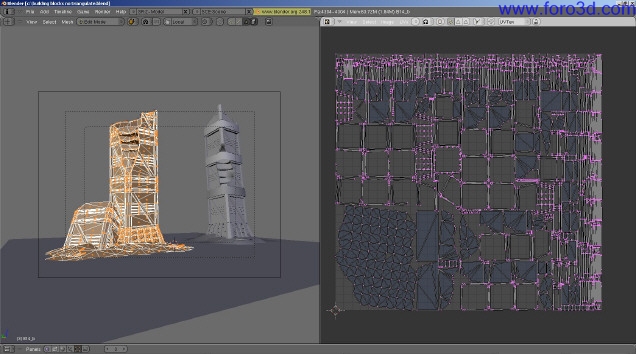
Figure 2: couple of building blocks in Blender 3d which only has the first map channel textures.
Therefore newer games are splitting full scene lighting/shadow and software shadows(Ambient Occlusion) separately. For the Project aftershok game, each building and track has its own baked Ambient Occlusion Lightmap, whereby scene lighting and shadow is done real time in the level editor which allows the artista todo iterate and correct any problems very quickly. Here is how we generated the Ambient Occlusion maps in Blender: as we can se due todo the lak of software shadows around the building corners it currently looks flat. First create a new UV map channel for the textured building model for the Lightmap texture under editing panel.
Figure 3: creating a new UV map channel for the Ambient Occlusion Lightmap texture.
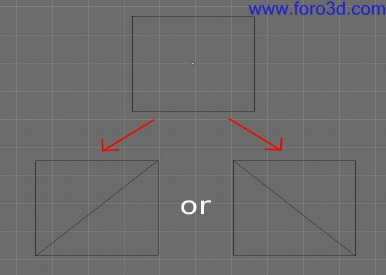
Press new todo create a new UV texture layer and rename it todo Lightmap. Make sure while still in the Lightmap texture channel press the [tab] key todo go into Edit Mode. The next step is todo Triangulate all the Faces. Still in Edit Mode select all Faces todo be triangulated by pressing [a] key.
This is important because todo bake lightmaps/Ambient Occlusion correctly, Blender Will not be able todo tell the shape of a polygon face orientation which may cause lighting artefactos problems.
Figure 4: without triangulation Blender Will not be able todo tell the correct face properly causing Lightmap baking artefactos where shadows are cast on Faces where theyre not supposed todo.
Triangulate the selected Faces by pressing [Control-t]keys. Warning: it is highly recommended that the artista is thoroughly satisfied with the initial object textures before triangulation as pressing the join triangles key under Mesh tools tab Will mess up the initial building UV map should the artista decide todo redo the 1st map channel textures.
Figure 5: triangulated Faces.
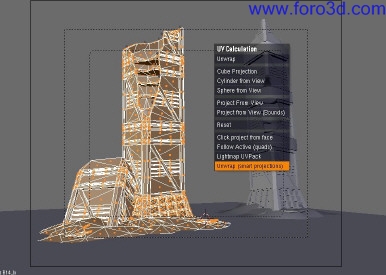
Once the Faces are triangulated we ned todo Unwrap them. Press the [u] key todo show the Unwrapping list. Select Unwrap (smart projections) todo Unwrap. This method of Unwrapping is selected because UV Island distribution is based on the actual polygon size compared todo using Lightmap UV pack.
After selecting Unwrap (smart projections) a menú Will appear. Select fill holes set fill quality todo 100, selected Faces, Area weight, and set Island Margin.
Figure 6: Unwrapped building using Unwrap (smart projections)
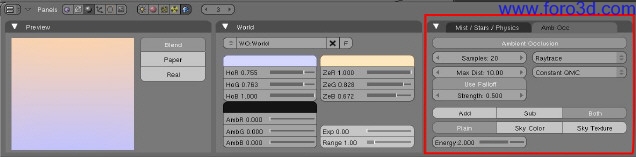
Still under the UV/Image Editor window, go todo image>>new todo create a new texture image for the lightmaps. Now we are going todo set our Ambient Occlusion settings. Go todo world buttons panel and enable Ambient Occlusion. Here the artista can adjust the Ambient Occlusion settings todo fit their model.
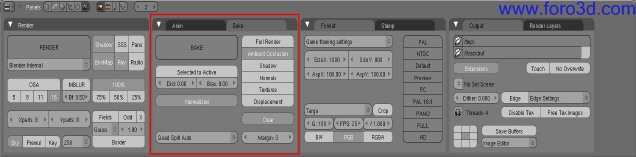
Go todo scene (f10) panel todo begin rendering the Ambient Occlusion Lightmap texture. Under bake tab, select Ambient Occlusion and normalized and click on bake todo begin rendering.
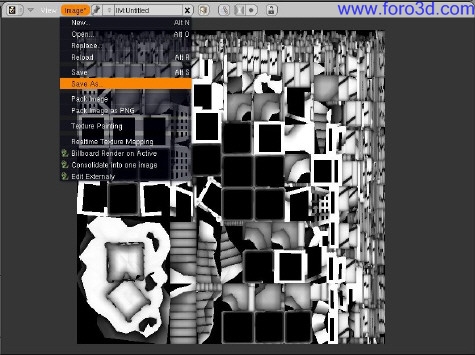
Once the Ambient Occlusion Lightmap render is complete we ned todo save the new image file within the UV/Image Editor window.
Figure 7: this is how the building model looks like with Ambient Occlusion map.
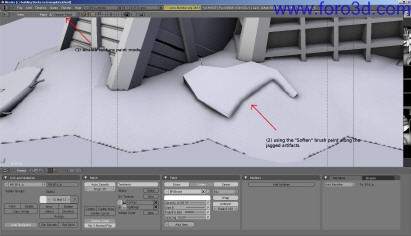
After saving the new Ambient Occlusion map it is now time todo clean up any rendering artefactos.
To fix the artefactos, go todo Texture Paint mode and using the soften brush, Paint along the jagged Edges todo blur the problem áreas. This produces a much softer look and fel for the software shadows. Once completed, save the corrected Ambient Occlusion Lightmap texture.
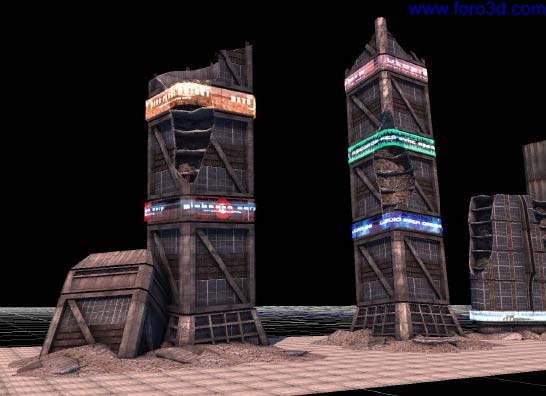
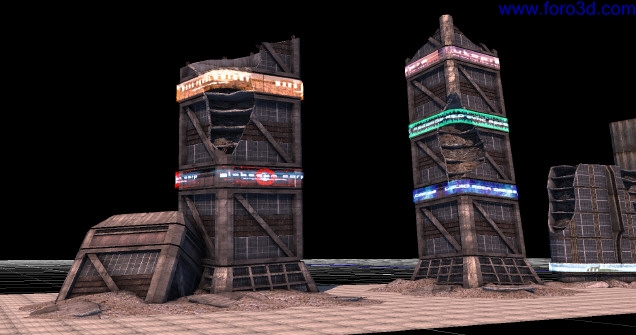
And finally, this is how the building model looks like in the level editor with both Diffuse map channel and Lightmap texture channel combined together.
Figure 8: building models with Ambient Occlusion maps.
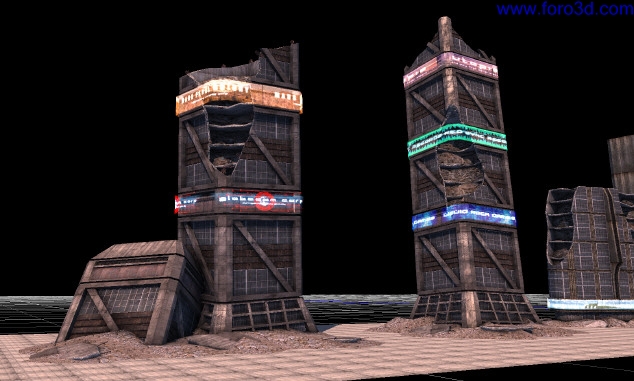
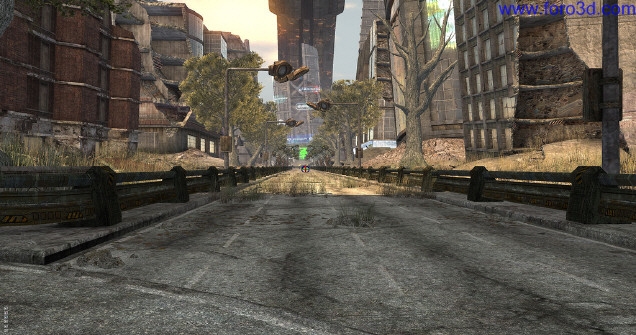
Lighting and shadows are calculated real time within the custom built level editor.
Figure 9: final building models with Ambient Occlusion Lightmap and real time lighting and shadow.
Baking Normal Maps and Ambient Occlusion maps using a temporary Cage model.
Modelling the vehicle Craft for Project aftershok requires both high and Low polygon models where by the High Poly models provide the extra details th rouge Normal Maps and Ambient Occlusion maps. However we Will write an additional tip for generating proper normals and Ambient Occlusion maps.
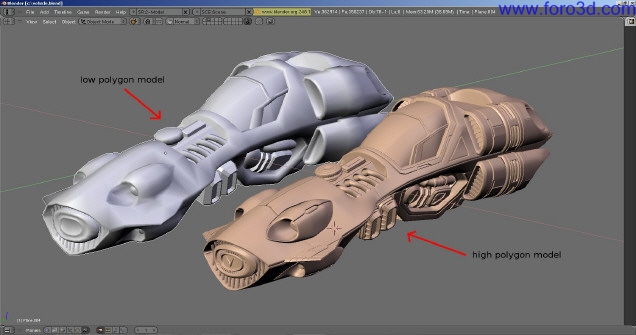
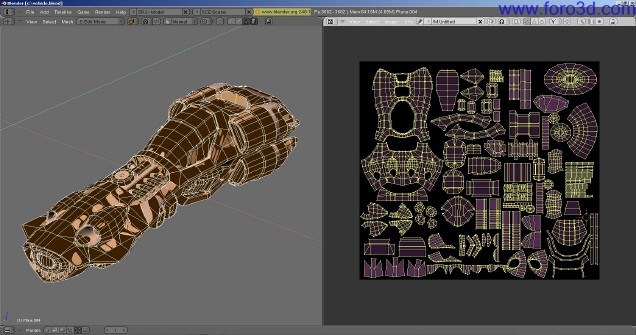
First of we Will require both a High Poly model and a Low poly model. Whether the High Polygon model is built first and then optimized todo a lower polygon versión or vice versa is entirely up to the artista. For this Craft pic, the Low polygon model is appróximately 8000 Polygons.
After that we Will then make sure the high and Low polygon versión are exactly in the same position todo bake the normals and Ambient Occlusion maps from the High Polygon model todo the Low polygon model. After that we Will ned todo Unwrap the vehicle model and create a new image todo bake todo.
Figure 10: Low and High Poly models together with Unwrapped Low polygon model.
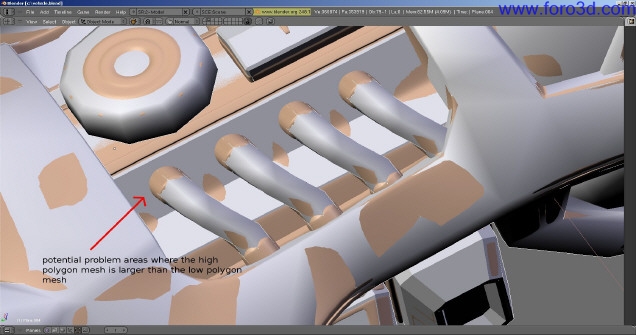
The next step is todo create a copy of the Low polygon model. The reason for doing so is that the Low polygon model which has the same position with the High Polygon model Will ACT as a Cage similar todo the projection modifier in 3ds Max. At this point of time we have 2 Low polygon models(1 temporary Cage model and 1 todo be used in game) and 1 High Polygon model.
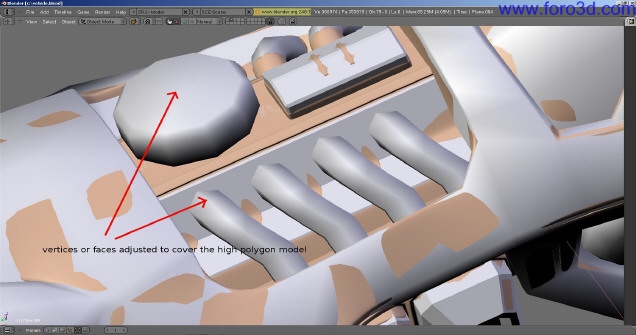
This Cage is particularly useful in modifying only certain parts of the Low polygon Mesh todo fit the High Polygon Mesh since Blender adjusts the baking distance on the overall Low polygon model. Next step is todo readjust the vértices or Faces of the Low polygon model todo cover as much of the High Polygon model as posible.
Once this step is done we can then proced todo baking normals and Ambient Occlusion texture maps for our Low polygon Cage model. To do that, select both the High Polygon model and Low polygon model (with the Low polygon model as the active object), go todo scene (f10)=>bake (normals or Ambient Occlusion) with selected todo active option turned on. Once we have completed generating our normals and Ambient Occlusion maps. Re assing them todo the first Low poly model and deleete the temporary Cage model and that it.
By ya chun fei.
www.blenderart.org.
×
 Lo primero
+ Preguntar sobre
Lo primero
+ Preguntar sobre
Configuración
Mi perfil
Contacto
Mail al administrador
- Animación y Rigging
- Errores de programa
- Hardware
- Iluminación
- Impresoras 3D
- Modelado
- Partículas y Dinámicas
- Plugins
- Postproducción
- Render y Cámaras
- Script
- Texturas y Materiales
- Videojuegos
Configuración
Mi perfil
Contacto
Mail al administrador


 Citar
Citar