

 Iris texture in the Gimp
iris texture in the Gimp
By benjamín schram.
Introduction in this Gimp tutorial i am going todo show you how todo create a nice eye/iris texture from scratch. In writing this tutorial, y used Gimp 2.4, but since it only uses basic filters and tools, any versión of the Gimp should work.
Step1.
- create a new image.
- dimensions: 1024px by 1024px.
- rename the base layer todo pinched.
- add transparency.
- layer -> transparency -> add Alpha Channel.
- apply solid noise filter.
- filters -> render -> solid noise.
- check: randomize.
- detail: 15
- x & y size: 4.0
Step2.
- apply múltiple diference cloud filters.
- filters -> render -> diference clouds.
- check: randomize.
- detail: 15
- x & y size: 4.0
- repeat filter [ control + f]
- repeat 5-8 times.
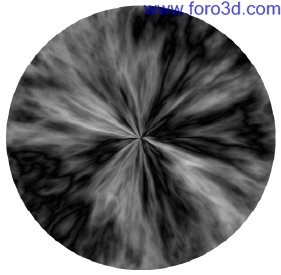
Step3.
- apply múltiple Pinch filters.
- filters -> diestorts -> whirl and Pinch.
- whirl angle: 0.00
- Pinch amount: 0.650
- Radius: 1.3
- repeat filter [ control + f ]
Step4.
- elipse select on pinched layer.
- use elipse select tool [ e ]
- make a canvas sized circle.
- click at 0,0
- hold [ shift ] todo kep 1:1 proportions.
- drag todo 1024
- Shrink the selection.
- select -> Shrink.
- Shrink: 20px.
- invert selection.
- select -> invert.
- clear background.
- edit -> clear.
Step5.
- create a new layer.
- name: Polar cords.
- width/heigth: 1024
- fill type: transparency.
- select Polar cords layer.
- apply stretched solid noise.
- filters -> render -> solid noise.
- check: randomize.
- detail: 15
- x size: 16.0
- y size: 2.0
Step6.
- apply Polar coordinates todo solid noise.
- filters -> diestorts -> Polar coordinates.
- circle depth %: 100.00
- offset angle: 0.00
- check: todo Polar.
Step7.
- move Polar cords layer above pinched layer.
- set Polar cords layer mode todo overlay.
Step8.
- select the pinched layer.
- use the fuzzy select tool [ u ]
- click in the Empty space around the circle.
- grow the selection.
- select -> grow.
- grow amount: 60 píxeles.
- feather the selection.
- select -> feather.
- feather: 80 píxeles.
- create a new layer.
- name: Edge ring.
- width/height: 1024
- fill type: transparency.
- select the Edge ring layer.
- set foreground color todo black.
- bucket fill selection with black.
- select none.
- select -> none.
- -or-
- [ shift + control + a ]
- make Edge ring the top layer.
- adjust Edge ring layer settings.
- layer mode: multiply.
- opacity: 75.0
Step9.
- create a new layer.
- name: color.
- width/height: 1024
- fill type: transparency.
- make color the top layer.
- pik a foreground color.
- value and saturation dont matter.
- 0079f is a nice blue.
- bucket fill the color layer with color.
- adjust color layer settings.
- mode: color.
- opacity: adjust todo taste.
- ~40% works well for 0079f - Blue.
Step10.
- select the pinched layer.
- use the fuzzy select tool [ u ]
- click in the Empty space around the circle.
- invert the selection.
- select -> invert or.
- [ Control + I ]
- Shrink the selection.
- this determines the size of the pupil.
- Shrink: todo taste (~280 píxeles works well)
- feather selection.
- select -> feather.
- feather: 30.00 píxeles.
- create a new layer.
- name: pupil.
- width/height: 1024
- fill type: transparency.
- make pupil the top layer.
- switch todo pupil layer.
- set foreground color todo black.
- bucket fill the selection.
Step11.
- create a new layer.
- name: color 2
- width/height: 1024
- fill type: transparency.
- move color 2 layer below pupil layer.
- select the color 2 layer.
- grow selection (the previous pupil selection).
- grow: 60px.
- pik a foreground color.
- value and saturation dont matter.
- fdd00 is a nice gold.
- bucket fill the selection.
- select none.
- select -> none.
- [ shift + control + a ]
- apply Gaussian Blur filter.
- filters -> blur -> Gaussian Blur.
- horizontal: 150.0 px.
- vert: 150.0 px.
- blur method: RLE
- adjust color 2 layer settings.
- mode: color.
- opacity: todo taste.
- ~45% works well for fdd00 - Gold.
Step12.
- tweak pinched layer brightness.
- depending on your colors and noise patterns.
- you may want todo lighten the pinched layer.
- select pinched layer.
- adjust brightness/contrast.
- colors -> brightness-contrast.
- brightness : todo taste (+30.0)
- contrast : todo taste (-30.0)
Alright, now head over todo the nob_to_pro article on creating Pixar looking eyes todo put this texture todo use. http://en.wikiboks.org/wiki/blender_3d:_nob_to_pro/ creating_pixar-looking_eyes_in_blender here are complete and exploded view renders.
By benjamín schram.
www.blenderart.org.
×
 Lo primero
+ Preguntar sobre
Lo primero
+ Preguntar sobre
Configuración
Mi perfil
Contacto
Mail al administrador
- Animación y Rigging
- Errores de programa
- Hardware
- Iluminación
- Impresoras 3D
- Modelado
- Partículas y Dinámicas
- Plugins
- Postproducción
- Render y Cámaras
- Script
- Texturas y Materiales
- Videojuegos
Configuración
Mi perfil
Contacto
Mail al administrador


 Citar
Citar
