

product modeling: SDS and details
By clas Eicke Kuhnen.
introduction
Exploring a design or posible surfaces is the most important part in industrial design during the creative phase. Ideally you would like todo use a tool which allows Mass-modifications without remodeling already finished parts. However not every programa ofers this. Some CAD programas round Edges on-the-fly as a so-called característica, or change the lofted surface when the curves are modified, which are used for skinning.
The same a los applies todo working with model creation in Blender. How do you optimize your work when creating some new design. Unfortunately Blender does not have an interactive modeling tree - For example, like Amapi profesional - However Blender has some nice layers.
Layers can be used as a estorage space for diferent steps. You can create a first draft in a layer, then duplicate it todo another layer todo refine it. On each major step of your modeling process, you may copy your model todo another layer. This bien you can always come bak todo a former shape if things go wrong. This can a los be used when specific elements are finished.
This means layers are used like an explorational utility. During any time of the modeling when a specific problem is encountered you could quickly Jump bak todo the model stage of one layer and restart there. Or you could combine the result of diferent stages into a new form.
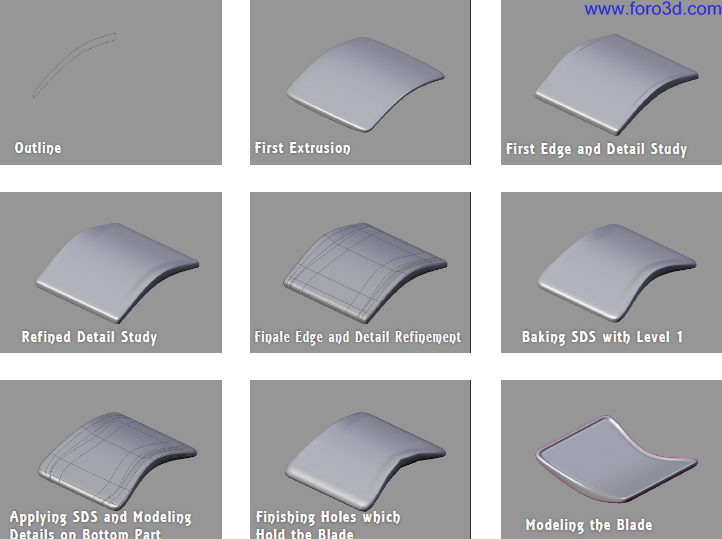
I a los personally find this workflow very useful when working with SDS (subdivisión surfaces), which is mainly what i do. The problem with SDS in Blender is that you cannot locally subdivide the surface todo model in details. It is important that when beginning todo model you have a rouge Understanding of the required Mesh density required todo build specific surface details. Sometimes during the initial steps you Will quickly encounter problems with your Mesh and can make, in the preliminary stage of modeling, quik adjustments todo it.
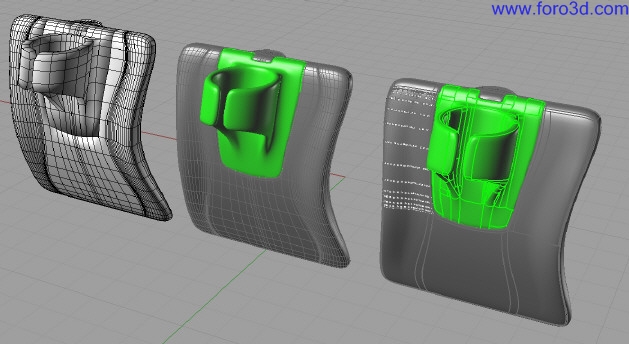
For example, while modeling the chefn carrot Knife i tried todo figure out the minimum required density for getting the basic surface details, like the rounded quality of all Edges as well as the curvature of the main body. Following this i was exploring the required Mesh density todo model in details like the finger holder and the geometry for holding the cutting Blade.
Bake SDS levels for further detailed Refinement:
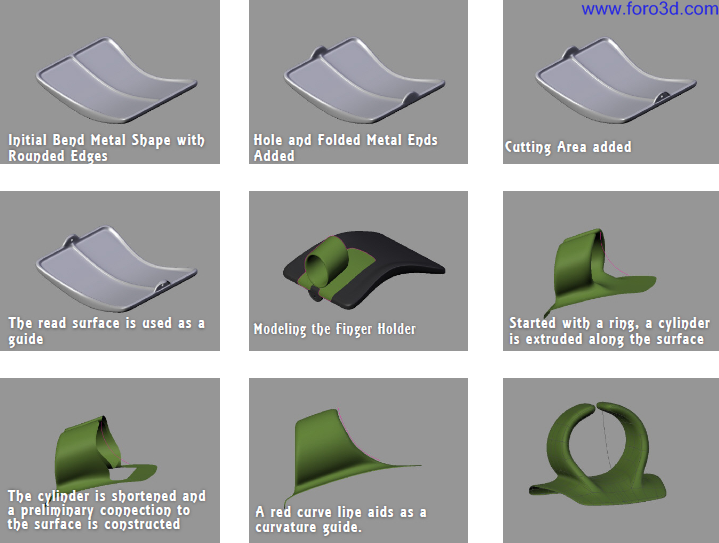
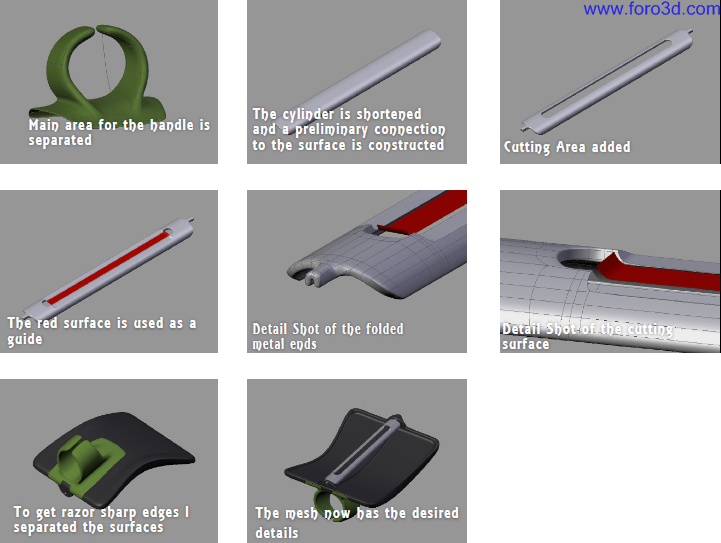
The last step in particular was dificult because as mentioned with SDS you cannot locally subdivide a surface todo build such details. To tackle this problem i baked a level one subdivisión into a more dense base Mesh. This level was fine enough for my desired details. From there i continued modeling. If you look into the diferent layers you se that i started with a general cross-section profile, extruded it, capped the Edges and then pushed in the sides and extruded the tops todo build those raised parts. After that the hand part was explored, starting with a ring extruded into a cylinder, and a side view curve helped me todo model out the curvature. At this point i neded todo figure out an elegant face flow todo get god Mesh quality but a los capture the actual details of that kitchen utility. This approach of roughing out a basic shape with SDS, baking the modifier and then continuing todo model from that point does not allow for quik stepbacks, however as mentioned the layers can be very useful in this case todo estore diferent design steps. This minimizes the amount of rework.
A Mesh view showing the Smooth transición between the finger element and base surface. There are no bad Edges or unwanted surface flows, and few triangles are used todo get the face network. In addition, the outline Edges are extruded slightly downwards todo make the part look sepárate when placed into the main model.
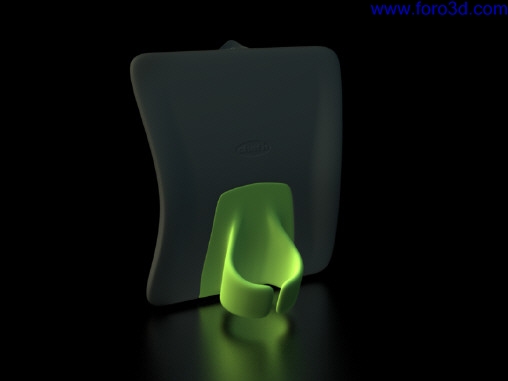
The result is a quite accurate representation of the actual chefn product, with a modeling time of around thre hours. The finger holder required the most attention, and is the most interesting element and best example for using SDS for product modeling.
Specific elements like the holes or Blade are more qualified todo be done entirely in Rhinoceros - However, for rendering purposes i modeled them inside Blender.
Clas Eicke Kuhnen
Assistant profesor industrial design digital fabrication technologies Kendall College of art and design of ferris state university.
Mfa 3d Studio jewelry/metal Bowling green state university, usa focus in functional metal art and 3d digital art.
Dipl. Des. (fh) color - advanced color concepts Hawk university of applied Science and art, germany focus on functional graphic and product design.
Blender is my main modeling programa for organicshapes with subdivided surface and for fast render. It workflow is fast and allows me todo quickly explore design variations. Moreover can it be used for rapid prototyping th rouge importing the Mesh into Rhinoceros and converting it there todo Nurbs patches using t-Splines.
It is an accepted addition todo the digital modeling class here at the Kendall College and is currently evalúated for digital rendering. [URL=http://www.ckbrd.dwww.ckbrd.de[/url] | [email=info@ckbrd.dinfo@ckbrd, de[/email]
By clas Eicke Kuhnen. www.blenderart.org.
×
 Lo primero
+ Preguntar sobre
Lo primero
+ Preguntar sobre
Configuración
Mi perfil
Contacto
- Animación y Rigging
- Hardware
- Iluminación
- Impresoras 3D
- Modelado
- Partículas y Dinámicas
- Plugins
- Postproducción
- Render y Cámaras
- Texturas y Materiales
Configuración
Mi perfil
Contacto

 Citar
Citar