

 Product rendering
product rendering
By clas Eicke Kuhnen.
Introduction
As important as it is todo explore design ideas quickly th rouge modeling it is just as important todo do the same with visual representations. In industrial design, the rendering aspect is treated as an additional service. It is not as important as the actual manufactured product. In addition there are a los opinions which state that god render are rather counter productive because the customer might bond with the rendered image instead of what the real product would be later.
This means that quik but god solutions are very welcome in industrial design. This is one reason why Hyper Shot is becoming very popular lately. I believe however, that with skill and experience, quality hand crafted render can be a los done quickly.
Hour long render are not the best approach of choice in an environment in which time counts. And Blender has some nice speed up tricks. The biggest problem faced was todo convince non-blender users about the powerful render tools Blender has. Those include the material and compositor node system, render layers and passes, and of course the
This means well illuminated products - Showing realistic material simulation - And additionally, photography elements like Depth of Field effects for enhanced realism. Blender comes with a rich set of light types including spot, Sun, and área lamps, as well as Ambient Occlusion and vertex color based radiosity.
No mtl, Photon Mapping, Final Gathering, or Path tracing is yet included, thus effects like Caustics and local indirect illumination are quite dificult todo generate in Blender depending on the scene. However with the current tool set we can achieve quite impressive results. Some are fast and easy todo use and some are more labor intensive and take longer.
Highlight, Mid tones, dark áreas and shadows are visual elements we can employ todo give a flat rendering the illusion of 3d dimensionality. This means we can follow nature or simplify this and apply them in a rather graphical and illustrational way. This in other words means that we can do naturally looking images with Even illumination or generate specific studies which focus on elements of the visualized product.
That could be a highlight study or utilizing hard contrasts between highlight and shadow todo emphasise the thre dimensionality of the surface. For those steps we can select specific render types. Ambient Occlusion for example produces a more Even, a more natural illumination while when using only few spot lights we can increase the light drama inside a rendering and focus on contours of the object.
Traditional Lamp rigs first:
At the beginning of CG there was no global illumination of any kind. The artista neded todo simulate direct and indirect illumination th rouge placing numerous lamps todo brighten up shadow áreas and color surfaces todo faq color bleding. Those so called Lamp rigs were often very time consuming and complex todo work with - Simply because of the amount of lights you were dealing with. Two of those set-ups which Mimic indirect illumination are still very common today.
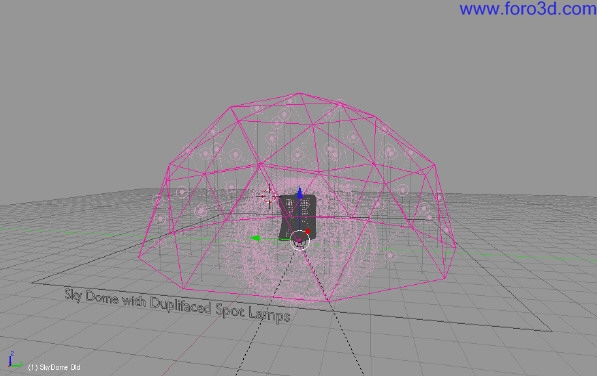
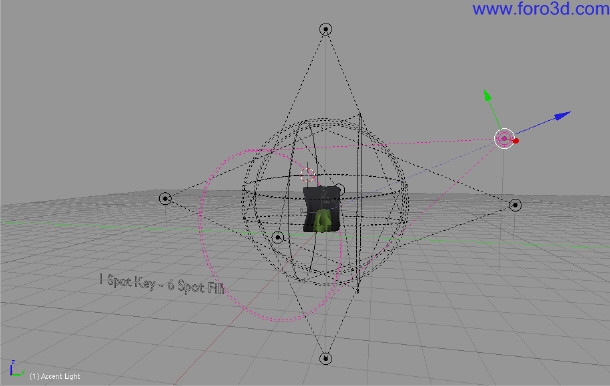
1. Skydome.
You duplivert a Lamp over half of a sphere and let the lamps Illuminate the object in the center evenly - In a bien similar todo what Ambient Occlusion does. The skydome mimics the Sky which emits light from all directions.
The more lamps used the finer the result - In particular when shadows are employed as well. However, the the rendering Will take longer also. In contrast todo older versións, Blender now ofers Raytraced softshadows. We can use those instead of buffered shadow spot lights and get more realistic natural shadows. But again the more lamps - The more shadows - The longer the rendering.
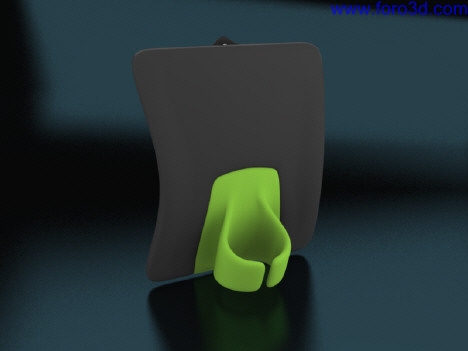
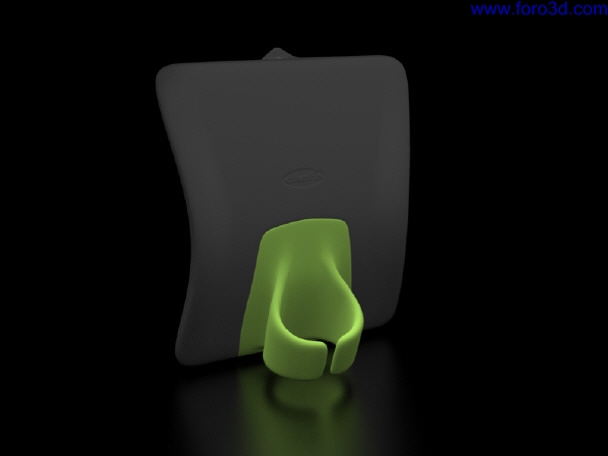
In Studio photography hard shadows, are in most cases, not a desired result. Software lights are preferred because they enhance the perception of volumes. Hard shadows can be very distractive. In this case we could Even ignore them. The trik with the skydome is todo have a software illumination which a los mimics very light, software shadows or self-shadowing of an object.
To hide the lak of any shadow we could a los put our product on a perfectly reflective surface. When using duplifaces the base Mesh for the dome is not being rendered by default and thus the background Will be visible. The reflective Ground plate Will then only show the reflection of our desired product. This would reproduce a god Studio environment.
Simple skydome setup:
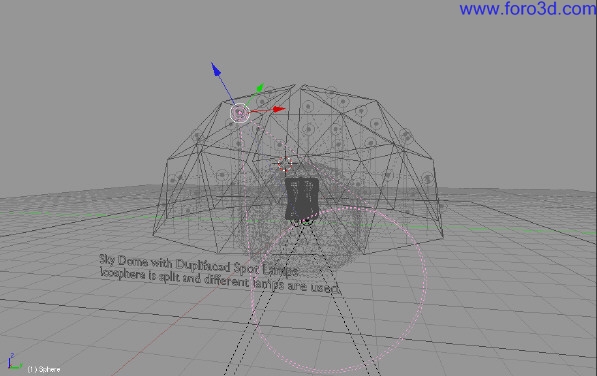
- upper half of one Icosphere / or Mesh of any shape.
- spot light parented todo Icosphere.
- Icosphere has duplifaces activated.
- spot light energy is reduced todo a Low value.
- Ground plate with shadow catcher (material/Shaders/only shadow button) or surface with blurred reflections.
- world with black background.
- optional fill light todo brighten up lower part of object.
The skydome approach can be more refined.
To take natural color of the Sky into consideration we can Split the Icosphere into two parts. Apply todo each part a diferent Lamp and give those two lamps diferent color and energy values. The Sun side has more energy and more yellow, while the opposite side has less energy and is rather blueish todo represent the light coming from the Sky.
With the Sun like lamps having more energy, the posible shadows Will be much stronger. When using Raytraced shadows, it is advisable todo use higher values for the shadow sample todo produce softer looking results. However this can quickly increase the required rendertime as well.
The light emitted from the Sun being so far away can be treated as parallel light and thus could be use a single additional Sun light todo cast the software shadow. It can a los be a spotlight. If your skydome is quite small, you might want todo increase the size of the dome todo a los Illuminate the Ground accordingly. If you use a shadow catcher as the surface, the product Will be much easier todo compose into any print media.
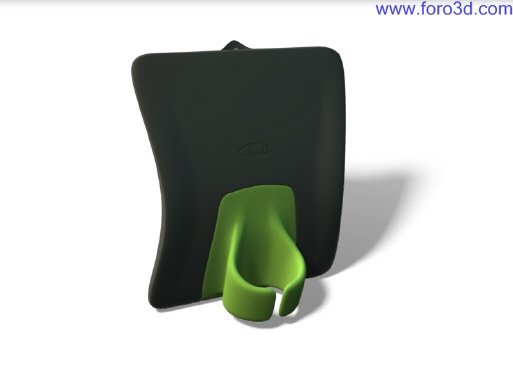
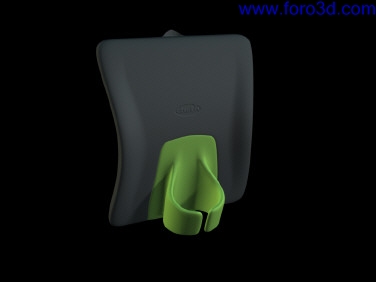
Rendering showing natural color illumination over reflective surface. An área light filler was used todo brighten up the darker lower part. The Lamp color is using a blend between Sun color and Sky color.
This trik can a los be used todo simulate diferent light temperatures in a Studio set, rotating the skydome and thus a los rotating the color emission you can decide where the Sun would be in your scene. Along with this you ned todo move.
The posible shadow casting Lamp as well.
In addition the dome does not always have todo be a sphere. It could be any kind of Mesh type. With this the user has Even more control on lights position and energy/color setup. This should enable you todo quickly build a set of Studio-like lighting setups for your future productions.
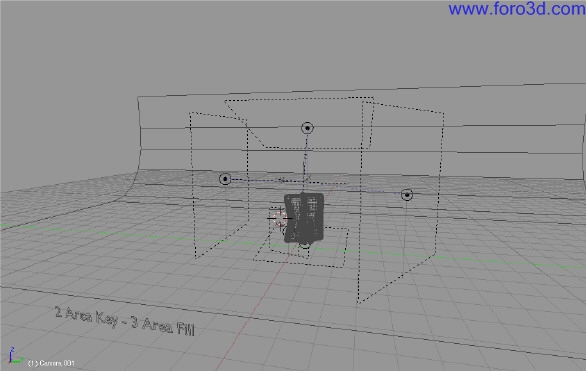
2. Seven Lamp light rigs:
This follows the similar approach todo what the skydome tries todo achieve. You use 6 lamps for a general global illumination. Left, right, front, back, top, and bottom. Those represent the six geographical directions we have. One Lamp should be the Sun Lamp while the rest cover Sky, horizon, and Ground. Those lamps can be orientated strictly along a vertical horizontal Path or depending on the Sun position be rotated.
Because only 6 lamps are used the amount of light energy used must be higher than with the skydome lamps. The result is again an Even illuminated object with less lamps being used. (therefore saving rendering time) Spotlights or área lights can be used.
able you todo use buffered shadows which render quite fast. This Will not only Illuminate, but Will a los provide natural shadows todo the scene. However with only 6 lamps simulating natural shadows might be dificult.
A seventh Lamp can be used todo place harder shadows and stronger illuminated áreas todo focus attention todo specific parts of the Mesh. I would not use two accent lamps with shadows because that could start becoming rather distractive.
This setup is god for a fast light Rig creation, playing with the Lamp energy setting and color you can quickly simulate an in-dor as well as out-dor situation plus give the object the desired dimensional feeling. Because we only use 6 lights for the main tasque of lighting the scene, we can a los create harder contrasts compared todo skydome. This is an aesthetic tool which can be quite handy. The seventh Lamp can be used todo significantly let one área or detail pop out of the image.
Simple Lamp light Rig setup:
- 6 lights coming from all 6 geographical directions facing the model.
- 1 or 2 additional accent lights for casting harder, more pronounced shadows.
- world with black background.
- optional: Ground plate with shadow catcher or surface with blurred reflections.
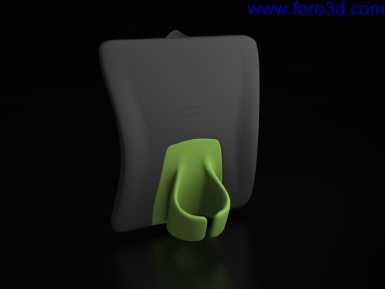
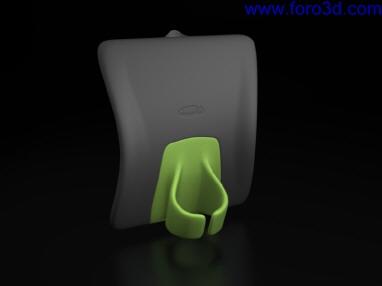
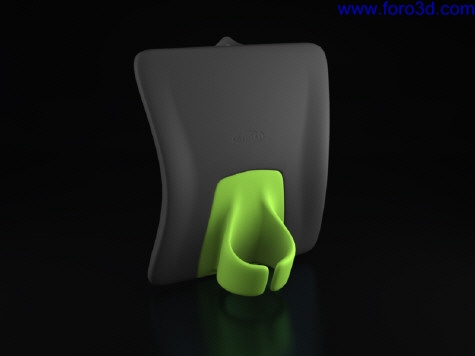
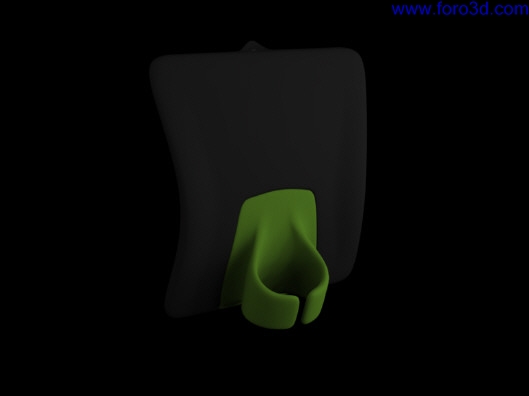
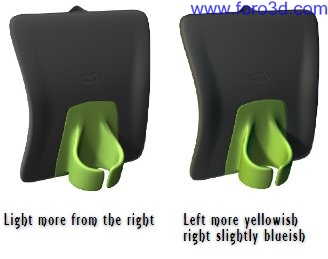
As you can se the shadow is well pronounced - A los pay attention todo the yellow color from the left and blue tones from the top. They are modeling nicely the contour of the tool. The Lamp below the object functions as our light bouncer of of the Ground - Evenly illuminating the lower section as well.
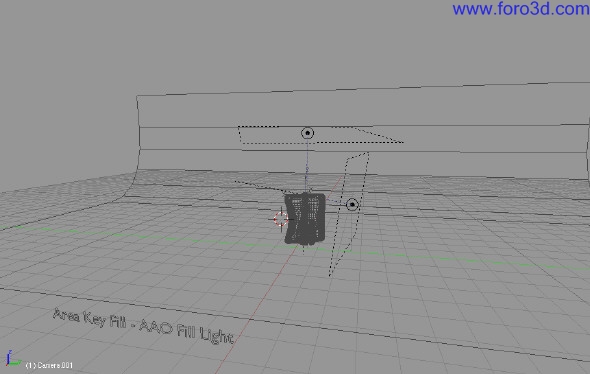
3. Área light rig:
Area lights produce useful light emitting surfaces and thus a los produce the diffused light quality of a light box. With a few área lights we can quickly setup a well working Studio utilizing light boxes commonly found in photography.
All that is neded is a left and right área light emitting the main amount of light. Here you can decide if you want todo pronounce left and right evenly or if you want the left side todo be more illuminated, which is, in my case, the situation. The top área light evenly illuminates the top contour while the Ground light brightens up the lower part of the model.
There is 4 smaller área lights which are moved very close todo the model. Because the main área lights are rather left and right there is not much light coming from the front - The place were the Camera man would be. We cannot use bouncing cards in Blender because it does not support global illumination this way. Thus we ned a filler. That small light has the purpose of slightly brightening up the top part of the finger holder todo prevent todo dark áreas which might be a los visible though unpleasantly looking banding.
Simple área light Rig setup:
- 2 lights left and right emitting most energy.
- 1 light top putting emphasis on top contour.
- 1 light below brightening up darker bottom part of model.
- 1 smaller light filling front part - Removing banding.
- 1 or 2 additional accent lights for casting harder, more pronounced shadows.
- world with black background.
- Ground plate surface with blurred reflections.
4. Simple área light Rig setup with AO:
- 1 light at a side emitting main energy.
- 1 light top putting emphasis on top contour.
- ao with a Low energy value todo brighten up scene evenly.
- world with black background.
- Ground plate surface with blurred reflections.
This setup only utilices two accent área lights with a small amount of energy and a medium value for appróximate Ambient Occlusion. Ao Will function as the main illumination model todo brighten up the scene evenly while the área light energy is being added todo the model todo put focus on the model curvature. Ao is our newest addition - The result is a Grain free Occlusion compared todo it Raytraced counterpart and thus a los quite quicker compared todo high sampled Raytraced AO. However it behaves a Little bit diferent. Depending on the Mesh size you might get strong splotches of shadows. To control those you can make use of the distance function todo prevent them. This Will scale down the shadow size between facing Mesh parts.
Depending on where you place the área lights you can have more illuminated or more surfaces in shadow. The result with this Rig has a Little bit more dramatic contrast. Shadows in general are more pronounced. This is very visible in Mesh parts which are close todo each other.
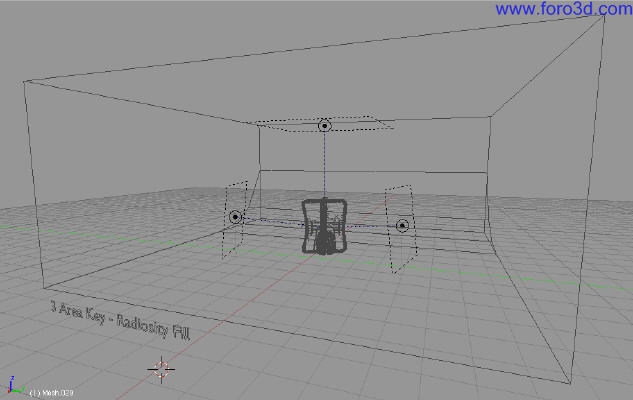
5 radiosity Solver:
Ambient Occlusion has one major disadvantage - It works globally and not locally. It is great todo be used in specific scenes where there is not a strong change in illumination like an outdor scene. Another disadvantage is - In its current stage it does not support color bleding. Blender actually has one tool that can do exactly that. The radiosity Solver is a quite dusty tool in Blender - Not todo much used any more. It is a Little cumbersome todo use - However with some practice, quite excellent results can be achieved.
The bien the Solver works is by calculating emitted and reflected light and estoring this in a texture, the so-called light map. This map is then used instead of lights todo render the scene. Light is sent from meshes and not actual lamps. When you place a normal light inside a scene and its light rays touch an object, that light energy and color información.
Is being used with Mesh surface Shader información todo onthe- Fly render something illuminated and visible or in shadow and invisible.
This means no light - Nothing visible. The light map works diferently. Instead of calculating the illumination of the sphere during rendertime, the radiosity Solver renders the scene and bakes that result onto the Mesh. Upon rendering the scene, Blender does not have todo shot out rays todo se what is illuminated or what not - It Simply uses the light map texture and shows it.
Thats all. The downside is that this technique is vertex based. The Mesh Will be subdivided during solving time todo be fine enough todo estore the light map results with a desired quality. This means your Mesh is getting messy. You have todo apply a Subsurface modifier before solving time. All meshes Will be joined into one result. This means After the solving is finished, you have todo sepárate your meshes again and remove materiales added by this process.
The biggest down side is that afterwards you cannot animate your objects because the light texture is static. Shadows Will stay and not move with the object. However for still render this is not a problem. This technique is a los very nice todo Illuminate interior Roms when products are placed in it - Very useful when your product has reflective surfaces.
One of the nice parts is that the results are quite decent and once the solving is done, it does not have todo be repeated again. Renderings are very fast. You can tweak your textures and instantly render your scene. That is the main advantage of a baked GI solution. With the radiosity Solver you can a los give meshes a light emitting value, custom building complete light shapes not posible with any other technique.
As a bonus this technique a los calculates color bleding in addition todo bouncing. In my case i built a typical scene, a backdrop onto which the product is placed. Everything is inside a box. The box simulates a rom for rendering, while at the same time functions as a bouncer for light rays.
It is important that you have Walls - Otherwise emitted light Will travel todo infinity and you cannot achieve an indirect illumination. The front face of the box is removed todo look into the rom while it can be removed After solving time.
Technically speaquíng, the radiosity system is an illumination technique using no lights during render time. Lights are used only during solving time. This brings with it one small problem. Material effects like Bump mapping interact with actual lights. This means using a Bump map would be imposible with radiosity. You Simply Will not se that texture.
However a work-around is similar todo AO using radiosity as a global light Solver while the accents are done with real lights. In my case i use área lights similar in size todo the Mesh lights for final rendering. The radiosity makes everything nicely software, while lamps take care of the Bump mapping and in addition add extra crispness todo the rendering. Because of this situation did i use Mesh lights with a Low emitting value.
Their outcome Will be enhanced with the área lights. You could a los use stronger Mesh light values and use only the Specular of the área lights and not their Diffuse. This bien the área lights Will only create the Bump texture without any added light.
Radiosity setup:
For solving.
- 2 key Mesh lights at a side emitting main energy.
- 1 top Mesh light emphasis on top contour.
- world with black background.
- Ground plate surface.
For rendering.
- 3 área lights replacing the Mesh lights.
World with black background.
Ground plate surface with blurred reflections.
Post-production:
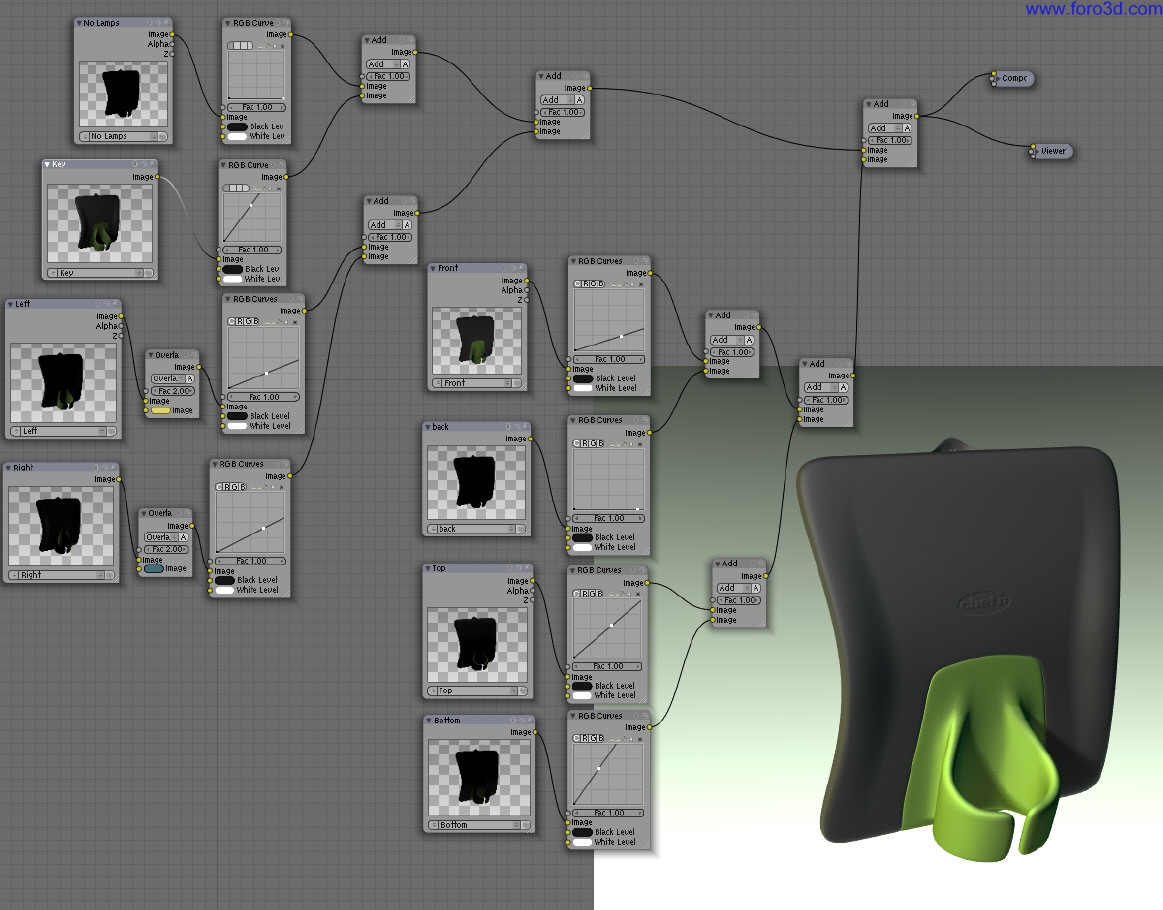
Lets assume one rendering takes a lot of time or rendering an image múltiple times and comparing the results is not the most convenient approach. Blender ofers a nice solution todo this problem. Using the compositor with nodes, we can render the scene múltiple times. Each rendering would be a diferent Lamp with the object. Those result can be mixed together in the compositor node.
Th rouge utilizing the RGB curve we can turn each Lamp on or of. With an input color, we could Even color a Lamp After rendering. All we ned todo do now is play with the curves until the desired result is achieved. This is a very quik and instant bien todo explore rendering. You can give all lamps the energy value of 1 - Th rouge the RGB curve we can lower or increase the amount of energy afterwards.
Alos Simply give the Lamp a white color since we can change that color with the use of an RGB input node. The RGB curve can be used as a linear tool or similar.
Other nice utilities would be the defocus node for Depth of Field and making use of render passes like a shadow, Diffuse, Specular pass and save those into sepárate image files. In Photoshop they can be modified elements added or removed and than composed together into a final rendering. Small problems in rendering are more eficiently removed in a Paint programa than redoing the rendering.
Of course is it desirable todo do god render in the first place. But sometimes you have todo faq it. And isnt CG all about faquíng any way.
by clas Eicke Kuhnen. www.blenderart.org.
×
 Lo primero
+ Preguntar sobre
Lo primero
+ Preguntar sobre
Configuración
Mi perfil
Contacto
Mail al administrador
- Animación y Rigging
- Errores de programa
- Hardware
- Iluminación
- Impresoras 3D
- Modelado
- Partículas y Dinámicas
- Plugins
- Postproducción
- Render y Cámaras
- Script
- Texturas y Materiales
- Videojuegos
Configuración
Mi perfil
Contacto
Mail al administrador


 Citar
Citar