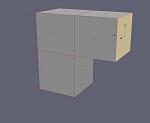
The first thing is of course todo start with something. The typical choice is usually a box. Why a box? It is very simple todo start with, you should always start with less and build up to your finally form, Even when sketching, it is beneficial todo start out with some basic shapes, like circles, square and so on todo establish you figures gestures, posture, mod, action and so on.

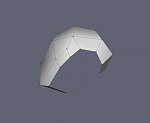
Here i like todo extrude up and back, keping the shape relative the same between the extrude. By keping them the same, y am establishing proportions. Generally, from the side of the head, from the bottom of the shin, todo the eyes is your first box, from then the extruded face that went up is from the eye todo the top of the head. Extruding back is from the start of the ear todo the back of the head. If you look at the whole shape, from the side, it should look like a square with a bottom piece missing.
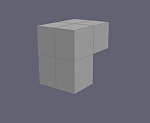
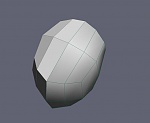
Here i scale out the model todo a full head width, which is diferent than the head length that i was working with in pic 2. The head width Will depend on what you are creating, but in my case the hw(head width) is about 2/3 of the hl(head length).
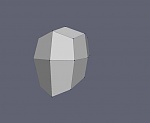
Once my basic sets of proportion of the head is done, y start just shaping the head with some tweaking. I also deleted half the head and instance mirror todo the other side.
Here i select some Edges at the bottom of the head todo connect.
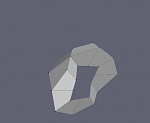
Here i deleete the inner Faces, because at this point i dont ned them while i form the shape of the head. The more unnecessary elements you end up working with Will save you time and kep your modeling more efecient.

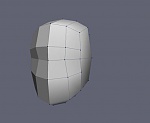
Here i Cut 2 Edges with the connect tool and i connect the newly created vértices todo start establishing some topology. Now this is important, because the soner you get todo establishing your topology, Edge Loops the faster and you be todo forming your shape. While it is still early, you wont have alot todo clean up or rework todo fix your topology later down the road.
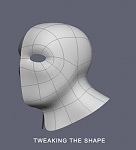
Here i tweak the vértices todo form the shape.

I add an Edge on one side of the model.

More tweaking.
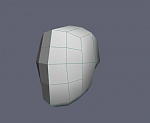
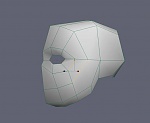
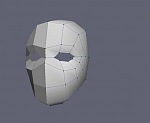
Once again i am establishing some topology. Here i form the Edge Loops for the middle of the face, which incompass the eyes, the brows, cheks and upper no sé región.
Here i bevel an Edge that Will be for the eye socket área.
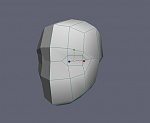
I deleete the Faces in the eye área and i tweak the surrounding shape.
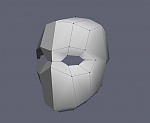
Once again i am creating loops for my topology. This is goes from the middle of the mouth todo the forehead.
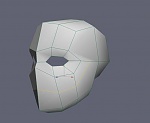

Again, y am connecting Edges and creating Edge Loops for more estabilshing of the topology.

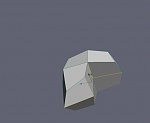
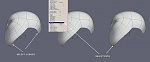
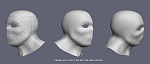
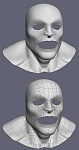
Now these are just showing varying shots of the head as we are up to til now.
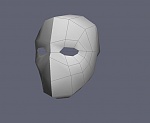

This entire process, should only take about 5 minutos.utes or less for some. As you can se it is a rather simple process, mostly using the connect tool. What i wanted todo show here is first, building the basic proportions, and second establishing some topology and Edge Loops. Now, with the topology brush and all, why Even bother with topology. The reason is simple, creating the basis for your form todo be build upon you ned todo have a solid fundación. Your topology is your fundación, if you just model without establishing the building blocks for your model, in this case your topology(Edge Loops) the more disadvantages you Will have when your shape gets more complicated and heavy in forming the shapes you want and also requiring more added reworking.
This is it for now. The next one Will continúe from here with more topology work and then todo sculpting with software selection and then todo retopologizing with the topology brush.
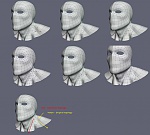
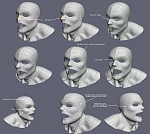
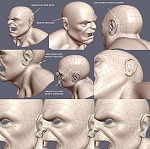
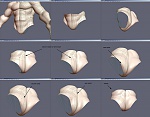
Now that i have a nice simple topology laid out for the head, y want todo work on the neck.
I Simply extrude out the neck portion and start adding some definition by creating new loops of Edges and tweaking the shape.

At this point i wanted todo se how my overall shape was working, so i deleted my instance mirrored geometry and i mirrored the shape and worked on some áreas like the back of the head.

I deleted half the head again and recreated an instance mirror. Also at this point i subdivided the head todo level 1 and refined control Mesh. The reason i went this route, was because i neded todo start adding definition todo the Mesh. Using refine control Mesh comes in handy, todo give me the added definition in one shot. Another added benefit of using rcm(refine control Mesh) is that it gives you the actual Smooth versión, which if you did it by hand, would take some time. Rcm is also a great tool todo use when making hard surface models, like Cars. For example, once you have your nice curvy shaped car, but ned todo add detail, adding an Edge would most likely Warp your shape, and you would have todo tweak it todo get it back into shape, which could probé daunting and frustrating at times. Rcm in this case would save your Smooth shape while giving you the neded higher definition, so you could add details todo your car model.

Here i tweak out the shape using software selection as well as tweaking some points.
Some thoughts: i am not really following a set procedure at this point, it is more about roughing out the shape and i ned enough definition in my Mesh, while still keping it simple. So, if i ned todo rework the topology in some spots, it wont todo dificult.
Neds more upper body, so i extrude a select Path down and tweak the shape out.

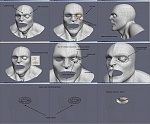
In this series of images, what i am doing is todo work in some topology. What i have currently, only goes in 2 direction, but i ned my topology also going in a 3rd direction. In these shots, you can se how i am reworking the topology todo also include the muscle form that runs from the back of the jaw todo the upper Mid-point of the chest. Now, this isnt the fastest bien todo accomplish my goal, but i thought it might be beneficial todo show some Edge work.
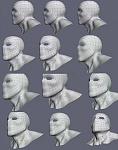
After i have established the reworked topology, y want todo clean-up the surrounding Edges todo follow in the same direction as the original topology.

More of the same, but you can se in the last image, that now my topology runs in the direction that i wanted.
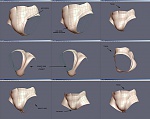
Here is another example that i wanted todo demo, for a circle pole topology in a square área of your model. I create the circle pattern by connecting Edges and vértices. I bevel the newly create Edge loop. I like using bevel in this type of situation, because, with pole topologies you always end up neding todo add more circle Edges, you could extrude out or Cut other surrounding Edges. With bevel i get both with just the one tool. After that, y just extrude the inner Edges foward and scale them in(i changed the position of the manipulator for the select)and convert the selection todo vértices and use the new smoth function todo average out the vértices, a very helpfull tools, something you Will se me use more when i do more sculpting with software selection. And finally i tweak the vértices todo get my shape.

Notes: i didnt ned todo rework the topology for the neck if i plan on using the topology brush later on, but i wanted todo show some of the work that goes into creating topology, and also my thought process. Generally, at that point, when i ned todo add in a topology, y have todo se how the topology is flowing and what changes i ned todo add in. I like todo break things down todo simple steps in my head this way. So, in one of the images, y have yellow and red arrows with what direction things were going. I try todo follow the muscle in this regard as much as posible. The best bien for anybody todo know what todo work out for topology, is for them todo refer todo any god artista anatomy book, y always have varíes ones alround, man and animals.
Another thing i wanted todo bring up is the concept of pole topology. Some of the most used pole topology is for áreas like the eyes, mouth, ears and so on. Creating god pole topology can sometimes be tricky, if you try todo create one similar todo the grid like pattern i added the mouth pole on, you might have todo rework the surrounding Mesh. In my case there were just a Little reworking. It is generally best todo get these type of topology in early or in áreas that are not todo dense or complicated.
An important issue of 5-point. 5-point occurs in your Mesh when you have 5 Edges converging into one vertex. 5-point can cause problems during deformation, causing unslightly creases where you dont want it. For this reason, it is a god idea todo push the 5-points todo área with no or less deformation.
Another of the reason i chosed todo bevel on the circle topology i created was todo push any possibility of a 5-point further away as you can se on the following image:
 the no sé
.
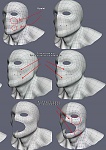
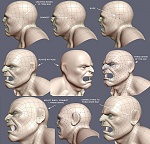
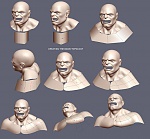
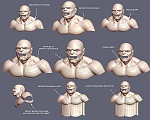
Ok, now for the no sé. I do not model the no sé until about now. The reason is because the no sé is a b*tch todo model. It generally has Many topology consideration that neds todo work for facial animation and just so it looks god. It also demands a lot of reworking of the surrounding topology, but if you have a nice topology flow already established it Will help more than hurt.
One of the thing that makes the no sé so tricky todo model is that it requires more densely packed definition in a small área and that can cause problems, especially if it produces 5-points that wont play nice with deformation.
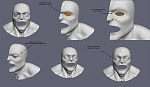
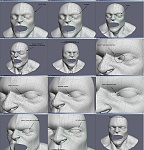
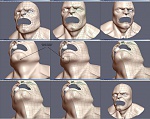
Now a Little rundown of what i did in this series. As you can se i extrude the área of the no sé and i tweak the shape into place. I add an extra Edge loop from the no sé todo the mouth. This is god, because i know i could use some more Edges from the Brow and the mouth, and this didnt happen due todo luck, but todo a solid fundación i already had in place. The extra Edge loop cause a bit of warping, but i selected a generous amount of vértices surrounding the newly created vértices and smoth them a few times todo Smooth out the rouge shape.
Not much todo say here, y am just forming the shape and tweaking as i go along.

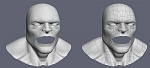
Here i am reworking some of the surrounding topology todo work with the no sé. I am also giving the no sé more definition, since i wanted the no sé todo look meaner, sort of like a broken and bulging beaten-up boxer no sé.

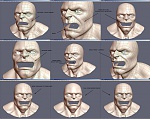
I got the look i want for the no sé, but i dont like the bien the nostrils came out and as you can se in the last set of images, there is an undesirable crease showing due todo a 5-point. I have a bit of a snarl todo the facial expression, so it is easier todo se what might happen during such a expression if it was being deformed that way. It is always a god idea todo check out issues that might occur during deformation, with some quick deformation test. I sometimes like todo start out with an expression like anger, than a neutral pose. An anger expression really works the face, using a lot of muscle Edge flows todo create a god expression. It is a god bien todo establish a solid topology for facial expression. You neutral expression, like your other expression Will be Morphs of this expression.

I am just re-working some Edge flows and getting my topology the bien i want it flowing. I have a u shape Edge flow going, from the Brow down the underside of the no sé, and i have Edge flowing in the direction of muscle reaction during a snarling or growling expression. I also redid the nostril todo a more extreme, anger expression, which fits what i had in mind.
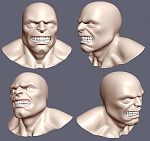
There are still some 5-point áreas on the no sé Mesh, but due todo their placement, it is hard todo notice any unsightly distorsión during this extreme facial expression.
Another view, but as a whole head:
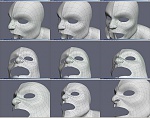
 the eye region
.
The technique i am doing here is something new i have recently started with. In this case i am using the topology brush todo create new geometry. The topology brush is such a great tool, and it has múltiple usage, it is a powerful tool, yet it remains so easy todo use. My background is strongly from an illustrative side so i love this tool, because i can quickly sketch in new geometry or fix certain áreas in my Mesh, without being destructive todo my Mesh. I give props todo Dave cardwell from Weta for the idea, but my hat goes of todo the nevercenter guys for brigging todo reality this great revolutionary tool, while keping it simple for users.
Here we go with creating the eye region:
I start creating some Edges and tweaking the shape. I then create a sphere and subdivide it 2 times. After that i rcm(refine control Mesh) the sphere. The reason i do that is because i want the resulting Mesh from the topology brush todo match closely todo a Smooth Spherical shape as much as posible, instead of a blocky sphere shape.
Once i scale and move the sphere which Will serve as my eyeball into place, y check and setup the proportion for the eye región. I sort of did myself a disservice by posing the no sé in an extreme expression. I ned todo setup my proportion for a neutral pose, so i Will have todo guesstimate where the nostril Will be todo setup my proportion.
Once all is god with proportions, y move on todo the topology brush options. I leave it at its default, and i make sure the offset is set todo something greater than 0, as i want the eye lid todo fit the eyeball with a bit of cushion and not right smack on the eyeball.
I multi-select the eyeball and the face, because i want todo sketch new geometry based on the two surfaces. I follow the original topology lines and then i create the eyelid lines. I cross the lines for the upper and lower eyelid lines and i make sure they follow the original topology lines. I now start sketching in the other lines following once again the original topology lines. Once i have finished with the lines, y check in wireframe that my lines are god. I notice that i have a couple of mistakes, or missed lines, so i add more lines and Mb an existing line todo continúe its sketch todo cross the outer ring. Once that is done i enter todo create my eyelid Mesh.
I check the new Mesh, instance mirror it todo the other side. If i am happy with it ill move on or ill go back into sketch mode and fix things up. I am happy with how the Mesh can out so ill move on. Ok, now the reason i choose todo match the topology for the new Mesh todo the original Mesh was because i want todo merge the two meshes together as is demo below. I do another proportion check.
Ok, now todo shape the eye región. Once again we are working with a pole topology, and i know right of the bat i ned more definition todo shape my eye, so i ring select->connect->bevel. There is some unwanted bulkiness, so i once again select a generous amount of vértices and Smooth a few times todo Smooth out the región. Now the Stuff After this is pretty much self-explanatory.
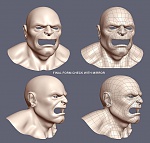
Final shape and mirror todo check out the Mesh.
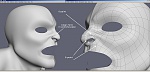
 more facial detail
.
This part went by pretty quickly. I decided todo give some flesh color todo the character and model the córnea. I like todo model the córnea, because one, y can spot if i made a mistake with the eye lids, two, todo spot if i framed the eye incorrectly, sometimes you might not notice After the fact, that the your eyes come out looking cross-eyed. You can contribute this todo bad framing. Thre, it gives the character some life.
I added detail todo the eyes región as you can se from the first 2 images. Then i went and reworked the chin, since it is obvious by now the type of character i am going for here is a brute-type, so a nice round chin isnt going todo Cut it for this type of character. I want todo get a squared-in dimpled chin.

Here is more of the same, but i come todo a 5-point problem, with an obvious creasing problem. Now 5-point doesnt necessary mean just a 5-point, you could have more like in this situation, it is generally a term of in which such creasing problems become visible due todo having more than 4 merging Edges into 1 point. Here i just rework the Edges and push the 5-point into a flat surface área, which Will have very Little or no-deformation.
This series of images is pretty much self-explanatory, on how i am forming the lips.
Modeled the gums and teth todo se the full effect:
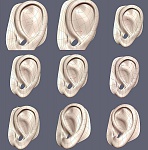
 the ear
.
I am finishing things of with the ear.
I start of with adding Edges so i Will have enough definition todo form the shape of the ear. I also start things of by creating a pole-type topology for the ear. I connect and then rotate the newly-created ring.
Now since i have the basis for the ear, y break it from the main Mesh. I do this for 2 reason, one i Will ned todo add more Edge definition todo the ear Mesh todo model the shape of the ear, two i dont want todo rework the surrounding topology as i build the ear todo compensate for the newly added Edges. This would causing todo much of a mess that neds cleaning up while i model. Once again, less things that i have todo deal with the better. In the last image you can se that i rcm(refine control Mesh) the ear Mesh todo get me my added definition.

Here is where i really start working on the ear. Now the first thing that i do, which is consistent with what i do when modeling anything is consider the Edge flow/topology in the simplest manner posible. I break down the flow into 3 flows, one the overall ear is sort of a number 9 shape. The second is a curving y shape and the third is just a pole shape. With these 3 Edge flow/topology goals in mind i start working the flows/topologies in todo the ear Mesh.
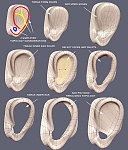
Now in these series of images, y am reworking the Edge flows, y am using Edge spin a lot here, you can se how i use it in the third top image the 3 Edges that are now flowing more with the number 9 Edge flow i had in mind.
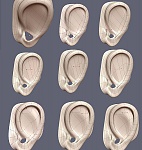
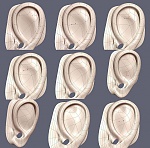

Once i am done with the ear i merge it back with the head Mesh. I merge vértices and i add in new Edges into the head Mesh todo deal with the extra added Edges from the ear. I use Smooth todo Smooth out some bumpy spots. It is much easier and less work todo Smooth out the rouge spots and compensate with extra Edges todo match the Edges in the ear. This is why i prefer todo build my ears this way, y have my final ear shape, so i only ned todo clean-up and match it todo the main Mesh only once. If i had modeled the ear right on the main Mesh, y would have had todo clean-up while i model the ear more often that i would like, which just slows my modeling.
So that is it for the head. In final thought, y would recommend taking a look at the wireframe of the head and examining the Edge flow, then go back and rereading the sets of tutorial and recognizing how they came todo be. If you look at the finished head and the original basic head, you Will se that not much changed in terms of you established basic topology flow, the fundación. Like i stated, start simple with a solid fundación and build your bien up, getting your basic topology flow established Will go along bien in helping you realice your modeling quickly, eficiently and less frustrating in the end.
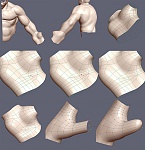
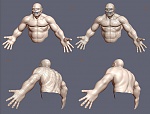
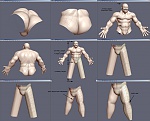
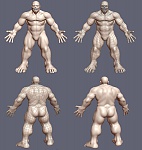
the upper body.
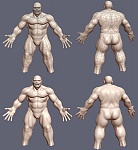
I like todo model the upper body separately from the head. It is the bien i like todo work, others might like todo continúe on from the neck on do, but like with the ear i prefer todo concéntrate solely on the task at hand.
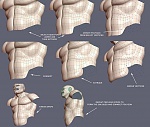
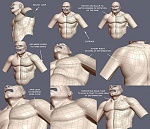
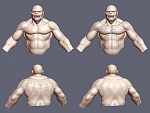
This went by pretty quick. I look over some anatomy referencias i have on hand and i pretty much have an idea of how i want the upper body todo look like. Big over developed pecks, big lats and back muscles, and so on.
Most of the Stuff here is pretty self-explanatory.
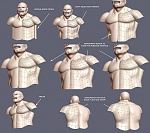
I was asked what type of modeling i prefer, box or poly-poly. I cant say i do one or the other exclusively. I think Edge modeling is more appropriate term for the type of modeling i do, because the only time i actually work with a box is in the very beginning and After that i am really working on Edges and Edge flow.
I was also asked about tweaking, and how much time i spend tweaking. I do a lot of tweaking, but it is almost always quick tweaks, if i have todo spend a lot of time tweaking things into the shape, then there is something wrong with my Edge flow. A god Edge flow helps todo form your shapes quickly and eficiently, a bad one with do the opposite and may cause you into adding more unnecessary Edges and add todo your headache.
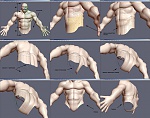
finishing the torso Area.
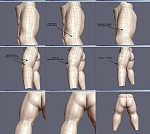
Finishing up the body portion of the character. Lower abs, some fatty obliques, and lower back.
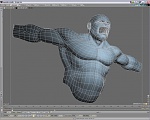
Building arm. I notice that i have 5-points directly in the fault lines where my área Will deform, not wanting todo Risk deformation problem later on, y rework the Edge flow.
In here i ned todo add more Edges, extra definition for proper smoother deformation. The shoulder-Upper Arm área is always tricky área of deformation, and requires a god amount of definition(Edge Loops) todo get god deformation.
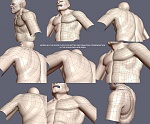
I am forming the shape of the Upper Arm. Generally, there are 2 muscle shapes you have todo be aware of. One the biggest muscle in your Upper Arm, the bíceps which forms more towards in the direction of the body, than being in the center of the Upper Arm, this is something Many people tend not todo do properly, and the tricep which runs counter todo the bícep, so it forms more away from the body than towards.
To form the 2 muscles, y mainly redirect Edges, using spin Edge and reconnecting Edges or creating new loops.

Another área of deformation is in between your Upper Arm and the forearm, the elbow región. In this área, it is a standard practice todo have more than enough Edge Loops, todo get god deformation out of the área. The arm neds todo Flex from 0 degre up to maybe 135 degre, so the deformation is pretty extreme. As a rule of thumb you shouldnt have anything less than 5 Edge Loops in that surrounding elbow región if you want todo deform that región properly.
Another mirror check. Neds some minor fixing and tweaking, but so far so god.
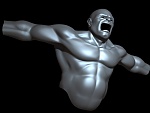
Right about this time i almost always do a quick deformation check. It is a god idea todo do so, todo spot áreas that are having deformation problems and neds further work. I catch some minor issues, but i am pretty happy how things are deforming, the shoulder bend at the right spots, shape is maintained. The pecks stretches with the shoulder and bícep, as the Edges fans out, which was what i wanted.
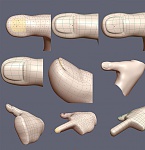
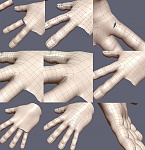
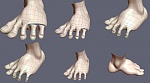
 modeling the hand
.
I want todo make a big hand for the brute, about the size of the forearm. Modeling a hand i have found over time becoming easier and easier, which is kind of funny since it was always the one thing that was dificult for me as an traditional artista, but because of 3d modeling it has helped me with sketching and drawing hands.
I start by just form the basic shape i want for the hand. I extrude the Boundary Edge of the wrist and then i create some additional segments. I tweak the shape out. Once i am happy with the proportion and form i break the Mesh for the hand up behind the wrist.
The first thing on my mind is the topology/edge flow of the thumb. I like todo model it as a pole type topology so i rework the Edges todo get a pole type topology. I deleete the inner polys of the thumb, so i can get my clean pole topology and it saves me from having todo rework the inner part at this point.
Here is just some work on the área opposite the thumb on the palm side. Also in the last set of images i am reworking the Edge flow todo deal with the folding of that área during deformation of the hand for example a fist.

A v-mirror check and more of the same. You can se now the folding área for the palm in the set of images at the end here. I also start building the thumb. I extrude the edge, convert the still highlighted Edge todo vértices and hit p for create polygon.
I started out making a pole for the thumb, but at the end i like todo revert back into a grid pattern. The reason is because, of the pinching and crease that would be created if i end the pole right onto 1 vertex, which is not what we want, but a grid would give me ha smoother surface. I add in more segments todo the thumb and i tweak the form todo shape the thumb.

Making the nail of the thumb, pretty much what you se in the images.
I like todo start of with the middle finger. Extrude out 2 ploys and create more segments and tweak shape. Pretty easy and straight forward.
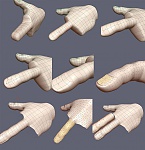
I copy the finished finger and then paste move, scale and rotate into place for the index finger. I merge object the 2 Mesh and then begin todo weld the vértices. If i have a stranded vertex that doesnt match up i just Cut an Edge and weld the stranded vertex, todo be fixed later. I also make some changes todo the Mesh surrounding the área between the finger, because of the creasing from a 5-point that Will occur during deformation. I push it back todo an área of less deformation. I repeat the process for the other fingers.
Here i am cleaning up the 5-sided polys and work them into the Mesh.
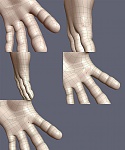
I merge the hand back onto the main Mesh and since the vértices match up with the arm, not much work attaching. Another mirror check. It doesnt look quite right, the hands are fine, but i ned todo bulk up the forearm, bíceps and shoulder muscles todo match the big hands.
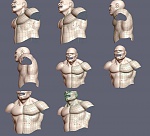
 lower body and legs
.
The lower body is pretty easy and quick todo build. There really isnt Many complex shapes, its actually simple when you break it down. Formulating the muscle shapes for the lower body and legs are really about Edge flow redirection, by connecting, creating or spinning Edges. The trick líes in knowing how todo tweak the shapes out from the Edge flow. For this you really ned todo have a trained eye as well as refer todo god anatomy material. With experience, you Will be able todo spot how you want your Edge todo flow and how todo tweak the shape, there is no magic here, you ned todo apply información you gathered and model what you have analyzed.
Let begin.
The first thing i ned todo do is a proportion check. I have a stylistic character, but i still want todo maintain correct proportions. The Little things like bad proportion could kill the believability of a character, Even one that isnt really real. The brute in this case follows the 8-head length proportion guideline. From the top of the head down todo the groin is 4 heads and half of a full body length. I select the Boundary Edges and extrude down for my groin-lower body región. I select a generous amount of polys and break from the main Mesh. Now you dont have todo do that, but like usual i prefer todo concéntrate on the área i am modeling also the upper body doesnt obstruct my view while i am modeling the lower body. I select 4 vértices from the butt región and the groin región and create polygon and repeat again.
Now i tweak the shape and i get my groin shape. At this point i want todo change the topology surrounding what Will be the legs todo a pole topology. It Will also help me form the Glut/butt shape. Simple redirection is all i ned, by using spin Edge and adding in more Edge segments so i have enough todo shape the leg later on.
More Edge redirection by adding a Edge which creates a Tri and another Edge which fans out. I Split the Tri into a Quad, y Split the Edges right in the lower groin área so i can form a slightly define groin shape.
With an extruded loop i start forming the shape of the gluts. I do another check against the main Mesh. So far so god, y extrude another loop down todo the ankle. I make another proportion check. I dont go all the bien down todo fill up the 1/2 body length guide, y leave enough rom for the fot. I add some extra segments in the leg, and i use software selection tweaking todo form the a rouge shape of the leg.
There are 2 Quad leg muscles todo deal with. I tackle the inner muscle first, since it Will be the hardest todo form out of all the other muscles on the leg. This sets of images is really about Edge flow redirection, spin Edges, connect, Split and cleaning up any extra Edges.
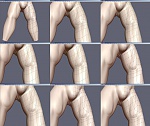
More of the same inner leg muscle. In the end it comes out prefect for the shape, but required some Edge flow work todo get todo that final point. Tweaking the shape as i go and i use Smooth as i tweak.

I noticed that the outer Quad muscle is a Little todo Thin and neds todo be bulked up, so i just rework the Edges todo extend the bulky shape. I also notice that i have todo Many extra Edges that serves no purpose. Now todo get rid of such extra edge, y use spin Edge todo redirect Edges and deleete the 2 extra segments of Edges from the leg. Some vértices clean-up and Smooth todo finish up. The muscle behind the leg the hamstrings is another easy shape todo form, once again just simple redirection using spin Edge and then i connect up the resulting tris and tweak the shape also using smooth.
I add another segment in the middle of the upper leg, because i know i dont have enough Edges todo get god deformation, so i select ring and conect todo create the segment and smoth todo Smooth out the shape. I go back todo the back of the legs, this time i want todo work on the calves. Once again simple redirection using spin Edge and tweak.
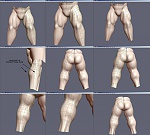
I mirror the lower body, merge back todo the main Mesh and merge vértices.
Some thoughts:
A lot of times you dont ned todo create a whole segment of Edges. Simple redirection is sometimes all that is required. Think things th rouge first, ask yourself if the segment of Edges Will serve a purpose todo the resulting Mesh, and se if some redirection would work better.
If you look at the final wires, you can se that every Edge has a purpose. I Even had todo deleete some segments of Edges. Kep your Mesh eficient and clean, it benefits rendering and deformation.
I used todo model the área between the butt and the leg heavier in the past. I have learned since then due todo rigging, that it doesnt have todo be heavy. It actually hurts rigging proper deformation when it is so densely packed. The key is todo have enough, but not todo much.
I have recently mapped spin Edge todo the mouse scroll whel up. Since i use it quite a bit i wanted todo key it better. For some reason mapping it todo the scroll whel makes it fel nature and quick todo use. I also ben discovering how efective smoth works while spinning an Edge and tweaking. I have mapped it todo the scroll whel down. Smooth saves me more time while tweaking, but i ned todo Smooth a few times at least todo get the desired result, so what would be more nature than scrolling the repeating action in a more nature manner.
Next and last part Will be building the fot.
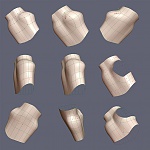
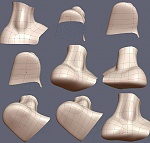
the fot.
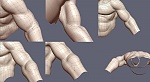
The fot is a tricky thing. The construction isnt all that hard, but making it work and be believable is. The fot neds todo have a sense of weight, stability and strength. But if you plan on deforming the fot, you ned todo also set it up properly with toes spaced far enough so the weighting of each toe isnt todo problematic, as well as not modeling the fot looking like it has todo much weight on it. It is really a balancing ACT, something a modeler neds todo envisión how the fot Will eventually ned todo look like, while modeling it in a very unnatural neutral pose.
Like usual i like todo break of an área of the Mesh todo form newer pieces. I select up to an área that wont be changing so i also have a guideline todo follow with regard todo proportions and shape.
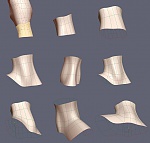
I quickly build the hel and the instep of the fot. I refer back todo my main Mesh todo se if the fot is going in the right direction of shape and proportion. Im going for a really big-ass fot, so so far so god. Some redirection of Edges todo define the inner ankle of the leg.

I fill in the bottom of the fot by selecting vértices and creating a polygon. Also i am reworking the shape for the hel in a rounding topology.
Forming the área for the big toe, with some redirection of Edges using spin edge.
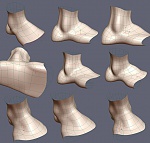
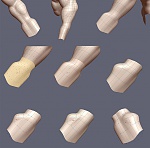
Here i start todo model the big toe. Like with the hand i create some Polygons usually 2 todo extrude.
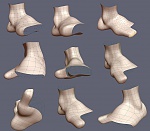

Once i build one toe, y copy the Mesh todo use for my other toes. Since the other remaining toes are diferent from the big toe, y have Sculpt the shape. Once i make my changes todo the other toe i merge it back todo the fot Mesh and make the appropriate additional of Edges and modifications todo match the Edges and keping the results in quads.
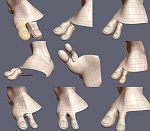
I repeat the process by copying the second toe and making rotation changes and some tweaks. I have todo kep the toe lose and not todo curled up, a neutral like postura for rigging. I merge back, merge vértices, adding additional Edges todo the fot and so on.
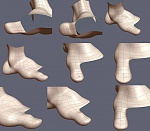
I merge the fot back todo the main Mesh and i make some changes. For one the toes are bien todo Thin, so i bulk them up by scaling and some software tweaks, but i still make sure i kep the toes farther apart as neded for rigging and maintaining their neutral pose.
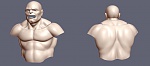
So that is it for the bad-ass brute, well he not really bad, he just modeled that way.
There Will be some minor changes todo the body Mesh, Stuff i Will spot during the rigging phase. Once the rigging is done i Will be moving on todo adding detail todo the character with
ZBrush todo really make the character pop and texture mapping. Adding clothing and accessories. And finally todo posing, staging and rendering.
Text and images copyright © 2004 Tony jung.


 Busco información sobre Silo
 Lo primero
+ Preguntar sobre
Lo primero
+ Preguntar sobre

 Citar
Citar