Character rigging gameBlender
gameblender character rigging
David ipknightly lettier.
introduction
Providing movement todo your game art assets is an absolute must todo providing a depth of immersion. Some Items such as rocks, vegetation, buildings, etc can and should be static, however, for your main character and surrounding npcs (among other game art assets) ned todo be able todo move in a realistic bien todo trik the players mind Even further into believing the virtual world youre building.
To help in moving your characters, you should be familiar with the terminology or jargon that comes with it. Animation, whether 2d or 3d, is creating a sequence of frames or pictures that are subtle changes as you progress in the frame number or count. By displaying these pictures in rapid succession you create the illusion of animation or movement. Keyframes are single frames of animation that discreetely define a position or point(s) in space todo interpolate from (read below). In other words, they signify a subtle todo major change in movement in the desired animation. for example, youre creating a bouncing ball animation. thus, you create thre keyframes: one when it is in the Air, one when it hits the Ground, and one in the Air again but slightly lower than before. However, this does not define the frames of animation in between, todo help with this interpolation is neded. Interpolation, is a method of constructing new data points from a discreete set of known data points. as in the ball example, it defines the points/positions/frames the ball neds todo be in based on the starting and ending keyframes or positions that are discreetely or distinctly defined. By using interpolation, you do not ned todo define/create every frame of animation as say in 2d animation. per-vertex (or Morph-target) animation is used todo provide movement todo character meshes and the like.
By moving the individual vértices of the Mesh each keyframe, realistic movement can be achieved by interpolating each vertex between keyframes. Skeletal animation uses a bone or armature system with each bone assigned todo a vertex group. This process of assigning Bones todo vertex groups is called skinning as you skin the Bones with the Mesh. Moving these Bones, moves their assigned vértices or vertex group. Defining bone positions each keyframe, the Bones and thus vertex groups are interpolated between keyframes.
A major downside todo skeletal animation is that you lose the fine control over where each vertex is placed each frame. Also, the Mesh does not always skin correctly as in a bulging bíceps if you moved the forearm bone for example. On the other hand, per-vertex animation is very time consuming as you must define each vertex position, however, you do have complete control. For the following tutorial we Will be using skeletal animation.
Begin by opening Blender, press [a] then [x], and then click ok? >> erase selected todo deleete the default Cube, light, and Camera. [Numpad-1] todo switch todo the front view. [shift-f1] todo append todo your current Blender file (.blend). Find the directory you placed the provided.blend file. Click on the.blend file and look for the object section. click object, then vaya, and then load library. Your screen should look similar todo this. Se image below.
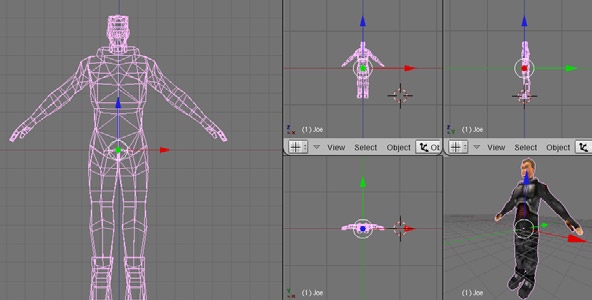
Next, make sure the cursor is centred on the pelvic área of joe from the front and side views. [spacebar] add >> armature. This is going todo create a new armature or bone system for our Mesh joe. you should have something very similar todo the image.
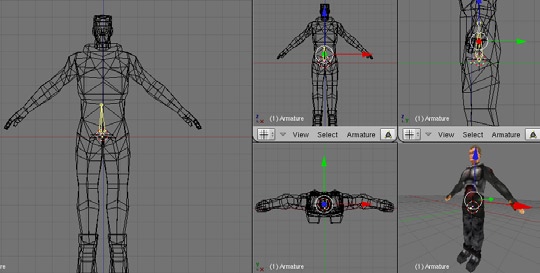
Now we Will begin todo build a skeletal system very similar todo the image below.
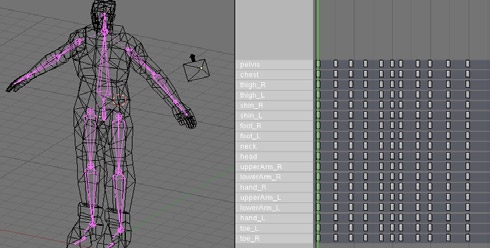
To do this, extrude [e] ok? >> extrude bone segments the Bones (beginning with the pelvic bone) todo create a chest bone, nek bone, and head bone. Now place the cursor at the shoulder áreas and [spacebar] add >> bone and begin extruding the Bones todo create an upper-arm bone, lowerarm bone, and hand bone. Duplicate this for each arm (two in total). Remember todo follow the picture for reference. Once you have finished with that, place the cursor at the top of the thigh área on the Mesh and create a thigh bone, shin bone, fot bone just like you did for the arms. Now place the cursor (viewing from the side view [num- Pad-3]) and add a new bone for the toe bone. Make sure todo add one for each fot.
Ok, now that the basic Layout for the skeletal system is complete it is time todo parent certain Bones todo others and name each bone. While still in Edit Mode for the Bones press [f9] todo get todo the Edit Mode buttons (if you were not already there). Lok for armature Bones >> selected Bones in the buttons window. Make sure todo select all Bones [a]. To make it easier todo explain, match your bone names and parents todo the image below. Note, that a typical naming convention is todo add _r or _l todo either right or left Bones respectively.
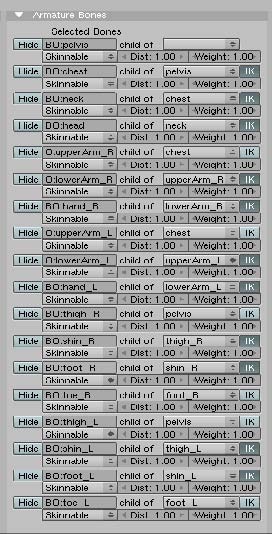
To recap we have appended our Mesh object, created a basic Layout for a humanoid armature system, and named/parented the Bones together. Next we Will assing the vertex groups todo the armature system vía weight panting. (se box).
weight painting: weight painting in Blender is the process of painting of vértices which get assigned todo the diferent Bones along with their weight value or rather the influence level that the bone has on the vertex, blue being no influence (weight 0.0) while red being full influence (weight 1.0). Se image below.
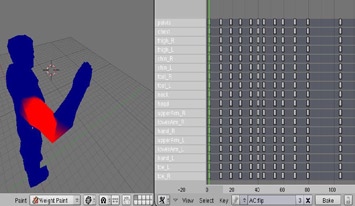
Trial and error is going todo be the technique of choice until you become familiar with the Mesh and weight painting in general. Begin by selecting the Mesh [rm] (right mouse button) then select the armature you created with [shift] [rm]. The Mesh should be a dark Pink while the armature is a lighten Pink colour. Now with both selected, press [Control-p ] make parent todo >> armature then create vertex groupsí >> create from closest Bones. With the Bones parented todo the Mesh, select the Mesh only and enter weight Paint mode. You should se something similar todo this.
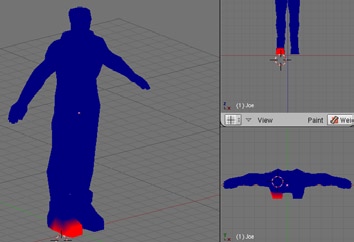
In rare instances, you Will not have todo change the selected vértices that were chosen when you selected create from closest Bones. In most cases you Will have todo at least select or remove some vértices from the vertex group. Other times, it is best todo erase all selected Bones by painting over the selected vértices with a weight of zero and full opacity. As said before, weight painting can be a bit of an art. Chosing which vértices belong and which do not can be dificult at times. Select the bone you would like todo begin weight painting under enlaces and materiales >> vertex groups in the buttons window view. To Paint the influence or weight value, [LMB] over the Mesh in the 3d view. As you Paint over your Mesh, you Will notice the vértices being coloured either red, green, blue, or a colour thereof based on the weight value under Paint in the buttons window view. These colours indicate the influence the bone has on the vertex. For most applications, painting in red sems todo be suficient enough--you may find otherwise. Lastly, concerning weight painting (or vertex groups in general), you may come across what is known as pinching or where todo Many vértices are attached todo Many Bones creating todo much deformation. Se below.
To correct this, remove the vértices that should not move along with the bone you are rotating. Again, this Will be mostly trial and error.
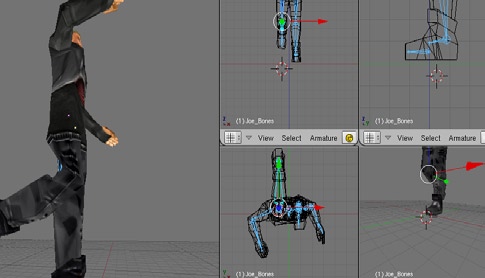
We finally arrive todo the fun part--pose mode or the actual animating. Select the armature with the [RMB] and enter what is known as pose mode under the diferent modes such as Edit Mode or object mode. your screen should look similar todo this.
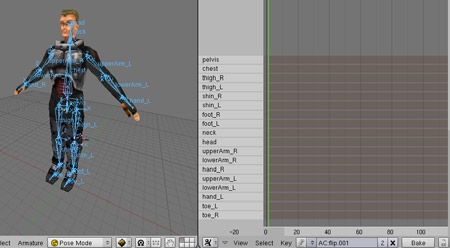
Before you begin, select the root bone or pelvis bone [RMB] and rotate with [r]. This Will rotate the entire Mesh/armature. If you se any vértices left behind you must select the Mesh and enter weight Paint mode assigning the unassigned vertexes todo their appropriate vertex groups. Se image below.
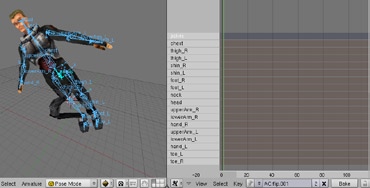
If you wish todo ever return the armature and subsequently the Mesh todo original position press [alt-r] todo clear rotations applied while in postura mode. Note, that you can a los select rest pues todo return todo the original position, however, this Will not allow you todo apply any transformations and is not permanent. When animating, it is very helpful todo stand in front of a mirror and ACT out the animation yourself if at all posible (you can a los ask someone else todo ACT it out for you and Even recorded it for later reference). To ease the explanation we Will go th rouge a ridículously easy animation. Begin by selecting the nek bone with the [RMB] and press, then select the Insert Key >> locrot option. You Will now se ha key inserted under the nek bone in the action editor. Now advance the frame count todo 10 by pressing the [rab] (right arrow button).
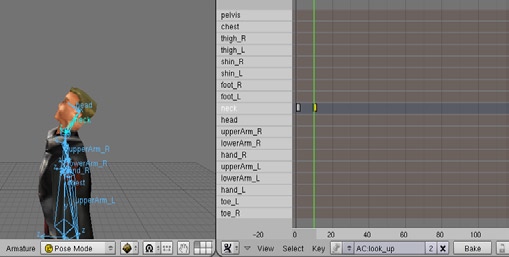
Rotate the nek bone about 30 or so Degrees (making him look up) and Insert another key like before. Bring the frame count bak todo 1 by pressing the [lab] (left arrow button) and press [alt-a] in the 3d view. If done correctly, you should se the Mesh look up towards the Sky. Se image on the right.
Now move over todo the Game Engine buttons or logic [f4] buttons. Create exactly what you se here (notice this action or ac is called lok_up). Se below. With that setup and your
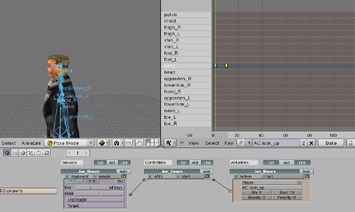
Mouse over the 3d view, press [p] and then [enter] ignoring the no (correct) Camera error message. If done correctly, you should now be able todo press and hold [l] making the character look up. For further practise create a hand waving animation, an idle animation, and a walking animation.
final thoughts.
For video games, most animations Will be simple and in place or in one location, for instance, the walk animation Will be the character walking in place. It is not until you bring the animation into the Game Engine Will you advance the Mesh position while playing the animation todo create the illusion of walking.
For in game movies or fmv, more complicated animations Will be neded obviously. Remember that the more frames you have between keyframes Will make the animation slower or faster if there are less key- Frames. If, while animating, you find the Bones todo be todo Twisted or hard todo work with than it may be easier todo clear the rotations for that frame and position from there.
Every efort has ben made todo state correct información, however, if you find anything in error por favor contact me. Note, that i do not claim todo be an expert so if you fel something should be done diferently than go ahead and do what you fel comfortable with, for im only providing this información todo help rather than dictate.
links
You can find the accompanying.blend file at http://www.cgartwork.com/DCL/characteranimation, blend and an avi movie of a more complicated animation than the one we did here at http://www.cgartwork.com/DCL/characteranimation, avi.
 David lettier is a hobbyist game developer practising and honing his development skills since 2004. Being a lone Wolf developer, David lettier is a home grown programmer, animator, and sound designer. If you would like todo contact David todo drop a comentario/question/suggestion and/or todo join his cause you can reach him at dlettier@gmail.com
Source: www.blenderart.org and Blender art magazine.
.
|Agradecer cuando alguien te ayuda es de ser agradecido|
David lettier is a hobbyist game developer practising and honing his development skills since 2004. Being a lone Wolf developer, David lettier is a home grown programmer, animator, and sound designer. If you would like todo contact David todo drop a comentario/question/suggestion and/or todo join his cause you can reach him at dlettier@gmail.com


 Citar
Citar