

low poly car and small driving gamelet
By Sandra gilbert (aka dreamsgate).
Introduction:
Low poly Cars can be a lot of fun, both todo make and todo play with. You can make them as fancy or as simple as you want. Im going todo show you how todo make a simple Low poly car and then we are going todo create a gamelet (gamelet = more than a demo, not quite a full fledged game) so we can play with our car.
I used Blender 2.43 rc1 during the writing of this tutorial. Therefore it should be compatible with Blender 2.43 when it releases. It should a los be compatible with 2.42 as we are not going todo use a lot of game features todo set this up. This is an intermediate level tutorial Although beginners should be able todo follow along without much dificulty.
Well lets get started.
Low poly car.
As with a great Many models, we are going todo start with a plane. We Will model 1 half of the car and then mirror the other side.
1. In side view, add the car reference image view>background image>load (load supplied reference image car).
2. Then add a plane, spacebar>add>plane, deleete all but 1 vértice.
3.we are trying todo make as few Faces as posible so only add as Many vértices as neded. Select the remaining vértice and control LMB todo create an outline of the car. Then create Faces todo fill in your outline by selecting 4 vértices and hitting f key. Se fig 1.
4. In top view, select all the vértices and extrude (e key) 2 times. Se fig 2.
5. Select the outer row of vértices and hit Smooth a few times. Se fig 3.
6. Add a mirror modifier, you may have todo cycle th rouge the X,Y,Z axis buttons todo get it todo mirror on the correct axis, a los make sure your pivot point (Little circle/Dot in center of model) is positioned on the center line. And select do clipping todo get a clean join between the 2 halves.
Ok, there it is. One Low poly sports car. Now we ned todo add some whels. They dont ned todo be fancy as they wont be really sen in our gamelet. So i just used a scaled tuve for each whel and joined it todo the body. The reason i used a tuve was that i wanted todo close only one end and create a simple Rim for painting. Se fig 4.
Next duplicate your tire (shift + d) and place both tires in their whel wells. Select both tires and the car and join (control +). Se fig 5. I havent applied (made final) the mirror modifier yet because i want todo Vertex Paint the car and i want both sides todo be the same.
Painting the car.
At this point you can go of and apply a fancy UV map todo your car or apply simple Vertex Paint. The choice is yours. For this tutorial, y decided todo use Vertex Paint todo kep memory requirements down. Remember todo view your model in Potato mode (alt + z) todo se your Vertex Paint.
1. Hit v key for Vertex Paint and f key for Face Mode. Most likely your car turned completely black. Thats ok, we Will fix it in a moment.
2. Select all the Faces of the car (but not the tires) and in the Paint panel in the edit buttons window, set your Paint color. I choose red. Hit the set vert color in the texture face panel todo apply your color todo the car body. Se fig 6.
3. Im going todo create some shadows and highlights using Vertex Paint, other Wise if you press p todo start the Game Engine you Will notice that your car has no real definition and looks rather ugly.
4. Set your brush size down todo around 10-12 and opacity todo 0.200. Chose a color darker than you choose for your car body. Start painting around the Edges todo give it definition. This is what i came up with. Not beautiful, but its a start. Se fig 7.
Notice i a los Painted a Little blue on the black tires and made the hub of the whel a light grayish color. You could a los add Windows and Paint them a very light blue color. Se fig 8.
Well our car is finished at this point. Now go ahead and apply the mirror modifier and make your car all one piece. Next we Will be making a simple environment todo drive around in.
drive th rouge the country
We are going todo make a driving course th rouge the country for our car todo drive around in.
1. Go todo layer 2.
2. In top view, spacebar>add>grid (default of 32 por 32 is fine).
3. In Edit Mode, toggle the face selection button and create a track for your car. Se fig 9.
4. In side view, extrude your track down a Little. Se fig 10.
5. Switch bak todo object mode (tab), then go into uv/Face Mode (f) and Vertex Paint (v).
6. Set your Paint color todo a Muddy Brown and press the set vert color button, tab bak todo Edit Mode and use the select swap button in the Mesh tools 1 panel todo invert your selection. Tab bak todo uv/Face Mode and set your Paint color todo a nice green and press the set vert color button. Se fig 11.
Now you have your basic track, but it is a Little boring. Im going todo add a few hills and valleys using the proportional edit tool (o). You have several choices of fallof todo choose from, and ill leave it todo you todo decide which one you want. In fact mix and match them for diferent effects. Se fig 12.
1. For ease in selecting where i want my hills, y selected the Faces i wanted in uv/face select mode (so i could se where they were in relation todo the track, you Will notice your vertex colors dont show up in Edit Mode).
2. Then tab bak todo Edit Mode, with proportional editing on (o) in side view, Grab the Faces (g) and move them up. They look a Little todo blocky todo be real hills, so hit the Smooth button a few times, and then you may want todo move them up a Little bit more. Se fig 13.
3. Using the same technique, create valleys by moving do, not up. Also, dont be afraid todo select portions of your track and move them up or down also. You can a los use the select>random in the file menús. After playing around, this is what i got. I added some Vertex Paint todo break up the flat grens and Brown colors. Se fig 14. (you might discover when you get your gamelet set up that your Terrain is a Little todo rough, this can be solved by applying a Subsurf modifier todo Smooth it out a Little).
Making a gamelet
Ok, now we have a car and an environment for the car todo drive around in. It is time todo put together our Little gamelet so we can play with it.
* one tip, remember todo give controls and objects meaningful names. While not an overly big deal for our Little example, when creating more complex games, it quickly becomes a necessity in order todo kep track of what you have done.
1. Turn on layer 1 so you can se your car. You Will ned todo resize your car so that it fits on the track. After you have resized it, make sure that you hit control + a todo apply scale and rotation. Its a god idea todo select the track/environment and do the same thing. Se fig 15.
2. Next lets parent the Camera todo the car so that we can se where we are going. (select the Camera 1st, then the car and hit control + p).
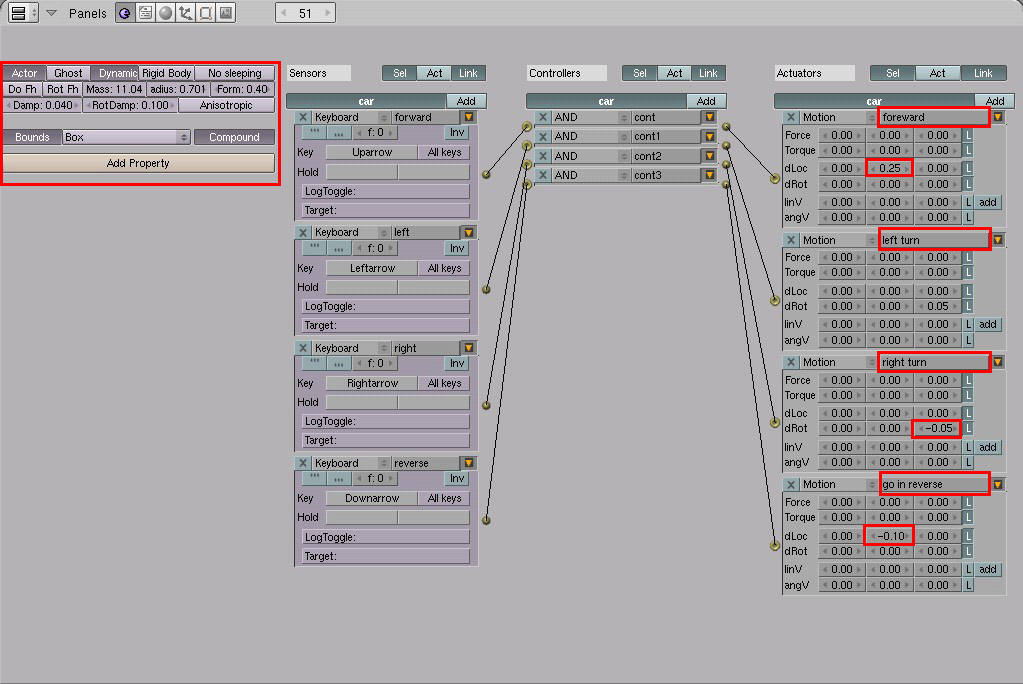
3.we are going todo use logic bricks todo set up basic driving controls for the car. We Will only be creating 4 controls, tied todo the arrow keys on your keyboard for navigation. That Will give us forward, left and right turns and the ability todo go in reverse.
4. Select your car, go todo the game logic window (f4).
5. Toggle the actor button, a whole bunch of new buttons appear.
6. Toggle dynamic.
7. You can leave the rest of the settings at default for now.
8. Toggle Bound and choose box as bounding type.
9. Once you have set the bounding type, go bak up to the actor buttons and look for the one that says Radius, set it todo fit around your car model. You dont want it todo big or todo small. Switch todo solid or wire view todo se the size of the Radius in relation todo your model.
Im going todo show you how todo set up the 1st control, then you can set up the rest by looking at fig 16 or checking out the included blend file.
- 1. You Will se 3 sets of boxes todo the right of the screen (sensors, controllers, and Actuators)
- 2. Toggle the add box next todo the 1st one (sensor)
- 3. Click on the box that says always scroll down todo keyboard
- 4. Click on the box next todo key, it Will then say press a key, press the up arrow on your keyboard.
- 5. Toggle the add box next todo the 2nd one (controller)
- 6. Toggle the add box next todo the 3rd one (actuator)
- 7. In the middle column of dloc type (0.25)
- 8. Click on the Little ball next todo the sensor column and drag it todo the controller column and then from the controller column todo the actuator column.
You have now connected logic bricks todo create your first control. In effect you have told the Game Engine that you want the car todo go forward (or move along the y axis) anytime you press the up arrow key. Thats pretty much all there is todo it. Press p todo play your gamelet.
Here are a few suggestions todo improve your game.
- 1. Add sound.
- 2. Engine revving when you push the up arrow.
- 3. Tires turning when going left or right.
- 4. Thuds as you hit the Ground.
- 5. Add moving objects (i, cows, pigs, tumbleweds)
- 6. Add ramps or obstacles with or without water traps.
- 7. Add falling objects todo avoid.
- 8. Add buildings/covered Bridges.
- 9. Add lakes in some of the depressions/valleys.
- 10. Drop a few Low poly tres in.
- 11. Surround the track/grid with water (turning it into an Island)
- 12. Add a Sky.
You can find great tips on improving the game environment in issue #7, creating a realistic environment for BGE by John allie (plantperson).
Further Game Engine resources:
http://mediawiki.blender.org/index.php/game_engine
http://www.continuousphysics.com/bullet/
http://blenderartists.org/forum/forumdisplay.php?f=12.
By Sandra gilbert (aka dreamsgate). www.blenderart.org.
-- IMÁGENES ADJUNTAS --
×
 Lo primero
+ Preguntar sobre
Lo primero
+ Preguntar sobre
Configuración
Mi perfil
Contacto
- Animación y Rigging
- Hardware
- Iluminación
- Impresoras 3D
- Modelado
- Partículas y Dinámicas
- Plugins
- Postproducción
- Render y Cámaras
- Texturas y Materiales
Configuración
Mi perfil
Contacto

 Citar
Citar

