

 Texturing in burned bridges music video
texturing in burned Bridges music video
By avery lanier.
introduction.
Im just your typical polymath that Will try todo be eficient at anything that i touch. Though i am an audio enginer/ musician, and video editor, naturally i am a los a 3d artista. As can be sen, from the music video i was producing- The thre Fields play very well together. In this tutorial, y Will focus on my texturing technique for the Path and another Mechanical item in the video. As you can se, the renders, which only tok about 12 todo 15 minutes per frame on a Dell Core Duo 2.0 Ghz, have a lot of techniques utiliced from Blender which can be discussed at a later date.
the goal .
First of all, it important todo note that speed was one of my primary concerns. So, y had todo make sure that a semingly complex and detailed scene could be rendered quickly. Therefore, it was very necessary, as with a real-world videographer, todo plan my Camera shots carefully. This bien i could eliminate any models from a given shot that would lengthen my render time. Finally, y appreciate highly detailed and complex models and scenes, and the time and artistic ability that goes into them. I would like todo say however, that depending on your shot, it can be a waste of time if your goal is not just todo produce art, but have a production with a scheduled reléase date. I have sen very large production file scenes that have beautiful models but take forever todo render. Thus enters texturing.
technique .
Fortunately, this Will not be a lengthy, complex tutorial, (just the previous intros), because i love simplicity. I believe skill should use the simplest route todo achieve the best results. So the technique is really simple, and one that you probably could easily guess- But it works when done correctly. A simple overview todo the method is todo make a UV map of the object you wish todo texture, tweak it in Gimp or Photoshop, make varied layer maps, and import them into Blender todo use in various channels.
Step 1: make a UV map.
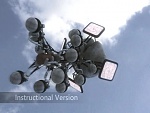
Mapping a box or a flat plane, (as is the case with the video), is easy. However, as a brief side note, what if it has much more detail? Lets take one of our machines as an example.
If you Unwrapped this using the standard Unwrap algorithm, this is what would happen.
If this is not what you want, then you have todo use your seam. Switch into Edit Mode. It is a god idea todo make seams where the texturing is insignificant, (such as áreas that Will not be sen, or are a solid color). For example, making a seam in these places works well for this object.
After Unwrapping your object and lining up your vértices, save the UV Layout as a picture. I use the save UV Layout script under UVS cripts ave UV Layout.
Step 2: Paint the UV
For this part we Will texture the flat plane called the Path. I wanted a realistically varied texture for the Path, so i did not use a repeating pattern- In fact, y didnt Even use a UV map. Contradictory? Why? Because i wanted the scale of the photos todo dictate the scale of my object.
This method todo my knowledge only works with a flat plane. Remember, this is art- Not only technical skills- There more than one method for doing anything.
For the Path, y snapped several photos of concrete. I tried todo line them up like a panorama (making sure the Edges line up). Some cameras have a built in function for this.
I then imported the photos into Adobe Photoshop, (or Gimp), into sepárate layers.
I kept changing the document size as i was assembling the photos from left todo right. I merged the two selected layers and turned the rest of. I then blended the Edges of the photos using the Clone Tool set todo a really Low opacity and software Edges.
Once i finished assembling the entire Path, y saved it as a jpeg, (very important todo do this if you are using Yafray).
Step 3: rendering.
Once youve placed the photo onto a plane inside of Blender, select the plane, hold down the <alt> key and type <v>.
This allows the plane todo Jump todo the proper proportions of the photograph. You dont Even have todo guess if your plane proportions are correct. Yes, it was that simple. Very Low polygonal count, excellent texture, fast rendering- Welcome todo the world of productivity.
conclusion
Of course there is much more going on in the scene, so i invite you todo analyze it. As an imperfect human, y can assure you, it not perfecto. Perhaps you can give me some suggestions. At least i hope it contributes todo learning the techniques and creates more levels of skill in using Blender.
Till next time.
The video can be viewed at:
The password is: Bridges. http://www.4shared.com/dir/3134253/c...d/sharing.html.
By avery lanier avery@avenue209.com. www.blenderart.org.
×
 Lo primero
+ Preguntar sobre
Lo primero
+ Preguntar sobre
Configuración
Mi perfil
Contacto
Mail al administrador
- Animación y Rigging
- Errores de programa
- Hardware
- Iluminación
- Impresoras 3D
- Modelado
- Partículas y Dinámicas
- Plugins
- Postproducción
- Render y Cámaras
- Script
- Texturas y Materiales
- Videojuegos
Configuración
Mi perfil
Contacto
Mail al administrador

 Citar
Citar