

 Multi layered plastic shaders
multi Layered Plastic Shaders
By Claas Kuhnen.
Whenever you want todo create a digital material select the best objects with that surface. Images can help as well, but only with the Physical object in your hand is it posible for you todo study the interaction of light and surface in detail. And 45 Degrees above the x-axis. Select the vertex todo extrude [RMB] Snap the cursor todo the vertex [shift- constraining moves todo an axis and dimensional input works for extrusión [ rotation [r] move (Grab) [g] and scale [. However with scale you Will ned todo use a scale factor rather than a dimensional input. This is easily calculated by dividing the required finished size by the existing size of the object.
1. Basic setup:
The majority of Shaders we create and the bien they are calculated are in general comparable todo an egg Shell. The light that hits the surface, gets reflected, it does not penetrate it and Illuminate the inside. This limitation for example a los formed the expression Plastic rendering.
The current implementation of sub surface Scattering tries todo simulate the penetration of light into the volume of the model todo create proper Mass illumination, enabling marble, wax, skin, and other materiales that can be simulated in a more realistic way. However not every Plastic surface is the same. And as simple as it sounds, god Plastic Shaders can a los take quite a bit of work todo get right. Specifically when the surface finish is Layered, a lot of extra steps have todo be included todo produce a realistic shader. The material setup should be similar todo the real world counterpart.
These type of surface finishes very often have a primer layer, two effect layers with iridescent particles, and one clear lacquered finish layer. The most common and visible example is in transportation design and they are a los commonly found in both product design and jewelry design.
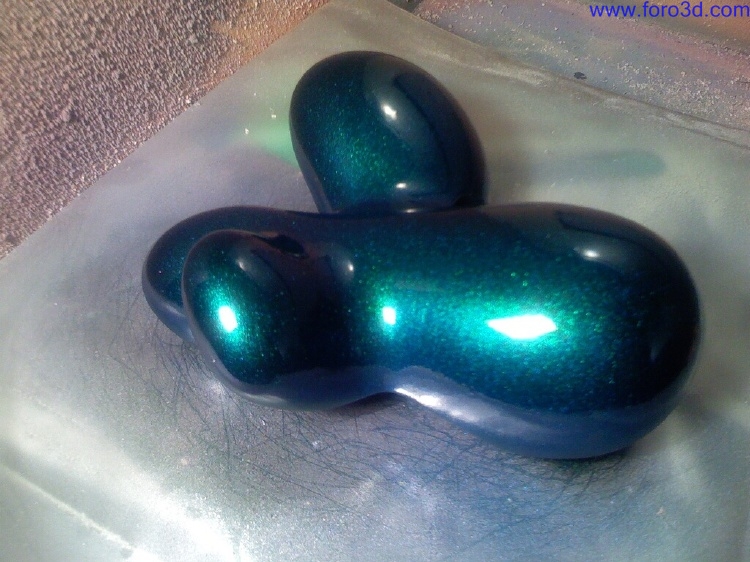
Image : work examples from phillip carrizzi jewelry work.
(More here: http://www.flickr.com/photos/optilev...66404718/show/).
As you can se in the example, we have diferent Specular reflections, we have true mirror reflections, and diferent colors. We have todo analyse this structure first todo be able todo translate it into a shader. If we break those visual elements down we would get the following Hierarchy:
Finish layer:
Translucent, high polished, with a strong Burning Specular reflection / highlight and a mirror effect with a slight Fresnel value.
Second layer:
Translucent, with iridescent particles in a specific color, producing an individual Specular reflections pattern.
Third layer:
Translucent, with iridescent particles in a specific color, producing an individual Specular reflection pattern.
Primer layer:
Opaque, basic color for the main object.
In addition todo the layering, we a los have todo look at the scene and watch for indirect and Direct Lighting diferences. For example, when you watch Cars with iridescent Shaders drive into a shadow, you Will notice that the car lacks changes. Because of a lak of Direct Light, the Specular highlights Will change, the Diffuse pattern Will change.
When you take a look at a car very closely, you Will a los notice that the Specular reflection is not just plain white. It has a nice set of rainbow colors. This, for example, is true with Many Plastic materiales when they are in Direct Light. But it is all dependent on the angle of light impact and from where you se the object. Those colored Specular reflections are very often an overloked characteristic. For example, you a los find them in brushed metal and coarsely brushed aluminum parts.
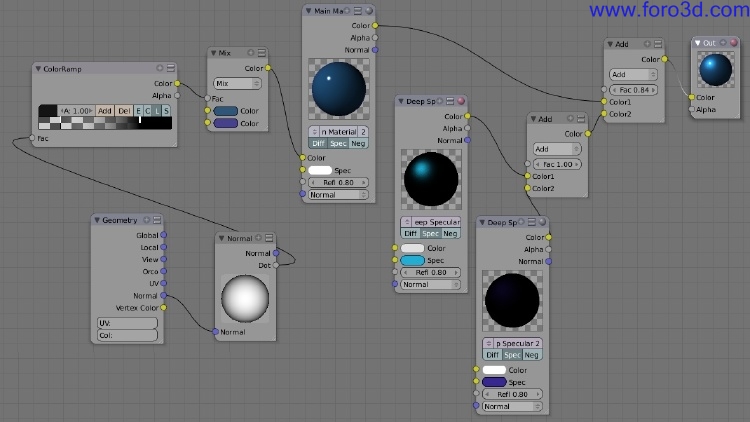
So how do we translate this into a digital shader? Lets use the material mixer. Technically we do not ned the same layer Hierarchy. The primer layer, for example, could be combined together with the mirror reflection and Burning highlight reflection. The reason why i would select the material mixer is Simply because of the flexibility todo create individual materiales and the option todo mix only Diffuse and Specular together.
In Blender this material Hierarchy could look like the following:
Main base shader:
Diffuse color value.
Specular reflection - Hard Burning.
Mirror reflection value - Very Low Fresnel set up.
Specular light model : wardiso.
First Specular shader:
No Diffuse output.
Specular reflection - Focused spread.
Color Specular - Color value set todo 0.02
Specular texture is scaled down: size 0.01
Specular light model : Blinn.
Second Specular shader:
No Diffuse output.
Specular reflection - Wide spread.
Color Specular - Color value set todo 0.02
Specular texture is scaled down to: size 0.02
Specular light model : Blinn.
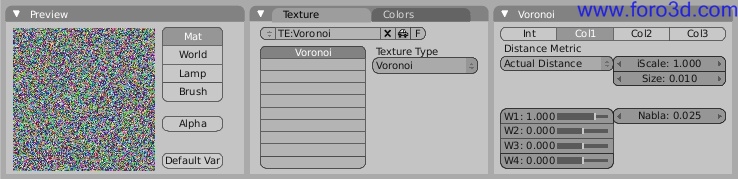
But how do we now create the pointy highlight texture? As a Specular texture, we can use the voronoi with the col1 tab selected. This texture can be used for the Bump map channel as well as the color Specular channel. The Bump map Will produce the grainy lok, the color Specular Will give the Specular reflection some color. Because we do not use any Diffuse, the Specular Will still be spread out by the texture size and normal value.
Wardiso Will produce very Sharp, hard edged reflections which are a god indicator of a well polished surface. Blinn, which has a Little less Burn quality, can be used for the iridescent particles of the following two inner layers. The Specular reflections of those two layers are less strong compared todo the top layer.
By setting the Spec value inside the material button from white todo a diferent color we can a los tint the complete Specular sparkles into a desired color, as you can se in the reference objects, the two layers have two diferent colors.
Inside the material node mixer, we combine these thre materiales together.
The two Specular reflection materiales are being added together and their color result is being added together with the main Shader material.
Add and mix produces diferent results. In our real world objects they add together. With mix you can specify if one input dominates more. Add defines how much the second channel is being added todo the first one. Here we a los deactivate the Diffuse output of the two Specular reflection materiales.
This setup should produce a rouge representation of the desired Plastic object.
Image: Blender first Specular layer material.
Image: Blender first Specular layer texture.
2. Refined settings:
Now it is time that we setup all material values correctly todo our neds. Using the material mixer, we can always quickly turn on/of complete Networks, a specific color output, or change the mixing proportions.
Looking at the reference image we can identify that the first Specular layer is very fine, is very close todo the main Burning reflection, and a los shows a similar while less strong Burn intensity. This tells us that the first Specular layer has todo be fine and not spread todo widely. It should start todo blend visually together with the main reflection and not spread todo much over the main body.
The reason for that is that the particles in the second layer sem todo be denser together and thus react more todo the incoming light. This a los means the light direction is important todo kep in mind.
In my example i set the Spec value todo 1.17, hard todo 20, and refr todo 8.27. This produced the desired shape and coverage. With the Nor value we can shape the material in a bien that the individual reflections Will stand out or blend more together. I want them todo blend a Little more together, so i use a value of Nor 0.1.
The next Specular layer, the first layer applied todo the body has a much coarser pattern. It a los spreads much more over the entire body and has a much less strong intensity. I set Spec todo 0.52, refr todo 3.47, and todo get a more spread hard todo 10.
Image: material mixing.
3. Comparison:
This produces a quite close representation. Depending on scale and view distance, we have todo adjust the texture values. However if we compare it todo the real object, we a los notice a significant diference. The spread in the digital model is todo Even. To help this it would make sense todo actually Paint the textures in Photoshop instead of using a procedural texture. We would only ned a coarse and a fine point map.
The transparent áreas in between Will allow the surrounding área todo remain transparent while keping the point size the same. Something dificult todo create when you can only use scale todo bring points closer or more far away from each other.
Additionally, it Will be very visually interesting todo a los add a software iridescent color change over the complete visible body, mainly at the object Edges. Make the color changes very software. However if we look at Phill object, we can se that there is no typical iridescent effect. The Edges are darker Simply because of the lak of glowing metal pigments. We plainly se the base color of the primed surface.
Alos kep in mind when you work from an image, that the reflection in your image is showing the environment of that shot. Of course, in that case it Will be dificult todo produce the same looking reflection in your work.
Reflections always depend on what you put your object into in terms of Physical objects around it and the light setup. If nothing is there todo reflect, then your reflections Will a los look lógically empty, which can be the case in Studio setups.
4. Indirect illumination trick:
In addition, because in nature there are no 100% dark shadows and every illuminated surface illuminates the environment, we a los have todo take this indirect illumination into account. A very simple bien todo make our model look better without using time consuming AO, is just todo utilice a filler Lamp. Next todo the speed advantage, this a los has the ability todo simulate color bleding, which Blender AO cannot produce at this point.
We can easily simulate the color bleding of the Ground color todo the object, by giving the light the same color as the Ground plane. We just ned todo place a Lamp below the Ground Mesh and let it Shine upwards.
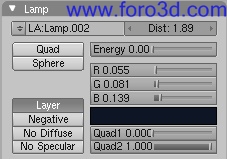
But which Lamp todo use? Sun produces perfecto linear light rays, but we cannot specify an endpoint. Point and spot are emitting light from one point. With the fall of value, we could specify where the reflected light would estop. Only the lower part of the model would receive bounced light. But we would ned todo create an array of lamps todo produce an Even illumination.
Area lights produce a nice Even illumination and with distance, we can somewhat control the fall of a Little bit. Let use the last one. With a very Low Dist value of 0.3, y place the Lamp slightly below the Ground. The more i move it away, the more the light intensity is lowered. Pléase kep in mind that in case you want todo increase the área of the Lamp use the size slider and do not scale the área Lamp. If you scale, you a los scale up the distance of the fall of.
In case you change the size value, you increase the surface from which light Will be emitted and thus the overall illumination intensity Will be diferent. Scale it down and the light rays Will be compressed and illumination intensity Will be very strong. Use the distance indicator as a reference for scaling.
Image: área light.
First, y just set a distance and then scaled the Lamp todo the right fall of result. In the following step, y did use size and energy todo get the desired área illuminated with the desired strength. Scale and Blender dimensions are the key here.
Inside the Blender scene are two cameras. One is nearly parallel todo the Ground. I use that one todo chek how well the área light is illuminating the Mesh from below. I use múltiple cameras todo quickly switch between diferent views for testing light and material settings. I prefer having individual cameras, than having todo move the Camera all the time.
In addition we could a los simulate the color bleding a Little bit here. All we ned todo do is todo create a spot light with a very software Edge and let it Shine downwards onto the flor, we have todo lower the light intensity and a los give it a color equal / darker than the body color of the Plastic. We want todo limit the Lamp todo only Illuminate the Ground plane.
For that we have todo put the Ground plane Mesh and the Lamp onto the same layer and activate the layer option for the Lamp under the Lamp buttons.
The illumination should only be a very small effect. Depending on Ground and body color the bleding effect would be more or less visible.
Again try todo always work from a reference objects. Our imagination tricks us very often.
Image: spot light layer.
Image: spot light intensity variations.
None energy: 0.00.
To much energy: 1.00
Just right energy: 0.50.
Image: spot light.
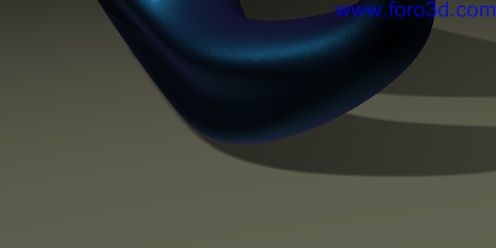
This should give you a god idea about what todo look out for. The supplied test scene for example, would require some work in the light set up.
Without a scene around it, all reflections look dark. It Even looks like there are no reflections on the object, all this Will change with some more work and actually having the bracelet relating todo an object.
Imagine a scene in which the bracelet is on an actual arm. With the reflection of the skin and the environment, it Will look very diferent.
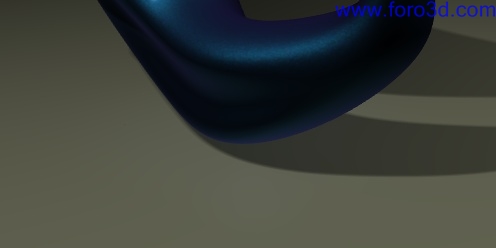
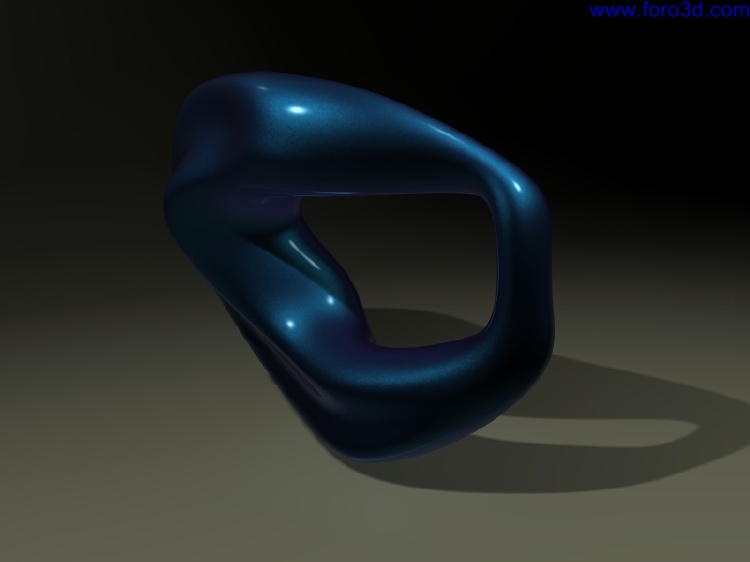
Image: finale rendering with slide Fresnel reflection value.
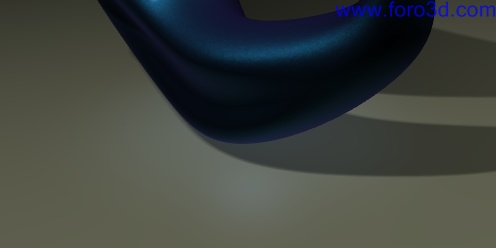
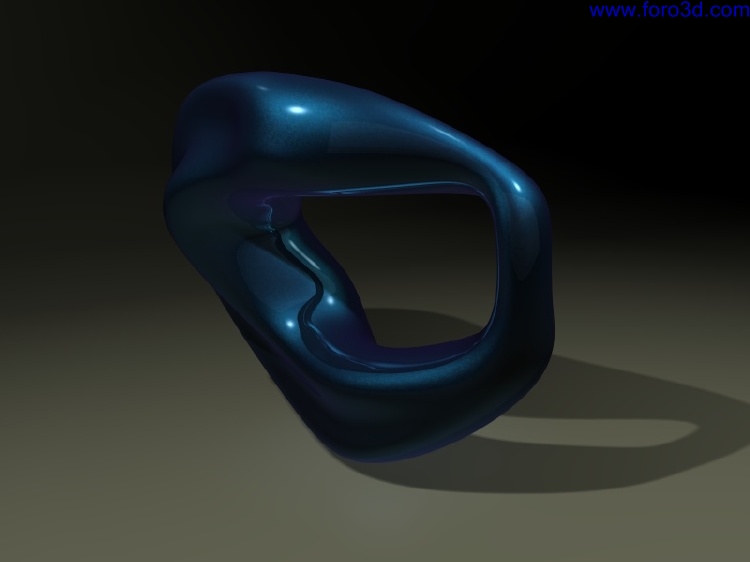
Image: finale rendering with slide and Even reflection value.
Note: the distraction inner reflection, but the nice window like reflection on the upper and right part.
Clas Eicke Kuhnen.
Mfa 3d Studio jewelry/metal Bowling green state university, usa focus in functional metal art and 3d digital art.
Dipl. Des. (fh) color - advanced color concepts Hawk university of applied Science and art, germany focus on functional graphic and product design.
After grad school i taught for one year at the university wisconsin-stout where i introduced Blender for industrial design and interior design todo students. Th rouge that exposure todo the students i focused more on researching the usability of Blender for this field.
It has increased my knowledge and Understanding todo se how Nurbs and SDS can be combined in a profesional work flow for CAD and rapid-prototyping using Blender Blender proved itself todo be actually not only quite useful but rather being a real treasure and workhorse for the design students. [URL=http://www.ckbrd.dwww.ckbrd.de[/url] |- [email=info@ckbrd.dinfo@ckbrd, de[/email]. www.blenderart.org.
×
 Lo primero
+ Preguntar sobre
Lo primero
+ Preguntar sobre
Configuración
Mi perfil
Contacto
Mail al administrador
- Animación y Rigging
- Errores de programa
- Hardware
- Iluminación
- Impresoras 3D
- Modelado
- Partículas y Dinámicas
- Plugins
- Postproducción
- Render y Cámaras
- Script
- Texturas y Materiales
- Videojuegos
Configuración
Mi perfil
Contacto
Mail al administrador


 Citar
Citar