Making of: teenage duck
making of: tenage duck.
by husam ibrahím.
introduction
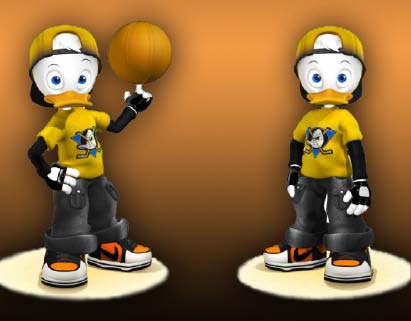
Ive always ben a big fan of donald nephews ever since i was a Little Kid. The new looks they received in quak pak and their portrayal as tenagers with distinct personalities made them cooler than ever. And now that i have laid my hands on Blender, y couldnt resist the idea of making one of them in 3d.
modeling
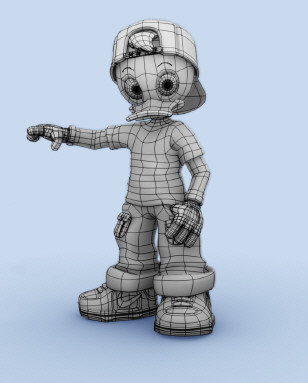
I started looking for some reference pictures of the trío on the web. Louie was the one that resembled my view of what a tenager is like the most, so i decided todo model him. I couldnt find perfectly matching front and side profiles and, todo be honest, y was todo lazy todo draw them myself. So i decided todo go with what i had. The head started out as a simple Cube, subdivided twice and converted into a sphere using the todo sphere tool in the edit buttons (f9). Then i made the eye sockets by extruding a couple of Faces inward. The beaque was modeled using a poly-by-poly approach starting from a simple plane.
The t-shirt, pants and Cap were all modeled by starting with circles, then extruding, moving and merging vértices as necessary. I then added some lopcuts [Control + r] todo the t-shirt and pants and moved the vértices todo create the Folds and wrinkles.
To model the hands, y started by making the fingers and worked my bien backward from there. Then i made a duplicate of one hand, deleted the fingers and scaled it up a bit todo make the glove. I had absolutely no idea how todo make his shoes, so i loked for some reference photos. I found some nice looking trainers from Nike, so i modeled one of them and scaled it somewhat todo give it a cartoony shape that fits the look of the character.
rigging & posing
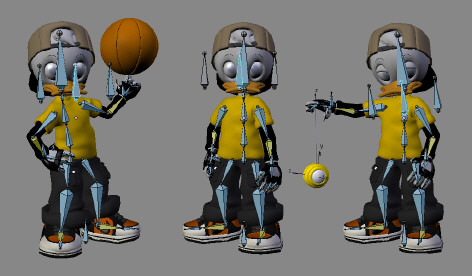
This is the part that i enjoy the most, despiste my modest rigging skills, y must say. I went for a simple Rig as i wasnt planning on animating this character at that time. The arms and legs were rigged using IK Chains. The hands were rigged in the same bien that was used in emo & prog rigs. I a los added two Bones todo function as track todo targets for the eyes.
He two Bones were parented todo a third bone that was used todo control the eyes. Since i didnt have todo cover a wide range of facial expressions, a couple of shape keys that control the position of the eyebrows were more than enough. I must admit this was one of my first complete rigs and it had Many errors that nearly drove me Nuts while posing the character.
I guess ill have todo redo this Rig when i start learning animation. I had planned since the beginning that i would put him in diferent posturas against a white background. The posturas had todo be col, show character, and have clear silhouettes that make the character instantly recognizable. I made seven diferent poses, two of which have never sen the light, as i didnt like how they turned out. Another two posturas i was told didnt look god enough, so i settled for the thre that you se in the FinalRender.
lighting
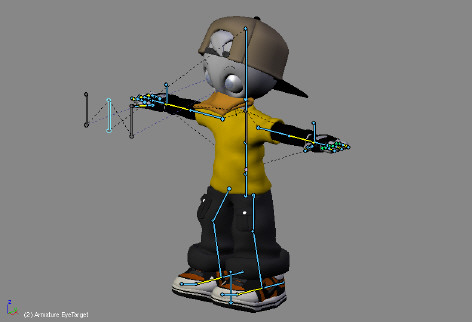
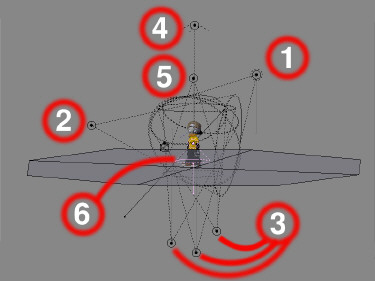
The lighting setup i used was Fairly simple. It is illustrated in fig.4:
1 key light (spot) from an upper right angle - buffer shadows enabled.
2 fill light (spot) from the left, a Little bit lower than the key light.
3 bounce lights (spots). Those were used todo simulate light rays bouncing from the Ground on the character.
4 this Hemi Light was used todo light the Ground. It had it energy level finely tuned so that the degre of white on the Ground matches the color of the background.
5 this light (spot) was used todo produce the orange spot on the Ground. Of course, the Ground was already fully lit by the Hemi Light, so a normal orange light source wouldnt work. The only bien todo produce the orange spot was todo get rid of the complementary color (blue). So this light source was negative with a blue color todo subtract the blue and leave the orange.
6 shadow only spot light todo produce the shadow on the Ground. This was important todo show that the character fet had a firm contact with the Ground.
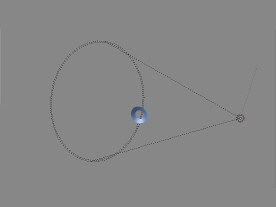
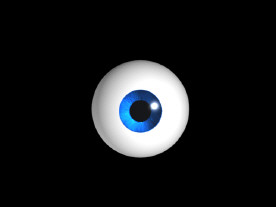
The eyes had a lighting setup of their own. They had ben modeled using the method described in the well-known creating Pixar-looking eyes in Blender tutorial (fig.5). If you like that method of making the eyes as much as i do, you must be using it and abusing it. But todo get the most of it you really ned todo pay close attention todo the lighting. Unfortunately, Blender doesnt allow assigning lights todo diferent objects, so youll just have todo use diferent layers. I separated the irises from the eyes (to do this select them in Edit Mode, hit, then choose selected) and then placed each eye and each iris on a sepárate layer.
Each eye was lit by a Hemi Light and had a spot light carefully positioned todo get a Specular highlight on the córnea. Each iris was lit by a spotlight shining from an angle todo get a nice color gradiente across the iris. This really makes it look a lot better and gives some depth todo it. Of course, you could achieve the same effect by using a blend texture mapped todo the color channel of the iris with a multiply blending mode, but controlling the light angle wouldnt be as easy. I finally parented the irises and the lights todo the eyes so that they look the same wherever they point.


materials & Shading
It was tempting at first todo se what he would look like with 3d Shading. I have todo admit it was a lousy idea. Sometimes you just have todo let the classics be the classics, if the term applies. So i decided todo use a ton Shader for his body. What i dont like about the bien people use the ton Shader in Blender is that they like todo have those Sharp transicións between lit and shaded áreas.
What people just dont sem todo realice is that they can get nice looking ton characters by the exact opposite, a highly Smooth transición between lit and shaded áreas. It a los helps if you give the Shader a medium-tohigh size value todo make the shaded área as small as posible, especially if your character is in front of a light background.
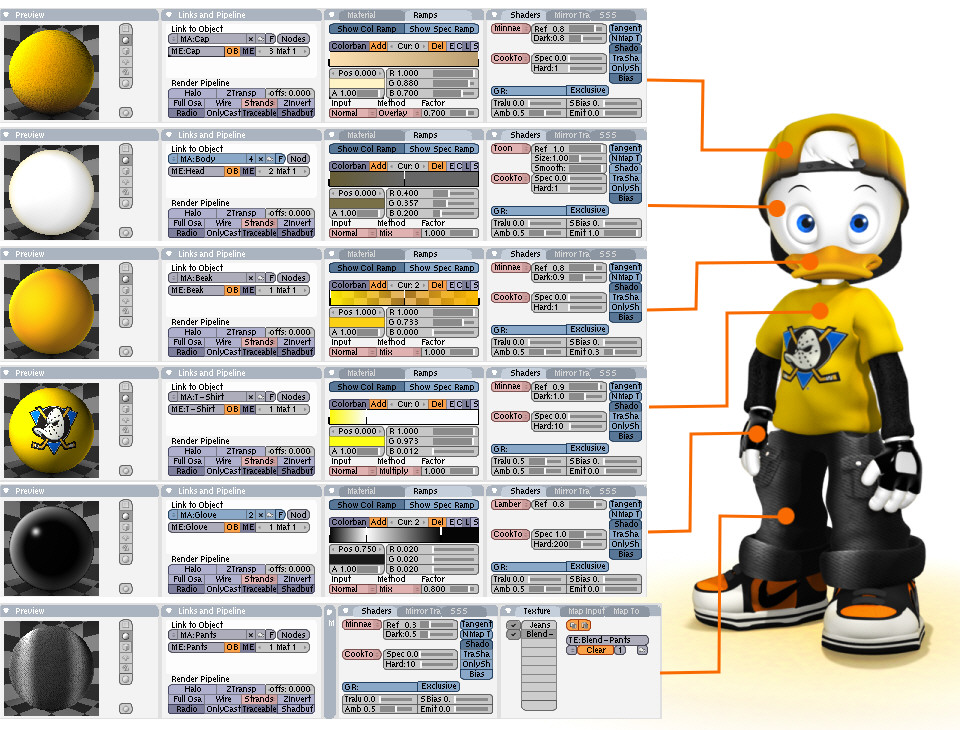
The other Shaders i used were mainly Lambert for the glove and minnaert for the Clothes and the beak. It really just a matter of playing with the settings todo se which combination works best. Nearly all the materiales i used had a Ramp shader, which gives a nice looking, Peach-like color fallof. For the body material, the Ramp Shader didnt only serve the aesthetics of the image, but it a los helped sepárate the character from the background, as they had the same color.
The only textures i used were a Jeans texture that i found on the web and the mighty ducks logotipo that you se on his chest. The logotipo neded some color adjustments so that it would match with the color of the t-shirt.
Both textures were mapped using the basic texture mapping modes available in Blender, so no UV mapping was neded. The figure below shows the material settings i used.
compositing
Not much was going on at this stage, except for an Ambient Occlusion pass i rendered todo enhance the lighting of the image, and the Motion Blur effect for the yo-yo and the basketball. It a shame that some potentially great renders fall flat just because they ned a Little bit of AO. Even if you are making a cartoony render, a Little bit of AO always helps, unless you are planning on making your render super-stylized and 2d like. But just enabling AO and rendering doesnt help very much, as it comes out multiplied and results in a grainy render, Even with a máximum number of samples.
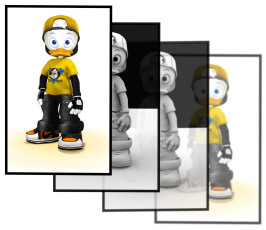
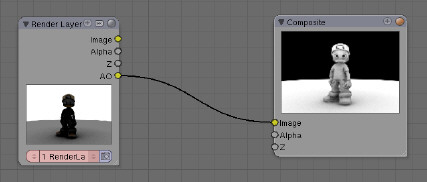
It always better todo render it as a sepárate pass and then combine it with your rendered image using the Node Editor, or your favorite 2d editing programa. To render the pass, first enable Ambient Occlusion in the world settings, then go todo your scene settings (f10) and make sure ray and do composite are enabled. Alos make sure AO is enabled in the render layers tab. Finally go todo the Node Editor, switch todo composite nodes, hit use nodes and connect the AO output of your render layer todo the composite node (fig.10).
Once you have your AO pass, try combining it with your rendered image using diferent blending modes. For this image i used two layers of AO, one set todo overlay and the other one set todo Burn. You should a los blur the pass a bit and play with the opacity todo get rid of the noise. Sometimes the AO pass can ruin your efort todo have a special lighting for the eyes of your character, so you might want todo erase that part of the pass.
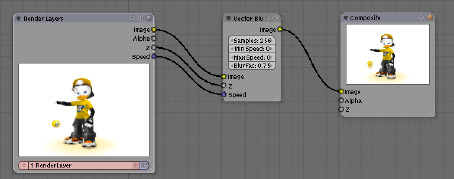
If you are using the composite nodes, youll have todo use the id mask node todo do this job. There is a fair amount of información about this node in the Blender documentation. As a final touch i added the Motion Blur effect. To do this i used Blender Vector blur node (fig.12), After animating the yo-yo and the basketball. Again, this is just a matter of playing around with the settings and the animation speed todo se which combination works best.
Well, y guess this pretty much wraps it up. I hope this making of proves somewhat helpful when the time comes and you decide todo make a cartoony character.
God Luk and happy blending everyone, husam ibrahím. www.blenderart.org
.
|Agradecer cuando alguien te ayuda es de ser agradecido|


 Citar
Citar