Creating a cartoony animation with Blender
creating a cartoony animation with Blender. By tobias dahl nielsen.

introduction .
The thing that makes a cartoon fun todo read is that they are reality*20. Cartoons are full of oversized characters that move in oversized ways, and that what makes them interesting. Another thing that important when creating cartoons, is making them easy todo read/Look At, with clear colors and Sharp shadows. This tutorial Will teach you how todo create a Little cartoony animation, using those guidelines. Happy cartooning.
Part one (animation setup and animation).
.
Note: if you just want todo apply the cartoon effect todo a scene youve already created, you can Skip todo part two..
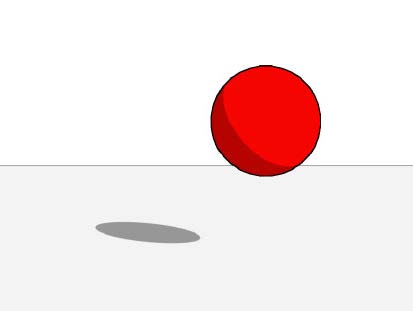
The reason ive put animation setup instead of modeling or rigging is that, todo kep it simple, well be animating a simple sphere, though the principales of animating this sphere can be used Whatever you are animating. Start by deleting the default Cube and go todo top view. Create a vSphere and go todo the edit tab and select set smooth. Then go todo front view and put the sphere just above the red line (the x-axis).
We Will use the red line as a guideline, todo show where the flor is, when we are in front view. Create a Cube, scale it down a lot, and put it on top of the sphere. The Cube Will be our rig. Select the sphere, and go todo the object tab and click add constraint and then stretch todo. Write Cube in the target field. Try moving the Cube.
The sphere should now stretch towards the Cube, while maintaining its volume (if you move the Cube far away, the sphere Will get Thin, etc). Go todo top view and create a plane. Move it around so that it just below the sphere. Go todo Camera view and scale it up until just before it exceds the clipping. Split the 3d view near the top, and change the new área todo a timeline.
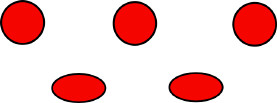
Select the Camera and press [alt-r]. Rotate the Camera 90 Degrees by the x axis, and move it, so that it just in front of the sphere. Go todo frame 0, and click the red circle button in the timeline área (this Will récord the places you put the ball). Go todo Camera view, select both the sphere and the Cube, and move them, by the x axis, todo a place just outside the Camera border. Move them both up a Little. Now were ready todo go. Move the ball up and down for every tenth frame, like shown in the picture (the first ball being frame 0, the next frame 10, and so on), and use the Cube todo smash the ball when it hits the Ground, by moving it towards the ball.

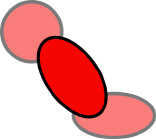
Remember todo move both the ball and the Cube. In the frames in between (5,15,25 and so on) stretch the ball, so that one end is pointing at the previous key-pose, and the other is pointing at the next, like shown in the picture. That actually the basic principales of Squash and stretch. Objects that move, stretch, objects that collide with something, Squash.

note: dont expect perfecto results the first time you try this. It may take some practice todo get god at it..
part two (materials, lighting and node setup).
Firstly, go todo the scene tab, and click the Edge button. Then click render layers and select col and sha. Those are the color and shadow passes (well ned them for the node setup). Secondly, click the button below the Word scene:, and select ad new. This Will create a new renderlayer. Then disable the buttons: solid, halo, ztra and Sky. We Will ned that for using Edge in the node setup.
materials: the materiales should Simply be clear colored, and without specularity (if you can do without it). I have chosen a clear red color for the sphere. Also, avoid ray-mirror, as it just doesnt mix with the cartoon style. The Cube should have a completely transparent material, which shouldnt be Traceable or Specular.


lighting: the lighting should consist of a single Sun Lamp, shining from the top right of the image. Note: this is just for this specific Project. You can use any lighting setup you want todo.
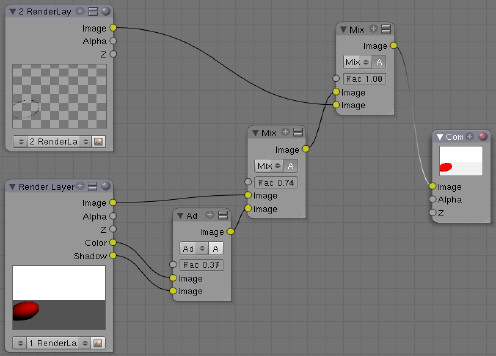
nodes: as i mentioned before, were going todo have a sepárate renderlayer for the ton edge. This is actually a work-around for a node problem i ran into, which wouldnt show the Edge in some parts of the image (the ones that were in front of the Ground, todo be exact). This is the complete node setup:
It consists of two render layers (the default one, and the one we created). We add the color and shadow passes from the first renderlayer, creating the cartoony Shading (FAC should be around 0.35). Then we mix the output from that, and the image (with alpha) todo get the Sky displayed todo (FAC around 0.74). At last we mix the output from that, with the image from the second layer (with alpha) creating the ton Edge (FAC around 1). You can play around with the FAC settings todo get just the effect you want, however, y found that this worked best for me. Make sure that you connected the diferent node the same bien i did. Now all you have todo do is todo select avi Raw (or Whatever movie format you like) under format, and click Anim. That it. Your cartoon animation is complete.

You can watch an extended versión of the animation made in this tutorial here if you have any trouble or comentarios, por favor email me at: tobiasdn@gmail.com.
By tobias dahl nielsen. www.blenderart.org.
.
|Agradecer cuando alguien te ayuda es de ser agradecido|


 Citar
Citar