

 Organic surface modeling big bobby car
big Bobby car - Organic surface modeling
By Claas Kuhnen.
Modeling an object eficiently is often a cuestión of Understanding its basic geometric shapes and imagining a wire Mesh over that surface. How far is an object a Cube, a cylinder, where could parts be extruded from, and in which order do you start working? Those questions should be asked first before any serious attempt is started because it can save the time neded todo model the surface and prevent time consuming re-tries.
The original blend file is a los accesible vía blenderart.org and includes all the following modeling steps and objects.
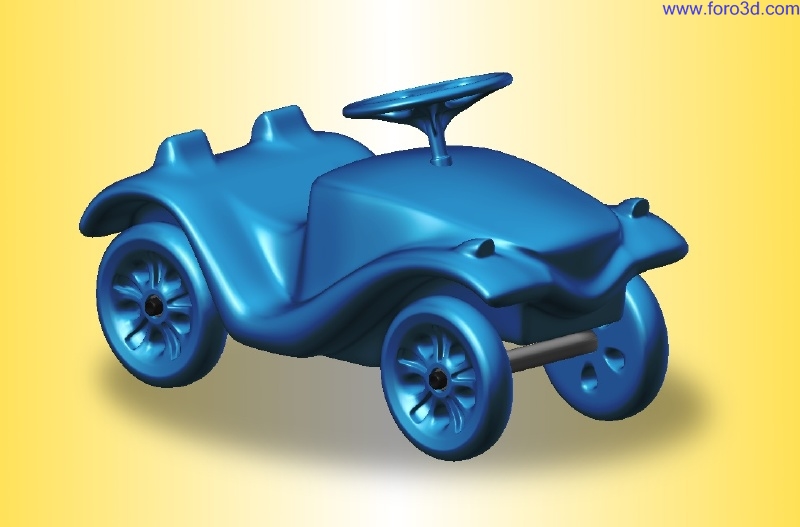
The big Bobby car was in particular a god object todo demonstrate that type of approach.
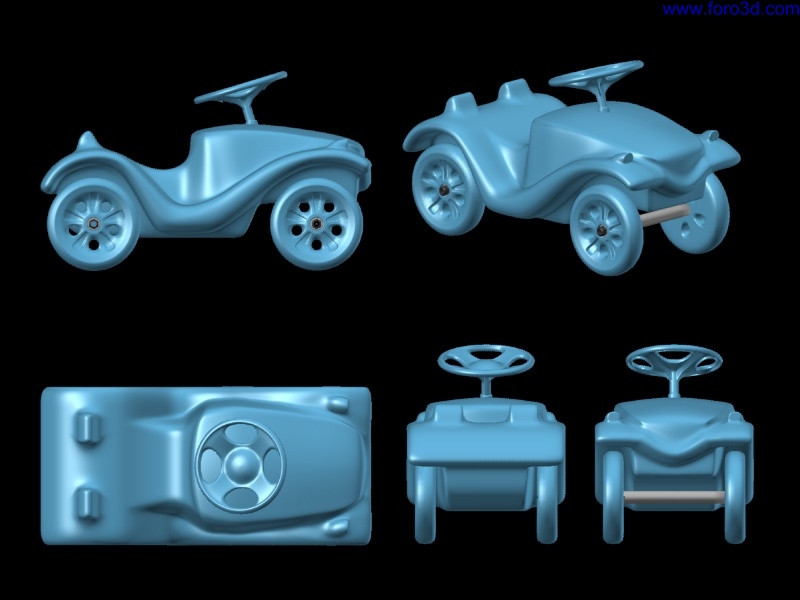
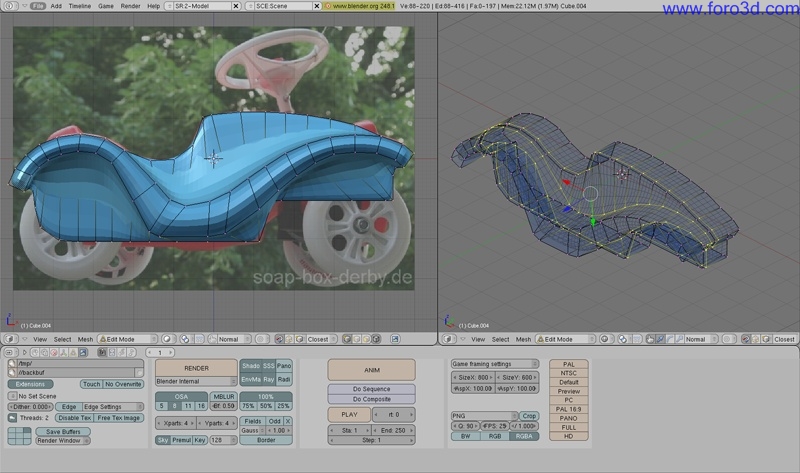
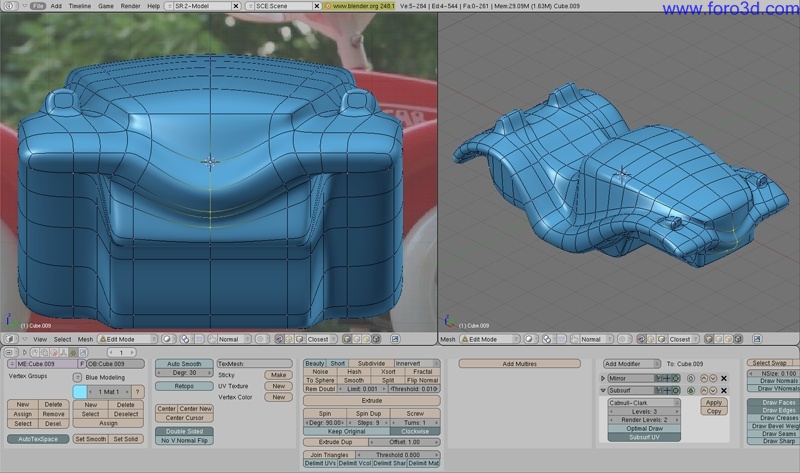
Lets look at the screenshots first and evalúate its design and curvature qualities. There are posible diferent approaches todo start this model, however i found it todo be easier todo imagine this starting with the curvy Edge shape of the Fender, extruding it in, scaling cross sections todo met the desired height for the center parts, and then finishing it up by adding loop cuts and some pushing and pulling of control points.
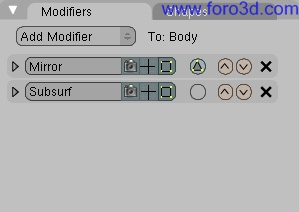
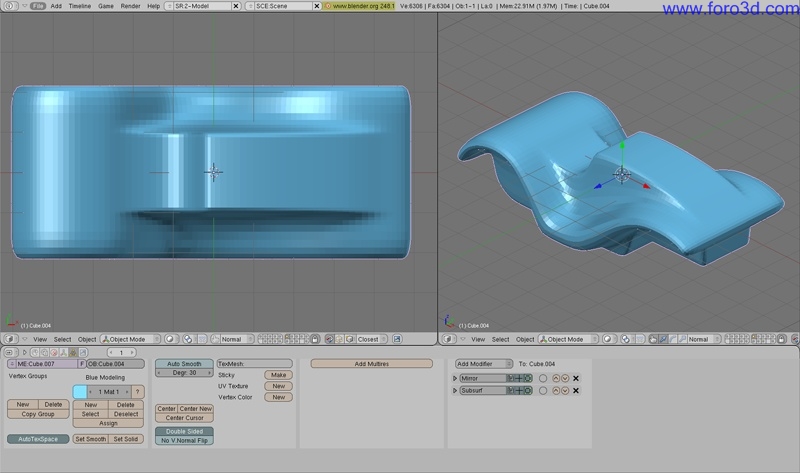
The modifier Hierarchy requirement:.
In particular i make use of the modifiers such as the mirror and Subsurface because this is a symmetrical object and this bien i only ned todo model half of it, but i can visualice it as a complete construction.
When using the modifier it is important todo understand how the internal Hierarchy works.
When you use the mirror modifier together with the Subsurf you want the mirror todo be the first one. The reason for that is the following one:
The first modifier passes the geometric result todo the following one.
This means when the mirror is the first, the Subsurf modifier Will get a solid geometry todo subdivide. Because it is a solid surface the result Will be nice and Smooth without any kinks or breaquíng Edges.
When the Subsurf is the first, the mirror modifier Will get half a model which is subdivided and Will mirror exactly that, producing a Shell which clearly shows a seam.
Modeling steps of the main body:.
Lets start with browsing some images online for the big Bobby car and find some inspirational and useful images. In an ideal situation you want todo have nice profile images.
When they are hard todo find, maybe hand sketching some designs Will help.
Alos as a small tip for making your own profile images: when using a digital Camera try todo stay as far away as posible from an object and zoom in as far as posible before making the shot, this Will create a picture with a túnel lok, where perspective distorsións are minimized compared todo standing close todo the object and using a rather wide angle which Will distort your profile shots significantly. This a los applies todo making reference shots of a human body or head.
In my scene i used a downloaded image from the internet and worked in front and perspective view at the same time - To make it easier for you todo se what happens in my scene and which steps i am executing.
Another tip before starting todo work, besides saving often, is todo actually distribute diferent stages of your models over the layers Blender has todo ofer. This bien you can first quickly go bak todo an older stage and second you can easily compare maybe 2, or 3 diferent results/stages by just browsing th rouge the respective layers.
Putting down basic details:
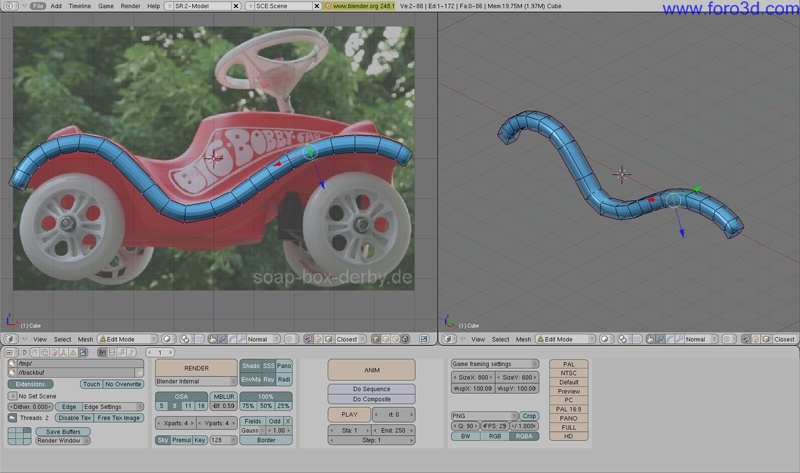
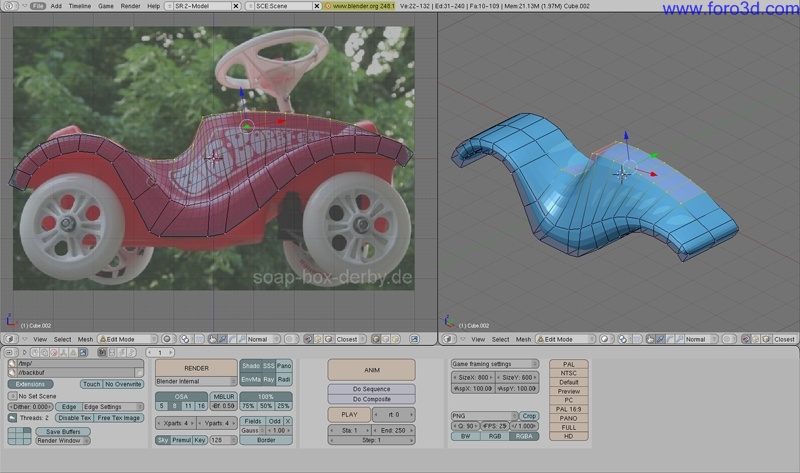
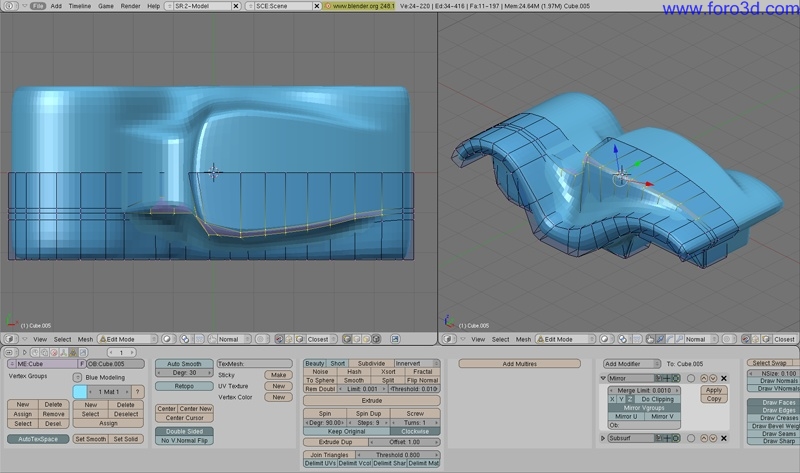
step 1
As mentioned in the beginning i found the object todo be suitable todo start modeling the curved shape of the fenders first. I started with a small Cube, rotated and moved the Mesh todo left side and started by extruding the form todo the right. After each extrusión i rotated the cross section so that it was perpendicular todo the curve surface of the Fender. I a los used the upper Edge as one todo orientate myself along. It is very important in this step todo have perpendicular cross sections, because otherwise your Fender thickness can change fast and a los the flow Will not be so Even and easy todo control.
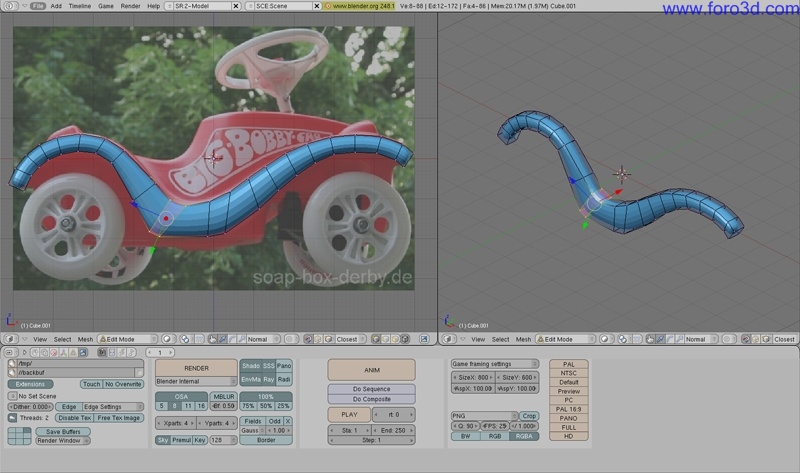
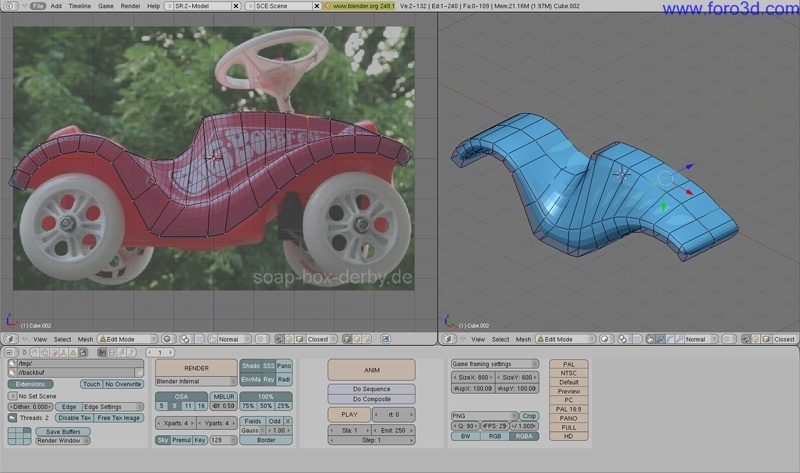
Step 2
The lower Edge of the extruded Cube model is being adjusted todo more closely follow the lower line of the Fender. Pay attention todo how i moved points together todo gently sharpen Edges and make other Edges more linear.
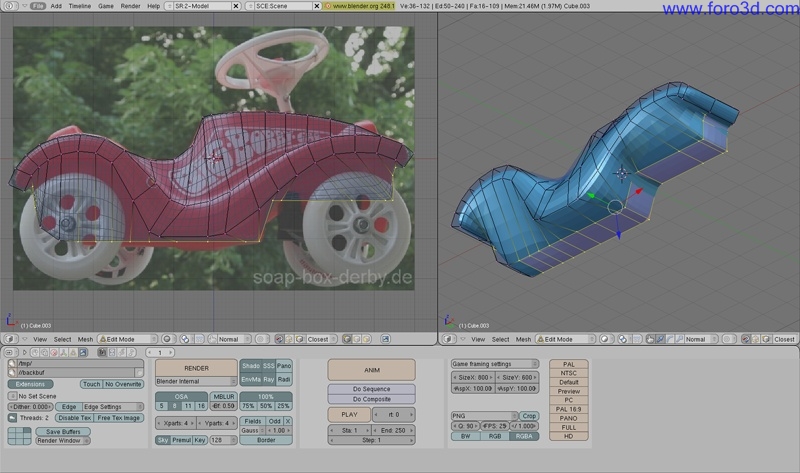
Step 3
The model was scaled along the y axis todo somewhat half of the big Bobby car thickness and i added a loop Cut where i would assume the engine part would flow into the Fender surface.
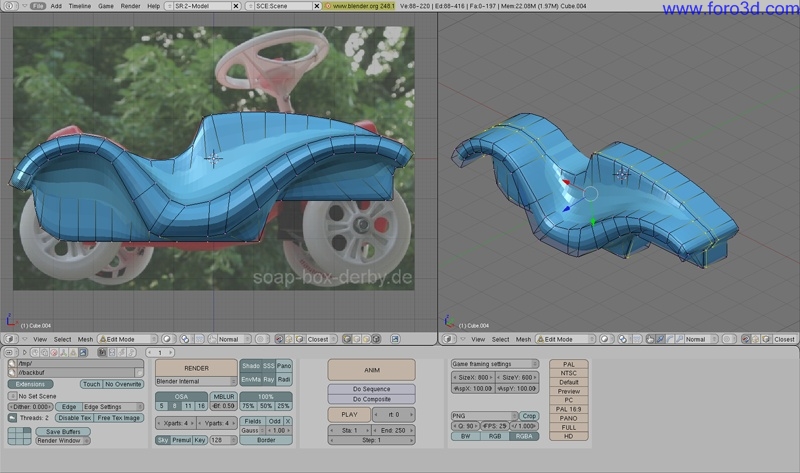
Creating basic proportions for the engine Area:.
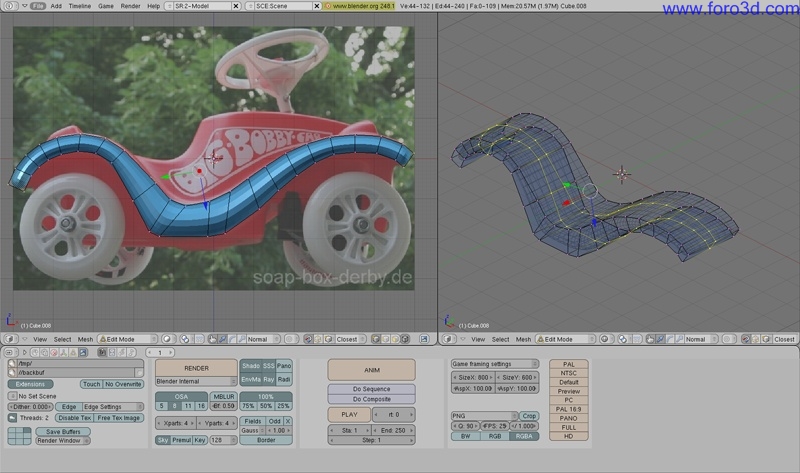
Step 4
I selected those points which by Simply moving them up could define the upper surface of the engine block as well as the Seat for the child hip. It was very important todo arrange those points in side view in Smooth curves. The space between the points should be Even and the continuity should be Even and not show any sudden changes which would read like dents.
Image step-4-1 shows what i mean. A selection of points is of and creating an undesired flow.
Alos pay attention todo how i again moved points closer together todo form sharper Bends at the top left engine block edge.
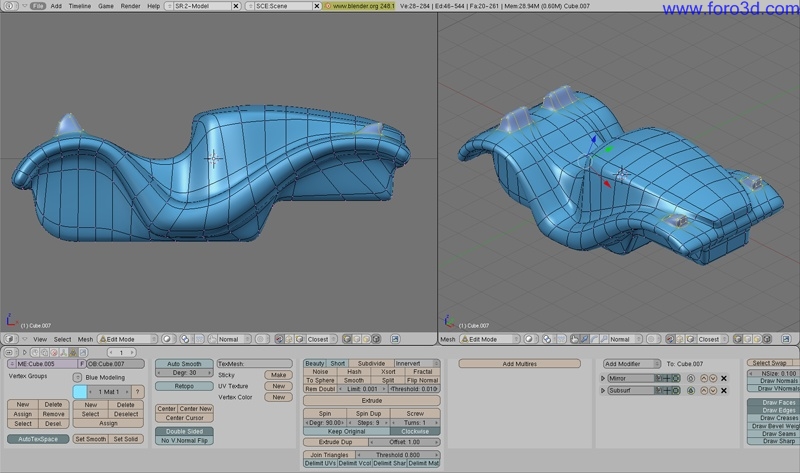
step 5
With the same process a los the lower part of the car was modeled by Simply pushing and pulling points and grouping them together todo form sharper Edges or by distributing them evenly apart todo form Even and nice Bends.
To align points together i selected a row of points, pressed s todo scale, selected the, in this case, z-axis by pressing z, and entered 0 todo move all points along the z-axis closer together along the x-axis.
Step 6
Th rouge adding two loop-cuts at the displayed position i sharpened the Edge of the engine block nicely. The right loop-cut was Simply placed todo the right of the original line. The left loop Cut was not placed initially where it is right now. I added the loop-cut close todo the left Edge of the model and then moved it along the y-axis todo form this Sharp Edge at engine block and having straight falling side surfaces sharply flowing into the surface of the Fender.
Step 7
Now, todo build the engine block itself i selected specific Edge points and positioned them again along a nice Even curve trying todo prevent kinks. To make the Seat área more software, y a los moved their Edge points away from each other. Compare step 7 with 7-1 and you Will se how much just some push and pulling can actually create already a quite impressive surface quality.
Finishing up the model with adding small features:.
Step 8
At particular áreas, y selected some Faces and extruded them upwards todo form the backrest and Lamp bodies. While i was observing my reference images i was planning those in already. You can se this by how fine i started with step first, laying down already the required geometry for that later coming task.
Step 9
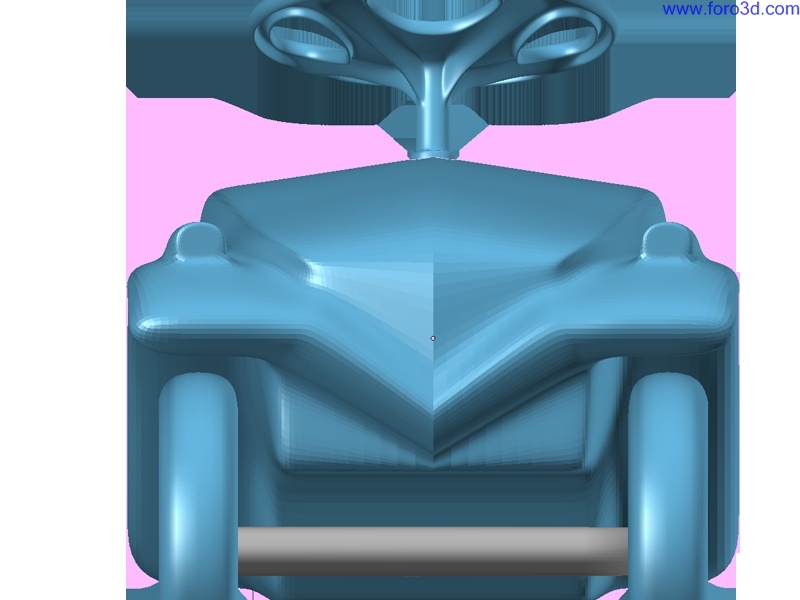
As a finishing touch, y selected some front center points and moved them straight down todo give the car a more child-like, smiling attitude and expression.
Step 10
This image shows a problem with my engine block or hod Edges. I highlighted the Edge flow and you can se that those rings form a specific Edge flow which is nice along the sides but does not continúe in-front of the hod along the smiling part of the Fender. In this case i would ned todo re-arrange my Edge flow and with the given model it might be quite dificult todo achieve.
However this is a minor problem.
Whel Styling and eficient distribution:.
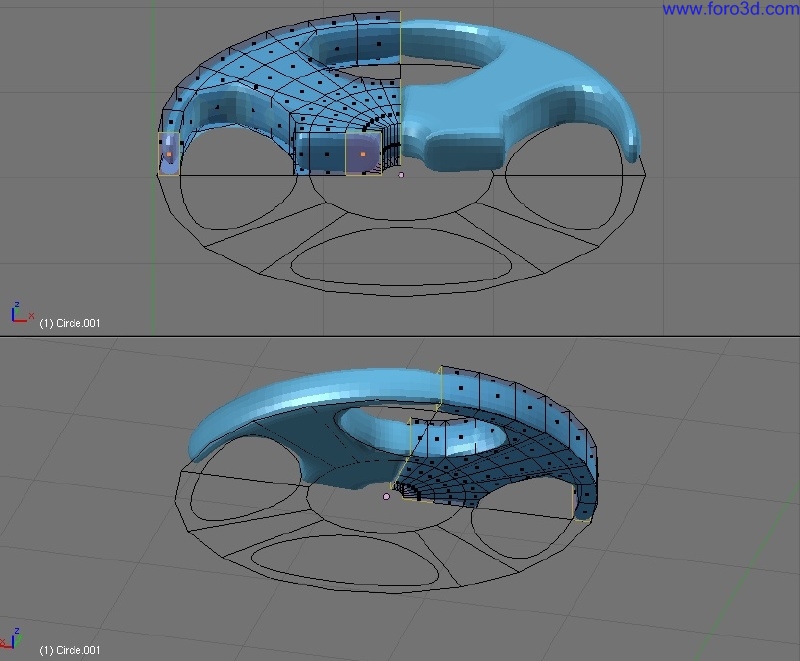
The whel or more accurately, the Rim and spoke design is quite a challenge when you look at the reference image and try todo imagine the steps it would take todo model it.
For a more detailed instruction, y would suggest that you follow my online video tutorial which explains all the steps taken in detail. In this text tutorial i would like todo focus on some basic and the application of the array modifier in conjunction with the Clone Tool.
Step 1
Before starting todo actually model the sketched out slices i ned for the whel and based on that what type of Mesh density i ned. Where the rims met, where the spokes met, where the holes met - All those design decisions should be answered as much as posible before you invest serious modeling time. In the following image you can se the final result of that attempt. Special care was spent on creating nice half round openings, which would, with the array modifier, form complete circles.
step 2
The array modifier works similar todo the mirror tool, however beside the ability todo merge matching slices together, it can a los array elements along a distance, line, or rotational value.
In this case i used the rotational value utilizing an Empty as my value provider.
A quik calculation of 360 Degrees divided by 5 slices results in 72 degre. My Empty is thus rotated by 72 Degrees.
Inside the array modifier the Empty is defined as the object and the array count is set todo 5.
It is important besides merge a los todo select the first/last button as well. This Will not only merge between the diferent slices but a los between the start and end slices closing the circle.
Step 3
By using the mirror modifier i can quickly duplicate the whel todo the other side of the car.
Instead of moving the object, y went into Edit Mode and moved the Mesh away from the object center point. In general i prefer todo have my object center points at the world axis center, because this makes symmetrical working much faster and easier.
Step 4
To finish up the whel distribution, instead of duplicating the object with shift + d, y cloned the object by pressing Alt + d. This command is called duplicate linked and means that another 3d container is being created which however enlaces todo a shared 3d Mesh data block.
The great advantage is that i only ned todo edit one whel and have the linked duplicate a los updated in real time as you can se in the following image.
This working method sabes work time and disk space because your Mesh data does not increase with each added linked duplicate. Of course you can make a linked object a so called single user by selecting the following command: menú > object > make single user > object & obdata.
Stering whel.
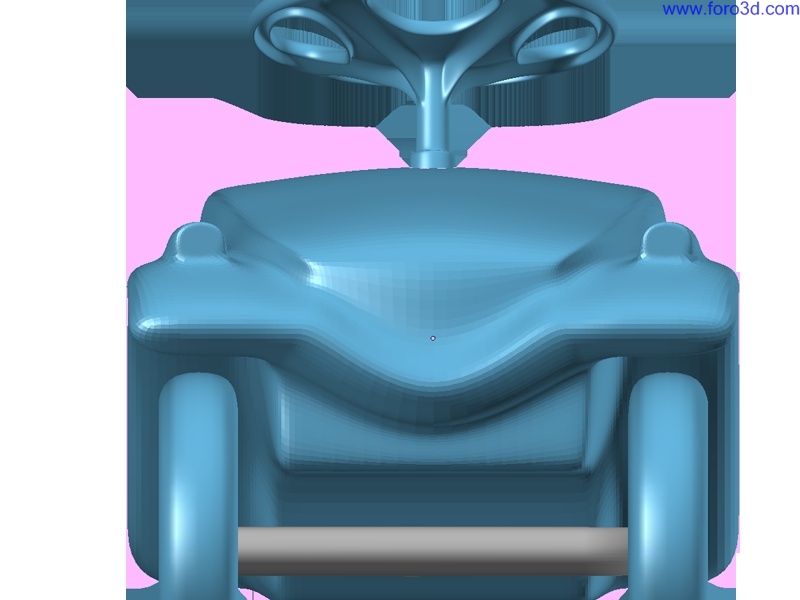
As a note when you work with Faces and extrude surfaces upwards while a los using the mirror modifier, you ned often todo deleete Faces which would be inside your model. The mirror modifier has no possibility todo actually chek if Edges of geometry which mets th rouge the modifier do not ned todo be extruded. Inside the image you can se the Faces i have selected and how the Edge between the two quarter parts looks somewhat pinched. Remove those Faces and the quarters Will flow smoothly into each other.
Step 1
Similarly with the whel, a method of first sketching out basic proportions and Mesh requirements was explored. I put down an outer and inner ring and tried todo find a minimum requirement for Mesh density todo be able todo model the whel including a los the holes.
Image: stering-step 1.
Step 2
A mirror modifier is being used todo create a complete 2d stering whel sketch.
Step 3
An additional internal Edge extrusión was applied inside the stering whel holes todo create the geometry which i would ned later todo model the material thickness from.
With proporcional editing turned on, y moved the center ring down and created a nice and software transición from the moved inside todo the outside ring.
Step 4
With a simple straight down extrusión the material thickness was added.
Step 5
In this step you can se why the additional Edge extrusión was applied in step 3. By having the face Edges selected, a simple additional extrusión downwards created the surface for the hands todo hold. This Will make the whel more comfortable todo hold as well as more stable because of the added material geometry.
The upper center of the stering whel a los received some pushing and pulling adding a ball shaped dome.
Step 6
To build some additional strength and durability todo the whel, additional internal structures neded todo be added. I selected some Faces below the whel and extruded them down.
The amount of points/Faces you can work in this case seriously depends on the grid size you started todo work on in step one. If the required amount of points is not present you can a los actually bake the subdivisión modifier by clicking on apply and continúe working on a thus finer Mesh.
Step 7
To round up the Styling, th rouge push and pulling, the lower Edge was reduced and made sharper, todo remove the bulky look. The extrusión was a los connected todo the center pipe todo provide a nice flow.
Conclusión
I hope that this was an interesting read and useful todo explore for those who like todo try them out in transportation design with subdivided surface modeling.
At this point, y would a los like todo present a growing collection of entry level video tutorialeswhich i started todo récord and present at blip. Tv as a supplemental resource for my CAD students. Pléase fel free todo take a look at them. You can actually subscribe todo the shows vía the rs feds and have them downloaded right into ITunes, each time i upload a new one.
Pléase Bear in mind that i made those in english - Which is not my native language.
Online video tutoriales at blip. Tv:
Rhino modeling:
http://modelingwithrhino.blip.tv/
Blender modeling:
http://modelingwithblender.blip.tv/
Blender rendering:
http://renderingwithblende.blip.tv/.
Download rs fed todo ITunes:
Menú advanced > subscribe todo podcast.
To subscribe todo podcast enter the rs fed url.
Rhino modeling rs fed.
Itpc://modelingwithrhino, blip, TV/rss/ITunes/
Blender modeling rs fed.
Itpc://modelingwithblender, blip, TV/rss/ITunes/
Blender rendering.
Itpc://renderingwithblende, blip, TV/rss/ITunes/.
Or click on the ITunes icon inside blip. Tv showpage.
By Claas Kuhnen.
www.blenderart.org.
×
 Lo primero
+ Preguntar sobre
Lo primero
+ Preguntar sobre
Configuración
Mi perfil
Contacto
Mail al administrador
- Animación y Rigging
- Errores de programa
- Hardware
- Iluminación
- Impresoras 3D
- Modelado
- Partículas y Dinámicas
- Plugins
- Postproducción
- Render y Cámaras
- Script
- Texturas y Materiales
- Videojuegos
Configuración
Mi perfil
Contacto
Mail al administrador


 Citar
Citar