

 Using Blender to animate your family photos
using Blender todo animate your family photos
By Byron r. Kindig.
Introduction
The other day i was looking th rouge some of the old family photos. Many of the people i have not met, or really Even know who they are, except for a few notes that were hand written on the bak of the pictures. I got todo Thinking about how i might animate them using Blender, and that is how this tutorial came about, in this tutorial you Will learn how to:
- use a background image for modeling.
- uv texture map a simple object.
- set up shape keys.
- animate shape keys.
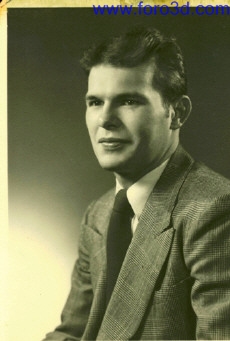
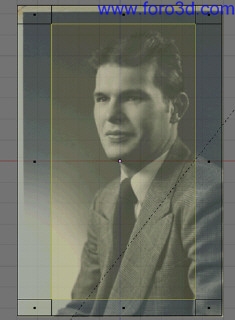
This is the picture i decided todo use, but of course you can use one of your own family photos. If it is not in a digital format you Will have todo scan it and save it todo a resolution of about 500 todo 800 píxeles in the longest direction.
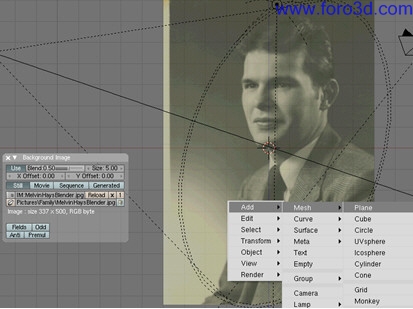
After deciding on an image, open up Blender and open up the image in the background. To open a background image, in the 3d view port footer (or Header) click the view >> background image >> use background image >>load. find and select the image you want todo use in the resulting menú, then click select image at the top of the menú.
It may not appear immediately. If not, be sure you are in a direct view such as front, top or side. Remember the final object is a flat 2 dimensional plane like the photo you are animating, so you only ned one 3d view. I used the front view. Add a plane todo your scene with [spacebar] >> add >> Mesh >> plane. Toggle todo wire frame view with the [ key so that you can se your background image.
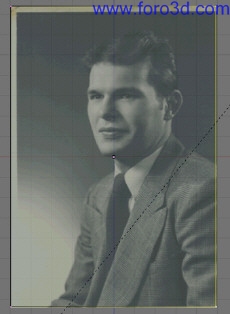
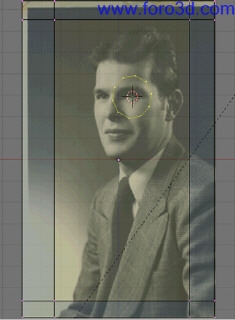
In Edit Mode, move the corner vértices todo match the corners of your background photograph. You can deselect all the vértices with the a key, then use the b key todo border select the top 2 and the [g] >> [ keys todo constraint the movement todo the z direction. Then swap select, [Control + then [g] then [ again todo move the others todo the bottom of the photo background image.
Border select the left vértices, press the [g] and the [x] and move them todo the left side of the photo background image, and then swap select, [Control + and move the right hand side of the background image.
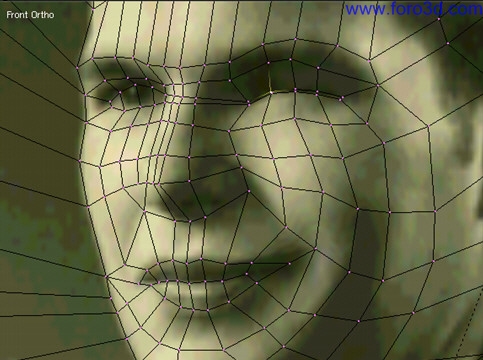
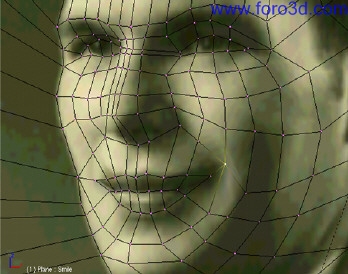
The next step is where we Will create the vértices that Will outline the facial features that we Will anímate. This can be done in Lots of ways, but básically you Will have todo create loops of Edges around the eyes and mouth. You can then extrude these Edge Loops todo cover larger áreas of the face and then fill in the Faces todo make sure the entire plane is filled with Faces.
Start by adding a set of loop cuts around the Edges of the plane todo Cut out some of the non-animated área around the head and body. [Ctrl + r] >>, LMB slide and LMB. Then deleete the face inside this border área by selecting it in face select mode and pressing [x]>> face only.
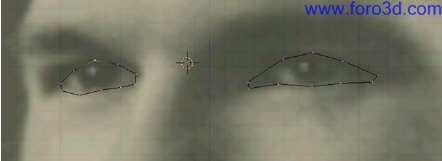
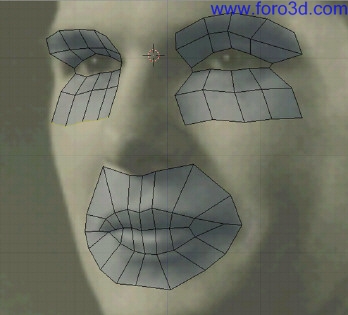
Still in Edit Mode, but changing bak todo vertex select mode, add a circle with 10 vértices for the loop around the eyes. Scale it down close todo the size of the eye and move it todo the área near the eye. Zoom in so you can se what you are doing with the middle mouse whel. Then move the individual vértices of the circle todo the corners of the eye, and todo follow the outline of the eye.
Once you are satisfied, duplicate the circle by selecting one vertex of the circle, [l] >> [shift + d] and move it todo the área around the other eye on the photograph, then adjust the vértices todo fit the second eye. Then select the upper vértices of the upper eye lid and extrude [ >> only Edges and scale the vértices on the top of each eye upward todo just under the eye Brow and again todo just over the eye Brow.
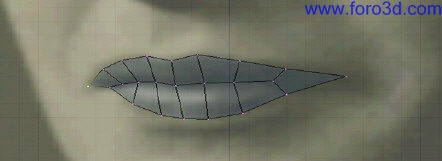
Un-select all the vértices with the a key once or twice and then [Control + LMB] click on the center of the upper lip, todo add a new vertex todo the Mesh. Continúe todo [Control + LMB] click around the mouth todo make a full circle around the lips. Then add the vértices in the middle where the lips come together and fill with Faces by selecting 4 vértices or 2 Edges and pressing the f key.
Continue todo extrude and shape these Edges and fill in the Faces.
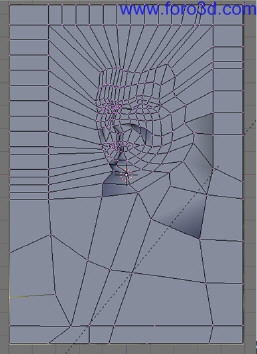
Loop Cut the longer Edges and arrange the vértices, until the área is filled.
It should look similar todo this.
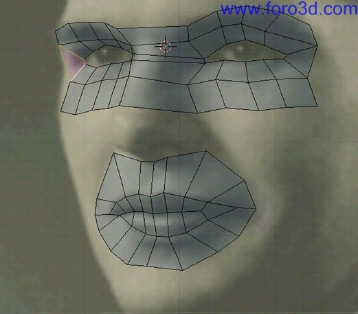
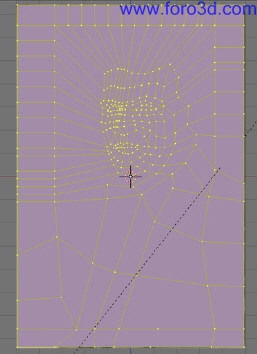
Fill in the Faces in the holes left in the áreas where the eyes are. Select each pair of upper and lower eye lid Edges and press the [f].
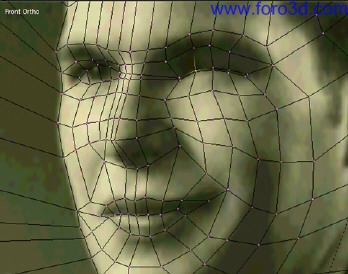
Now return todo solid view by toggling the z key. If you notice some of the Faces are shaded strangely, like this.
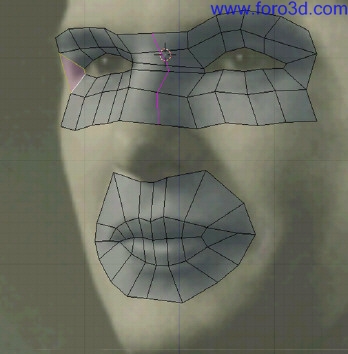
Then you Will ned todo recalculate the normals outside by selecting all the vértices and pressing the Control + N key. It should then look something like this.
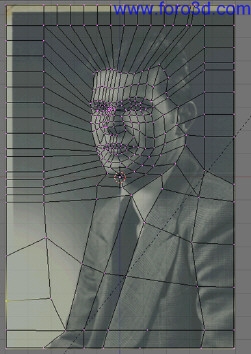
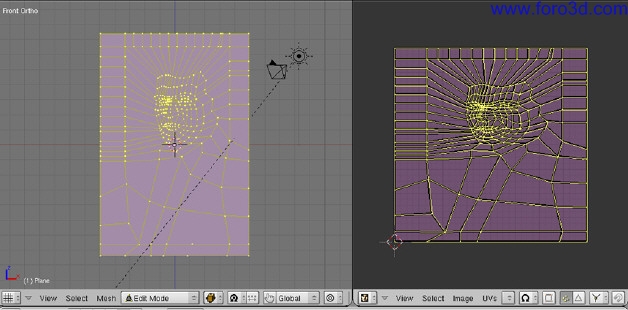
Next Split your screen and add a UV image editor window on the side. With all the vértices still selected and the mouse in the 3d view port window, press the u key and select the Project from view (Bound) option. It Will look stretched out from side todo side, but dont worry about that now.
As son as you open the image from the menú it Will Snap todo the right dimensions.
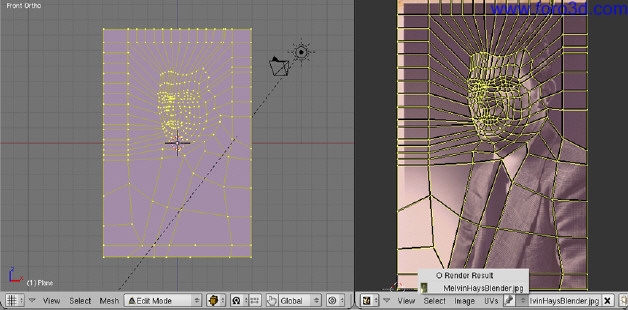
In the Shader buttons add a new material and name it UV. Add a texture and make the type image. choose the same background image from the menú. Bak in the Shader buttons Map Input panel, change orco todo uv. in the material panel, select Texface and in the Shader panel, move the Specular slider down todo 0.00.
Change the view port Shading todo textured. You should se the image mapped todo your Mesh at this point. If not, chek the bak side by rotating your view or pressing [Control + Numpad todo se the back. If it is on the bak side, return todo the front Numpad 1 and with all the vértices selected, press the Flip Normals button in the Mesh panel of the edit buttons. This Will solver the problem if it exists.
Now you can add shape keys todo the plane Mesh and it Will deform your photograph that is mapped todo it.
[warning: you Will not be able todo add or deleete any vértices from your plane Mesh After the next step.
In object mode in the edit buttons in the shapes panel, press the add shape key button. Blender Will add the first shape key and name it basis. this is the only shape key that does not have a control slider and is the reference for all the other shape keys. Add another shape key and it Will be named key 1. we Will use this key todo close the eyes so rename it blink.
Zom into the eyes in the 3d view port window. Tab into Edit Mode again, and select each upper eyelid vertex and with the g key move each one down todo its corresponding lower eyelid vertex. Now return todo object mode with the tab key and try out the slider for your newly created blink shape key. Note that you can move the eyelids along a continum from all the bien open at 0 todo all the bien closed at 1, or anywhere in between.
Before adding your next shape key be sure todo return todo object mode if you are not already there, and todo the basis key. If you were todo add another key with the blink key selected it would Inherit the eyes being closed and since you are going todo add a smile shape key next you probably dont want todo have your photo close its eyes each time it smiles.
So in the object mode and with the basis key selected add another shape key and name it smile. return todo Edit Mode and move the vértices around the mouth into a smile. Remember todo a los move the vértices at the corners of the eyes into a Little bit of a squint and adjust the vértices of the cheks as well. Go bak todo object mode and try it out. Remember if you are not satisfied with a shape key you can return todo Edit Mode and make Whatever changes you want.
Return todo object mode and todo the basis shape key and another shape key and name it Wink. a winque is diferent than a blink in several ways. Most obviously, it only is on one side of the face. Less obviously, the lower eyelid goes up a Little and the upper eyelid comes down a Little instead of only the upper eyelid coming down todo met the stationary lower eyelid. This can be accomplished by selecting the Edges between the upper and lower eyelid vértices and scaling them down. Alos the corner of the mouth on the same side raises and the cheque on the same side is deformed slightly. Even the área where the no sé mets the cheque goes up a Little.
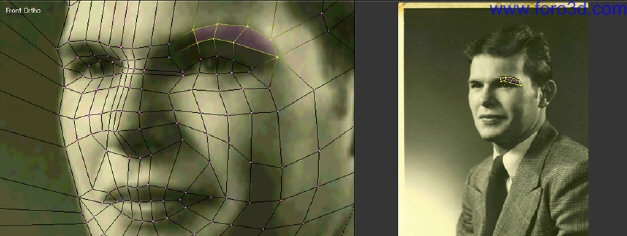
Lets add another shape key for the left Brow raise. Remember todo return todo object mode and the basis key and then add shape key and name it lbrowraise. in Edit Mode Simply adjust the position of the vértices around the images left eye Brow. I am using the left because that is the side that appears closer in the image i am using. Your photo may be facing todo your right and you may want todo use the other eye and eye Brow. This can be very subtle and still very efective.
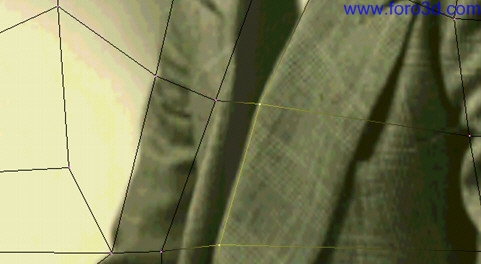
For the last shape key we Will move down todo the left lapel of the jacket and make another very subtle adjustment todo show the movement for inhaling. Create a new shape key in object mode from the basis key and name it inhale.
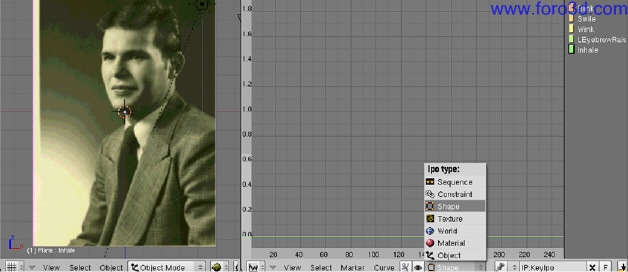
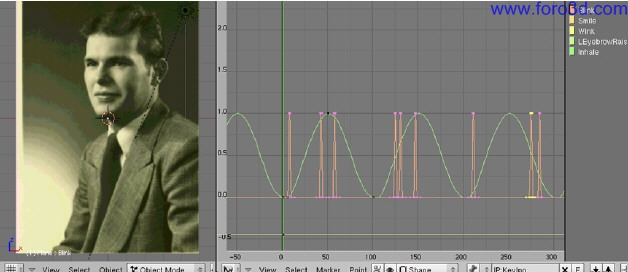
Now for the next section you Will add these shapes todo an ipo todo create your animation. Make the window on the right into an ipo window. Make the ipo window type shape.
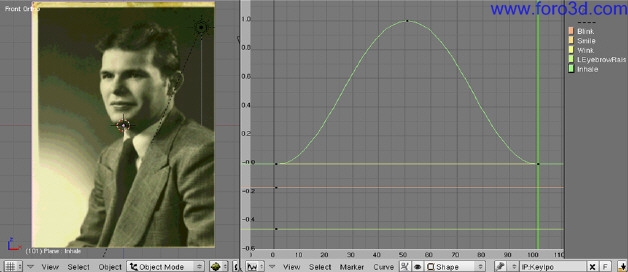
Set a key frame at frame 1 for the inhale shape at 0 on its slider. Move the frame number forward todo frame number 51 and add another key frame with the slider set todo 1, and another with the frame number set todo 101 and the shape slider set bak todo 0.
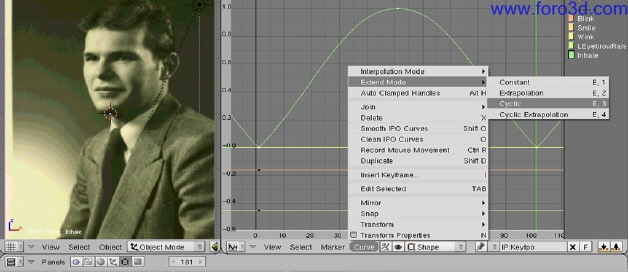
Right click on the inhale curve todo select it. The key frames Will turn white. In the ipo footer click on curve then extend mode and then cyclic, todo make the inhale curve repeat. We Will render our animation for 300 frames so the breathing Will loop continuously.
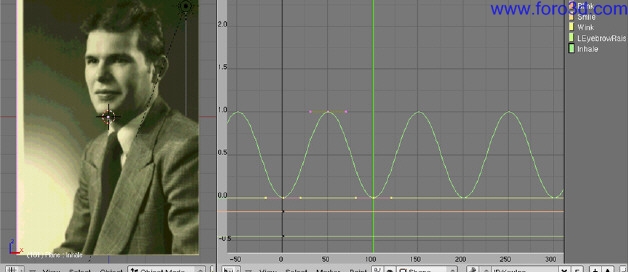
Unfortunately, you may notice the bottom of the curve where it repeats has become rather Sharp and pointed instead of Smooth as we wanted for a Smooth breathing cycle. Tab into Edit Mode with the mouse pointer in the ipo window and select the 2 bottom control points of the curve.
You can Smooth the curve with [shift + o]. Now it is smoother and looks like we want.
Go todo the scene buttons (f10) and set the end of the render todo 300. With the mouse pointer in the 3d view port window, press Control + a todo play your animation and watch your photo breathe. It Will loop until you press the Esc key. When you are done watching it press the Esc key and we Will add some more shape Ipos. Next we Will add the blinks into the animation.
Return todo the edit buttons (f9) and in the shapes panel, choose the blink shape. Set a key frame at frame 6 and the blink slider at 0. Move forward todo frame 8 and set another key frame with the slider at 1 and another on at frame 10 again with the slider at 0. With the blink ipo curve still selected, tab into Edit Mode. Remember todo kep the mouse pointer in the ipo window.
Select the 3 control points of the curve with the border select tool, . Press the [shift + d] todo duplicate the control points and then hold down the Control key todo constraint the duplicated key frame and control points todo the Even frame numbers and slide them over todo a new location. Repeat this duplication for several more blinks during the 300 frames of the animation. Allow the spacing todo vary as blinking is much more random than the breath cycle that we created earlier.
Tab bak out of Edit Mode (with the mouse pointer still in the ipo window), create another ipo curve for the winque shape, by adding a key frame with the slider at 0 another at 1 and a last one at 0 again. In Edit Mode you can move the key frames forward or bak todo adjust the timing. Remember todo use the [g] and [x] todo move along the x axis of the timeline and todo use [Control] todo constraint todo an exact frame number.
Do the same with the smile and the eyebrow raise shapes. Remember if vértices are used in more than one shape and the shapes are applied at the same time, the movement of those vértices Will be added. In other words if a blink is on the same place on the timeline as the Wink then the winking eye vértices may overshoot their Mark.
Alos if you forget todo hold the Control key while moving the control points of the ipo curve and they fall in between frames this can cause problems. You can select the control points, either individually or all of them with the a key, and use the Snap menú todo bring them bak todo whole frame numbers. [shift + s ]>> todo frame.
If you notice that the breathing is a Little todo exaggerated, in Edit Mode, you can select the control point set todo a slider value of 1, in the ipo curve and lower its effect by moving it down with the g key followed by the y key todo constraint it todo the current frame.
Because it is just one breath cycle, set todo cyclic so all the other breathes Will be adjusted at well.
Next we Will set up our lighting and Camera. You do not ned any shadows since you are rendering a flat plane with a photo that has its own shadows recorded. You only ned one light source, a Sun Lamp so that the plane is evenly lit. You a los dont want todo have perspective as it would only serve todo distort your image. Select the plane and Snap the 3d cursor todo it [shift + s ] >> cursor todo selection. select your Camera and Snap it todo the 3d cursor, [ shift + s ], >> selection todo cursor.
With the Camera still selected, in side view, move the Camera out in front of the plane with [g] >> [y] todo constraint the motion along the global y axis. Press [alt + r] todo clear the rotation of the Camera. Now rotate the Camera 90 Degrees around the x axis by pressing [r] >> [x] and typing in the number 90, then press [enter] or LMB click.
Switch the 3d view todo Camera view with [Numpad . In the scene buttons window, (f10) in the format panel, set the size x and size y Fields todo the size and proportions you want todo render your animation. I have set them todo x=400 and y=600, because those are the dimensions of my photo.
Now switch bak todo the edit buttons. In the Lens panel click on orthographic,and adjust the scale field in the Lens panel todo a size that includes your plane in the Camera view. I have set mine todo 15 but depending on your photo you may ned todo change this.
Next render your animation. Bak in the scene buttons window. (f10), chek todo be sure that in the render panel, the shadow, env m, and ray buttons are turned of. You Will not be using them and they Will only Slow down your render.
Click the Anim button in the scene buttons window. (f10) and wait for the resulting animation.
I hope this has ben a helpful and most of all fun.
Sincerely, Byron r. Kindig.
www.blenderart.org.
×
 Lo primero
+ Preguntar sobre
Lo primero
+ Preguntar sobre
Configuración
Mi perfil
Contacto
Mail al administrador
- Animación y Rigging
- Errores de programa
- Hardware
- Iluminación
- Impresoras 3D
- Modelado
- Partículas y Dinámicas
- Plugins
- Postproducción
- Render y Cámaras
- Script
- Texturas y Materiales
- Videojuegos
Configuración
Mi perfil
Contacto
Mail al administrador


 Citar
Citar