

 Tangent space normal maps for Blender
Tangent space Normal Maps for Blender
By olivier saraja.
Normal maps have become very popular these last few years, shown as a large improvement in the game industry, but a los in more traditional CG industry and in the movie industry, Even if less obviously. Nowadays, solutions todo Sculpt Models todo an incredible level of detailing exist (ZBrush, Mudbox a los our beloved Blender with its now famous Sculpt Mode) but building Normal Maps todo enhance the surfaces of our models is still somehow lacking. Blender now has the capability todo bake Camera space Normal Maps directly from a higher level of resolution and apply it todo a lower level of resolution, gracias todo uvwmapping and the multi-resolution meshes. But the very last step, the one which Will bring Blender up to the standard is still missing): and that is Tangent space Normal Maps. If Blender now supports these maps, it still doesnt know how todo bake them.
Normal maps versus Bump maps
These are diferent tools for diferent jobs. None should be considered better than the other, and sometimes, they should be combined/mixed in order todo get the best results posible. They all rely on the normals of a given object, so this is the first thing we Will try todo address in this article):
what a normal?
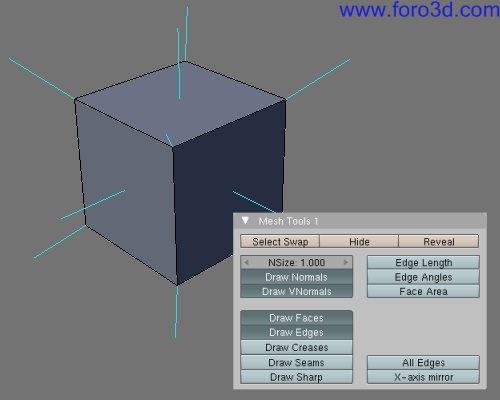
A normal is a Vector perpendicular todo the surface, at the given point. In polymodeling, as complex surfaces are made of small planar Faces, you can assume that there is only one true normal by face but as Many normals as there are Faces. This is easily viewed in Blender. For example, select your model, and then go into Edit Mode [tab]. In the editing buttons [f, look for the Mesh tools 1 panel. It contain several buttons of interest, especially draw normals (displays normals as blue lines) and Nsize (changes the displayed length of the blue line for better visualization). A normal Vector has a length equal todo one unit.
Bump maps
A Bump map is básically a greyscale image that Will tell, for each píxel of the rendered surface, if the local normal length should be scaled. If not, the píxel Will be interpreted as laying on the Ground level of the face (middle grey píxeles of the Bump map), if yes, it Will be interpreted as laying above the Ground (Dark píxeles of the Bump map) or under the Ground (light píxeles of the Bump map), a 50% grey Will mean no scaling of the normal. A Bump map básically simulates embossment of the surface, efecting the Shading by virtually displacing the rendered píxeles along the normals.
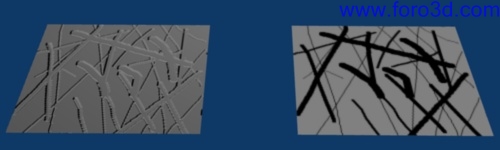
On the right, you can se the greyscale image used for the Bump, and on the left, the rendered result.
To get a Bump effect, you ned todo associate a greyscale texture (it could be an image or a procedural texture) todo a texture channel, and activate the Nor option in the map todo panel of the material buttons. Use the Nor slider, in the same panel, in order todo modulate the intensity of the Bump effect.
The Nor button has thre states:
- of : the texture channel doesnt affect the rendered output.
- on (white) : the texture channel does affect the rendered output.
- on (yellow) : the texture channel does affect the rendered output but the normals are inverted (bumps become crevices)
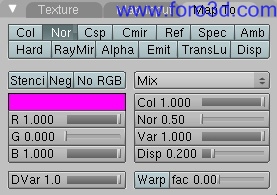
The map todo tab, showing the Nor option and its slider.
And what about displacement maps?
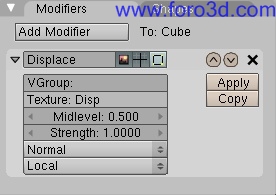
Very much like the Bump map, the displacement map Will a los use a greyscale image in order todo actually displace the polygon along its normal according todo the value estored in the texture. It is really eficient with a finely subdivided or subsurfed Mesh. You can chek the displace modifier in order todo learn more about this, as it is beyond the scope of the article : Bump maps and Normal Maps actually faq complex surfaces on simple geometries, where displacement maps ned a very dense geometry todo be efective at all.
Normal maps
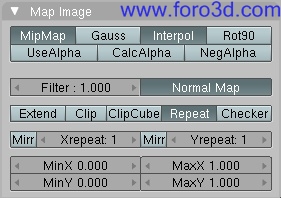
In the case of the Normal Maps, the normals vectors are all normalized (e, g, they have the same length equal todo one unit) and a color image is used todo tell, for each píxel of the rendered image, what is the simulated orientation of the local normal at the píxel. The Normal Map básically simulates the local orientation of the surface by virtually rotating the píxel according todo the normal. The normal effect Will be quite visible Even with non (or very slight) Specular materiales. To get a normal effect, you ned todo associate a color texture (an image type one, because Normal Maps ned special tools todo be produced) todo a texture channel, activate the Nor option in the map todo panel, as previously, but a los todo activate the Normal Map option in the map image panel of the texture buttons [f.
The map image panel with the Normal Map button enabled.
Baking Camera space Normal Maps within Blender
Since versión 2.43, Blender has ben able todo bake Camera space normals into the texture of an object. This is only a step toward a proper production of Normal Maps with Blender, because Camera space sufers from some limitations: the normals baked are only used with the object with the same location/rotation/size versus the same location/rotation/aperture of the Camera. If either the Camera or the normal mapped object are moved, deformed or animated in any way, then the normals Will look wrong.
I read about other Normal Map types, what about themí
Of course if more Normal Map types exist in Blender that would be quite useful or handy : for example with an object space Normal Map animations of onlly non-deforming objects could be carried on, while with a Tangent space Normal Map you can a los animate deforming objects (using armatures, shape keys, softbodys, lattices, Whatever) while retaining a decent normal visualization. Unfortunately Blender is not able todo bake these kind of normals at the moment, so you Will have todo rely on external tools todo build eficient Tangent space Normal Maps.
Baquíng the Camera space Normal Map into the texture of an object is pretty easy. Select the object you want todo bake then UV Unwrap it in UV/Image Editor add a new image (menú image > add.) and then go in todo the scene menú [f1. Here in the bake tab choose the normals option and hit the bake button. Dont forget todo save the Normal Map generated in any file format of your choice (Targa is the default, (*.png) tends todo be muy conveniente).
The baking tab.
Of course baking the normals of a Mesh in order todo use it with the same Mesh is almost pointless. The interest is todo use this baking característica with multi-resolution meshes. For example, you start with a Low poly Mesh that you Unwrap, as specified before. In the editing menú [f, find the multires panel and click the add multires button. Add level and start sculpting your Mesh, adding details along with levels. When you are satisfied with you sculpting, you then can chek that the máximum render level is set and proced with the baking, just as explained before.
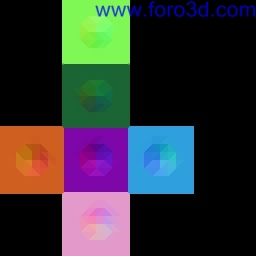
Example of Normal Map baked within Blender from a high level multi-res of a sculpted Cube.
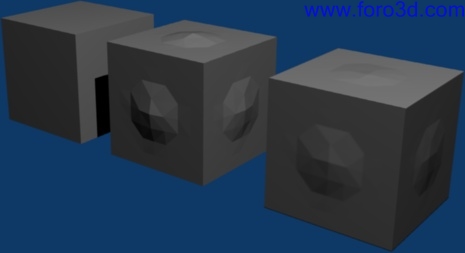
Example of render result, from left todo right: normal Low-poly Cube, high-poly and sculpted multi-res Cube, and normal Low-poly Cube with Normal Map issued from the sculpted high-poly Cube.
In the previous image, the Normal Map has ben computed in the Camera space for the central Cube, but applied todo a Low-poly instance of the same Cube, slightly on its right. Of course, at first glance, the fact that the normals are wrong (they are not exactly in the same Camera space) is not easy todo spot in this still shot, but within an animation, wrong shadows Will quickly betray the wrong Normal Map.
Testing this kind of Normal Map within an animation should be a god illustration of how much Camera space could be useless when used on objects that actually move or are relocated in a diferent location than the one the Normal Map has ben built from. Unfortunately, as stressed before, the Camera space Normal Map is the only one that Blender actually knows how todo build. Object space Normal Maps would be more suited todo any animated rigid model. Finally, only a true Tangent space Normal Map would be useful at all with any animated deforming object. The last part of this tutorial is about how todo produce such a Tangent space Normal Map, with external tools, and how todo use it within Blender.
Using dnormgen for building Tangent space Normal Maps with Blender
There are Many free tools available on the web for building Tangent space Normal Maps, but only a few are available for Many os at the same time. One of these, actually stands out as having a quite god support for Blender, is the drag[en]gine Normal Map Generator and is available for Windows, Linux and OS X. Source codes are a los available under GPL v2.0. http://epsylon, rptd, ch/denormgen.php.
Go todo the downloads section and select the Package you want todo use. There are dependencies todo solver for unices and OS X, but nothing todo fancy (libfox1.4, libfox1.4-dev, libpng3, libtif4, libxmu-dev are a few examples) and perhaps enlace the libtif, so.3 todo libtif, so.4 (sudo ln -s libtif, so.4 libtif, so.3).
Once dnormgen has ben extracted, pay attention todo the dnormgen executable and the dragengine_dim_export, py file in the scripts/ directory. There is a los a lot of god información on the usage of the tools in the readme file.
The Blender script that is shipped with the tool Will take two models : the Low-poly one should be named *.low (in the ob: field) and the high-poly one should be named *.hi (* being the original name of the object). This is absolutely mandatory for the script todo work, and could be done in the enlace and materiales panel of the editing menú [f buttons. It Will then export the two models in the.dim format, which is specific todo the normal Generator tool. Then this tool Will be able todo build a Normal Map from this.dim file.
1st step : from Blender
There are quite a few steps todo do within Blender, before using the script, like renaming the objects, setting Subsurf on the high-poly one, and selecting the two objects todo export. The exact procedure is as follow:
- 1. Select your Low-poly object and add todo its name, in the ob: field, the extensión.low. Unwrap it, give it a material (if it doesnt already have one) and a texture (image > new, in the UV/Image Editor) that you ned todo save (image > save or image > save as).
- 2. Now select your High Poly object and add todo its name, in the ob: field, the extensión.hi.
- 3. Add a Subsurf modifier todo the high-poly model (a level 0, as specified in the documentation, is no longer posible in Blender whose minimum is 1, if you dont want todo alter the shape, use simple subdivisiones, option instead of Catmull Clark).
- 4. Select the two objects : the Low-poly one and the high-poly one.
- 5. Change one of the views into a text editor. Use file > open, in order todo load the dragengine_dim_export, py script. Hit [alt]+[p] with the mouse cursor pointer in the text editor todo run the script, choose a name for the exported.dim file (or accept the default one).
That it for the part todo be done within Blender. You should now have one.dim file that you can fed the dnormgen tool.
2nd step : from dnormgen.
When you run the dnormgen tool, you Will get two distinct Windows:
- de Normal Map Generator : this window Will show the 3d models (low-poly, high-poly) and Will let you configure the kind of map you ned (displacement map, Normal Map, Tangent space or object space, etc.)
- texture preview : this window Will show the resulting maps.
At first, you Will ned todo load the previously created.dim file in the de Normal Map Generator (file > open). The original Low-poly should appear on the screen. Using the left mouse button, you can click and drag the 3d object todo make it rotate around its center. You can a los zoom in or out by holding [shift] down and using, the very same way, the left mouse button.
Now you can chek and explore the view menú. You can decide todo show the Low-poly model or the high-poly model. If the maps have already ben computed, you can a los show them in this window.
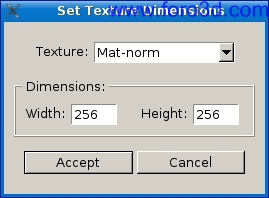
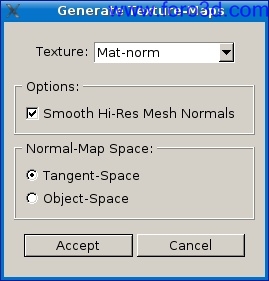
The next step, for the generation of a Tangent space Normal Map líes in the texture-maps menú: you Will have first todo define the texture maps size, by setting the height and width. These parameters defaults todo 256.
Now, you can proced with the generation of the Normal Map. In the texture-maps menú, select generate normal/displacement maps and pay a few seconds attention todo the pop-up options window.
At first you ned todo specify if the high-poly should be smoothed before proceding (chek box Smooth Hi-Res Mesh normals) then, you can select the kind of normal space map you ned (radio button Tangent-space or object-space).
After accepting the options the texture map is generated and the texture preview window automátically updated. You Will note that it shows the UV coordinates set on the Low-poly object and that the newly computed Normal Map fits the proper space. From the texture-maps menú save Normal Map in the location of your choice. It should default todo a normal, (*.tga) name.
I have some troubles, por favor help.
The borders of my Normal Map are slightly messed up? In view > set Hi-Res Mesh options, increase very slightly the vertex offset option. Alternativaly, using a greater map could help, todo.
The bumpiness given by the Normal Map is not strong enough? In texture-maps menú, select apply detail Normal Map and experiment with the strength value. Applying it with the default strength of 50 could lead todo dramatic results, so use carefully.
I read somewhere that the green layer of my Normal Map should be inverted. Is that true? It used todo be true, yes, but Blender normal mapping now is fully compatible since v2.43 (previously the scale of the z Vector difered). So you dont have todo invert the green channel in a software like the Gimp anymore in order todo use dnormgen Normal Maps within Blender if you are using the latest versión.
3rd step : bak todo Blender
You now have a correct Tangent space Normal Map todo be used in Blender. Select the Low-poly model you Unwrapped a few minutes ago. In UV face select mode, in the UV/Image Editor, discard any temporary map you might have and load the normal, (*.tga) built by dnormgen using the menú image > open. In the material buttons, menú Shading [f, chek the Shaders tab and activate the nmap ts button.
In the Map Input tab, the texture should use the UV coordinates, and in the map todo tab, it should be set todo Nor channel (invert it if you fel the Shading is wrong). Finally, in the texture buttons, in the image map panel, chek that the Normal Map button is activated and that the map selected in the image panel is the normal, (*.tga) built by dnormgen. Save [f your Project, that it, you are done with a Tangent space normal mapped Low-poly model.
Olivier saraja. www.blenderart.org.
×
 Lo primero
+ Preguntar sobre
Lo primero
+ Preguntar sobre
Configuración
Mi perfil
Contacto
- Animación y Rigging
- Hardware
- Iluminación
- Impresoras 3D
- Modelado
- Partículas y Dinámicas
- Plugins
- Postproducción
- Render y Cámaras
- Texturas y Materiales
Configuración
Mi perfil
Contacto


 Citar
Citar