

 Editing a music video in Blender
editing a music video in Blender
By valentin spirik.
Introduction for everything you ned todo get started with the Blender vse se ha los the video editing preset (and for making titles) the 2d title presets.blend files bundled with this edition of blenderart magazine.
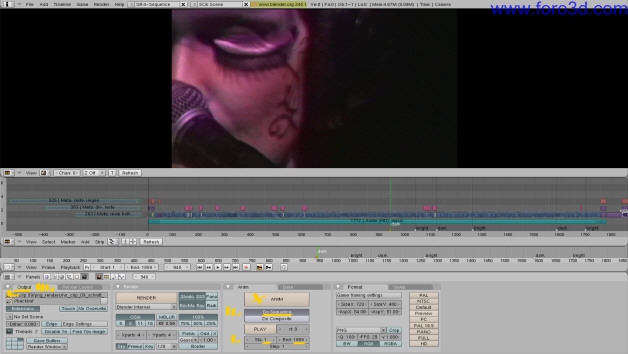
I load all of my footage into the Blender video sequence editor (vse) and start selecting the god Stuff: with the mouse over the image preview window. I use [spac for start/estop and [right arrow]/[left arrow] for going bak and Forth. In the timeline (= sequence): [k] for Cut and [shift for Snap editing (shortens/extends clip todo the playhead when start/end is selected).
Figure 1: selecting the god Stuff.
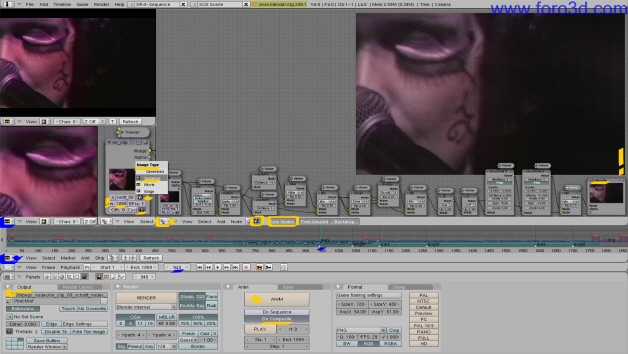
The god Stuff gets moved upwards a row (= channel) with [g] for Grab and [y] for y-axis. I kep the uncut original inside a (muted) metastrip should i ned it later since i am working without a time-code. (you can use the stamp render option for overlaying time información.) then i make a back-up of the.blend.
Figure 2: selected vs, original footage.
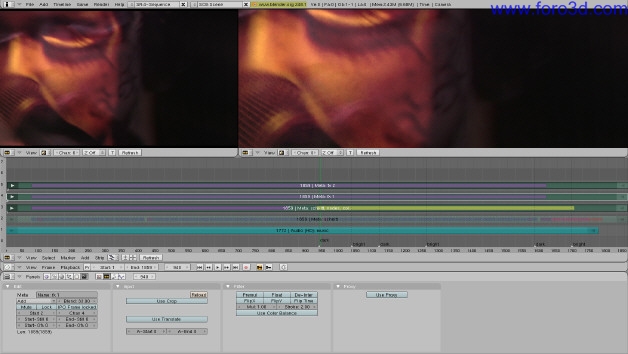
I move the selected clips together using [Control] for snapping clip todo clip. The white numbers on the right show the last frame of the god Stuff (top), the music track (middle) and the unused clips etc, that are now a los inside the muted metastrip (bottom).
Figure 3: selecting the really god Stuff.
Same procedure as above (1: selecting the god Stuff) with the mouse over the image preview window (top right) and [spac for start/estop and [right arrow]/[left arrow] for going bak and Forth. Since i easily get realtime playbak using DV footage (no effects applied) with Ubuntu 8.04 and Blender 2.48a on my PC (current Core 2 Duo processor, 2 Gb of Ram and a reasonably fast 250 Gb hard-drive) this work-flow allows me todo find my in and out points while looking at moving images the bien the audience Will se it. Frame 6 067 is now the last one After the really god Stuff is moved together (that down from 20,520 from the previous step). I use the Blender text editor for taquíng notes. Again, y make a back-up of the.blend.
Figure 4: sorting the clips.
I add a text editor window left of my sequence and name/tag my tracks. I adjust the sequence window with (number pad) [hom and then use middle mouse button and [Control] todo fit the channels todo my tagged tracks. Then i move the really god Stuff clips in the appropriate track (for moving clips up or down without moving them in time i once again use [g] and [y], for selecting múltiple clips i use for border select).
Figure 5: editing the video.
I use markers for the points where the singing starts. Then i move the best of the previously sorted clips todo roughly where i ned them and work on the details again using shift s for Snap editing and a los [g] for Grab todo shorten/extend a clip start/end. The basic structure for the edited video: details/close-ups at the beginning, the artists performing in the middle and a longer zoom out close todo the end. I move the unused clips into metastrips on the left.
As before, y use (number pad) [hom for seing everything that in the timeline. But since there are the unused clips on the left now, y then select the music track and (number pad) [Dot/del] (normally used for zoming in on a single clip) for focusing the sequence window todo the área that i actually want todo se when editing.
I export the edited clip as a (*.png) sequence (= series of (*.png) images). (f10 (pressed múltiple times) for switching between the Sequencer buttons when editing and the render buttons when exporting).
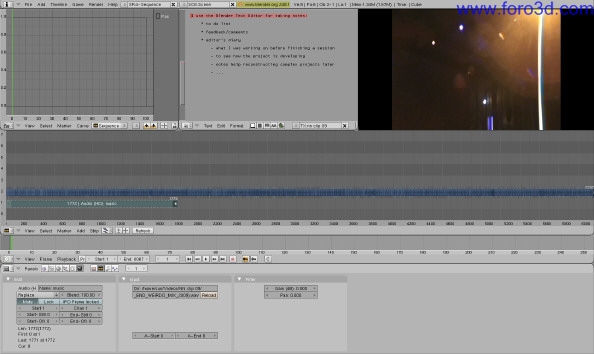
The annotations in the screenshot above show what important for exporting/rendering.
I load the previously exported (*.png) sequence into the compositing nodes and let it run th rouge a series of filters: DV video artefactos get smoothed out and my own graininess/structure and artefactos get added. The particular filters used here may be experimental and only make sense for this clip, but a couple of combinations can be useful for other projects (values would ned todo be adjusted): Gaus-darken for a ton lok, screen-overlay-mix for optimising an image, sharpen- Soften for focus related compositing tasks (high values for sharpen may introduce artefactos).
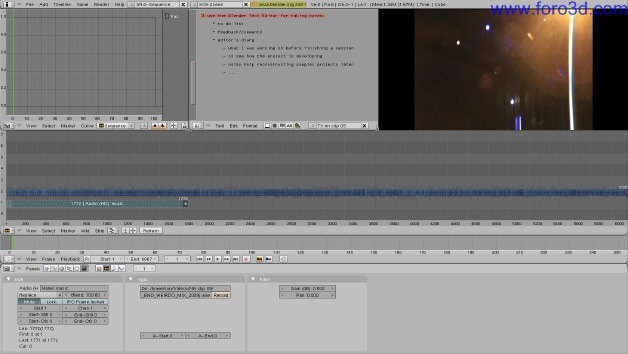
The yellow and blue annotations in the screenshot above show what important for processing a series of pngs with the compositing nodes: in this set-up, navigation is posible by moving the sequence playhead (the green line at frame 940) for previewing diferent parts (individual frames) of the nodes processed video. I export the nodes filtered pngs once more as a sequence of (*.png)
I load the nodes processed pngs into my vse sequence ([spac >> add image sequence), add and fine-tune a Glow (with clip selected [spac >> add Glow), make a metastrip of both (with clips selected and [m] and use color balance (with clip (metastrip) selected: filter tab >> use color balance) for creating the basis of the yellowish (but at this point rather dark) look. I then add a one step strobe (filter tab >> strobe: 2.00). With [shift d] i duplicate the metastrip, move it up one channel and a los move it one frame out of Sync (se screenshot). The Glow for this FX 1 track gets removed ([tab] todo open/close a metastrip) and in the edit tab i select blend mode add and blend: 33.00 and use color balance gets a los unselected for this FX 1 track. I a los duplicate the FX 1 track, move it up one channel and a los move this FX 2 track out of Sync for yet another frame. There is one last step not shown in the screenshot: a final, subtle Glow is applied todo all strips.
I once more export the clips as a sequence of pngs, import them one last time and change the export settings in the render buttons >> format tab todo FFMpeg, make my selections for the video and audio format/códec and make sure that Multiplex audio is selected in the audio tab before exporting the finished video clip with sound.
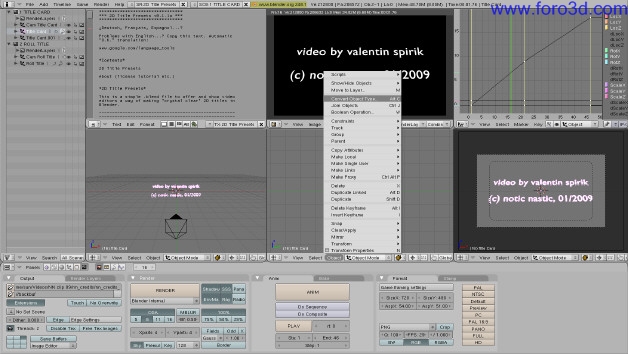
This is actually done somewhere before finishing the editing (5: editing the video) and using my own 2d titles preset.blend/tutorial. I adjust the text todo the right size first. In order todo have the center where i ned it for my title animation: object >> convert object type. >> Mesh. Then: object >> transform >> center new. For the finished video se indiworks, blip, televisión, for more about notic nastic se www.noticnastic.com.
By valentin spirik. www.blenderart.org.
×
 Lo primero
+ Preguntar sobre
Lo primero
+ Preguntar sobre
Configuración
Mi perfil
Contacto
Mail al administrador
- Animación y Rigging
- Errores de programa
- Hardware
- Iluminación
- Impresoras 3D
- Modelado
- Partículas y Dinámicas
- Plugins
- Postproducción
- Render y Cámaras
- Script
- Texturas y Materiales
- Videojuegos
Configuración
Mi perfil
Contacto
Mail al administrador


 Citar
Citar