

skin Shading using multi-Layered s. By Victor malherbe.
Introduction.
Organic materiales are probably some of the most dificult todo setup, since their realism does not rely solely on the quality of their textures. Cg skin often looks Plastic, and, when Subsurface Scattering is turned on, skin tends todo look like wax. Over the past few weks, y have ben trying todo achieve realism when rendering skin, or at least, todo obtain a Skin Shader which would not look terrible when rendered. After some research, y began todo build a kind of multi-Layered Skin Shader, which could take into account the various layers of human skin. In Blender, it means using one material for each of the layers of the skin (epidermis, dermis, and so on), mixing them together within the material nodes editor so as todo obtain the final output.
Part one : layering the difusion.
Step one: the structure of skin.
First, let deal with the difusión of our material: we Will setup the Specular highlights separately. Before trying todo simulate the appearance of skin, we must understand its composition:
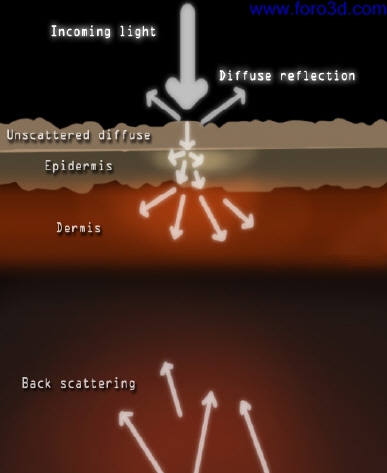
- the upper layer of the skin is the epidermis, which scatters the light slightly. It is yellowish/grey. Under the fet for example, the epidermis is quite thick, which is why the skin appears almost yellow.
- then comes the dermis - It is almost red, because of the blod. Unlike the epidermis, it scatters the light a lot.
- though the underlying tissues (muscles, organs, cartilage, etc.) are almost unnoticeable, we Will have todo simulate a kind of bak Scattering - When the ears are lit from behind, for instance, they appear red. The bak Scattering could have ben done within the dermal layer, since there is a back factor in the s panel of Blender, which allows setting the front Scattering and the bak Scattering separately. But in the end, it enables more control todo sepárate the bak Scattering from the dermal Scattering.
- one last note about the structure of skin: in theory, there is nothing above the epidermis. However, using s (Even in a very subtle way) Will subdue the bumps of your textured models. That why we Will have todo apply another layer, which Will be an un-scattering Diffuse layer. Doing so, you Will be able todo conserve all the bumpiness of your textures, and only this layer Will be textured (concerning the Diffuse Shaders).
- Simply take a look at the drawing, which sums up what we ned todo simulate. Knowing all this, we are able todo begin blending, and setting our materiales.
Subsurface Scattering, a los known as, is a phenomenon which has todo do with the translucency of some objects, which is todo say that they are not fully reflective, and neither transparent. The light beams Simply bounce on reflective surfaces. They go th rouge transparent and uniform objects, being deflected two times (when they hit the surface, and when they exit the object). But hola objects scatter the incoming light, deflecting the beams several times in a Chaotic bien before the beams exit. This produces a very software looking surface. Objects that exhibit this behavior are, for example, Milk, wax, potatoes, etc. Many organic objects tend todo scatter light.
Step two : the unscattered Diffuse.
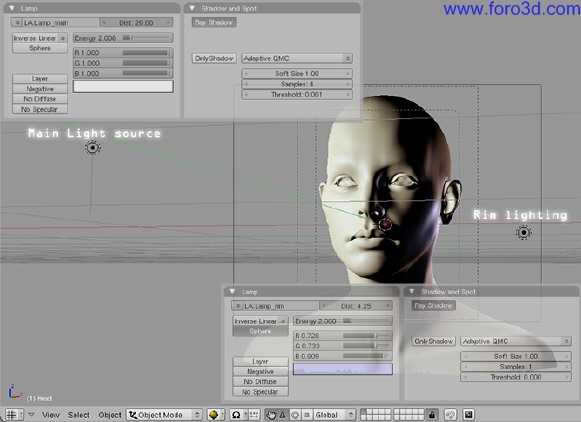
Lighting setup: before starting the Shading, we have todo set up a quick, and yet usable, test scene. Ive used a head model provided by maqs on the blenderartists.org forums, who a los gave me permission todo display his model in this article.
He deserves all gracias, since he a los helped me ha lot in building my shader. You can a los use the default Monkey head Mesh instead of maqs head model ([spac add>>Mesh>>Monkey), or Even a head imported from Makehuman (file>>import>>Wavefront).
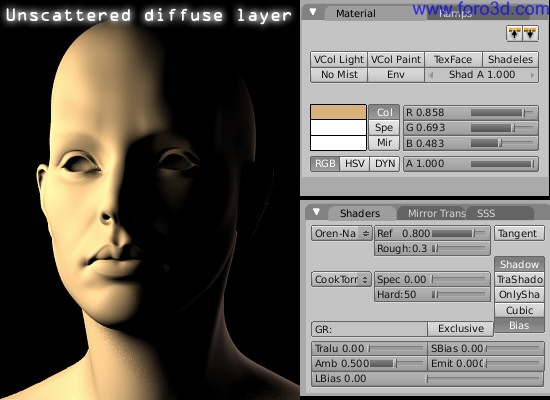
My lighting setup is quite simple: a main Lamp (add>>Lamp>>Lamp) todo Illuminate the head (with software Raytraced shadows turned on) and a Rim Lamp with a slightly blueish tint, lighting the object from behind in order todo make the Edges stand out. Now we can start the Shading itself. Add a new material todo your object (in the materiales panel, «add new»), and call it un-scattered_diffuse. Give it a natural skin color, and set the Diffuse reflection todo oren-nayar. The oren-nayar Diffuse Shader takes into account, when rendering, hypothetical microscopic bumps on the surface, which allows it todo simulate rouge surfaces such as Clay, Clothes, dry rocks, etc. So it helps achieve a more natural Shading. Dont forget todo put the Spec slider todo 0.00, since we Will take care of the speculars later. If you Painted some nice textures for your model, apply them now, except for the Specular textures. It is important todo understand that Even though the epidermis is the upper layer of the skin, we Will not texture it, since the Scattering effect would blur the bumps todo much.
Step thre : the epidermal layer.
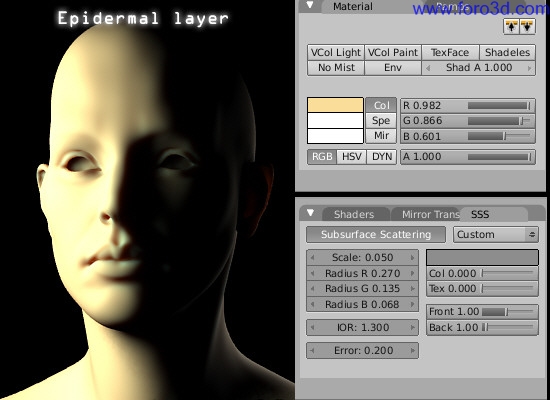
Now it on todo the epidermal layer. We have todo build a Shader which should look like a corpse without blod, since the blod flows mainly th rouge the dermis. In the end, it has todo look gray and yellow, and neds a quite subtle s effect. After having added another material called epidermis, give it a yellowish gray color as if it was desaturated skin, and take a look at the settings ive used for the s (i Will not detail everything, since we have todo set thre layers using s, i prefer using screenshots). Just kep in mind that for every layer, the red Radius Will be twice as large as the green Radius, and the blue Radius Will remain two times smaller than the green Radius (based on scientific measurements).
Just a quik note about the s scale: in theory, we should be using exactly the same scale factor for all layers incorporating, because our object has a fixed size. However, since the s radi of epidermis, dermis, and bak Scattering difer strongly, it would lead todo handling tiny s radi for the epidermis, and huge s radi for the other layers. Operating in this bien would be imprecise, and because were working step-by-step it is actually better todo set each layer separately, without wondering if the scale factor is the same for every layer.
Step four : the dermal layer.
In reality, the dermis is red or orange, because of the blod flowing th rouge it. When it is time todo combine all Diffuse layers together, we Will ned todo be able todo notice the underlying blod of the skin. So, add another material and name it dermis, and set a rather reddish orange tint for it. Unlike the epidermal, the dermal layer has todo scatter light a lot, so we are dealing with far bigger s radi. Simply chek the screenshot so as todo se the settings ive used. Note that we put the back factor todo 0.00, since the bak Scattering Will be handled with another shader. Once again, dont forget todo put the Spec slider todo zero.
The s color is set todo blue. Inded, y have noticed that setting the s color todo blue caused the terminators (transiciónal áreas between light and shadow) todo take on the complementary orange tint, and that is what we want todo happen.
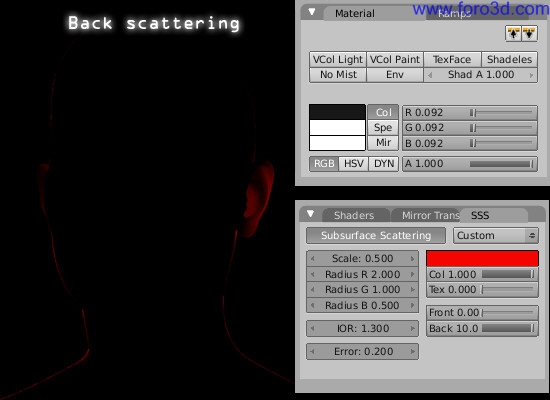
Step five : the bak Scattering.
Now we can take care of the bak Scattering. I have preferred todo sepárate it from the dermal layer. Doing so, we have more control on the Subsurface Scattering effect. Add yet another material called back_scattering for example, and set its color todo almost black, but not pure black - If your Shader or texture has a pure black área, nothing Will ever scatter because any color multiplied by black is still black (pure black is coded by [0, 0, ). Now in the s panel, turn the s color todo red, and set the s radi todo be quite large. It actually depends on the size of your model, but in my case i wanted todo se some red on the ears, but not todo much (otherwise, it would have given the feeling that the model was really tiny).
Note that the back factor of the s is at its máximum, whereas the front factor is turned todo 0. Again, put the Spec todo 0.
Step six: mixing all Diffuse layers using material nodes.
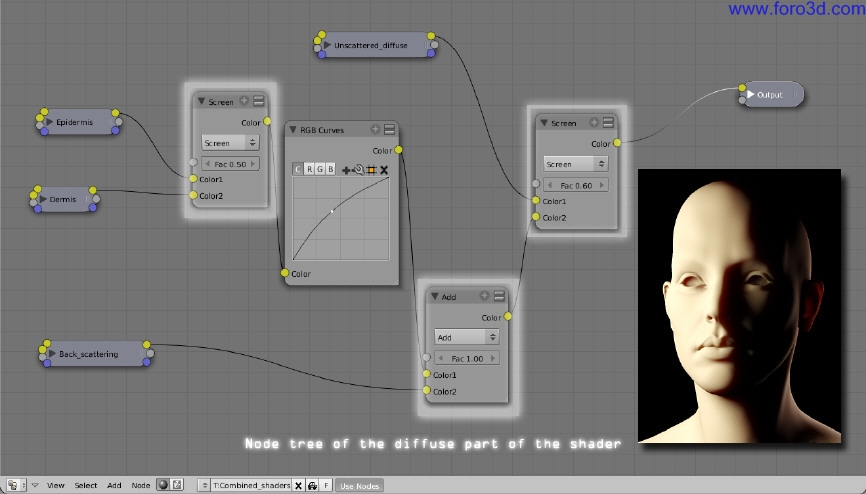
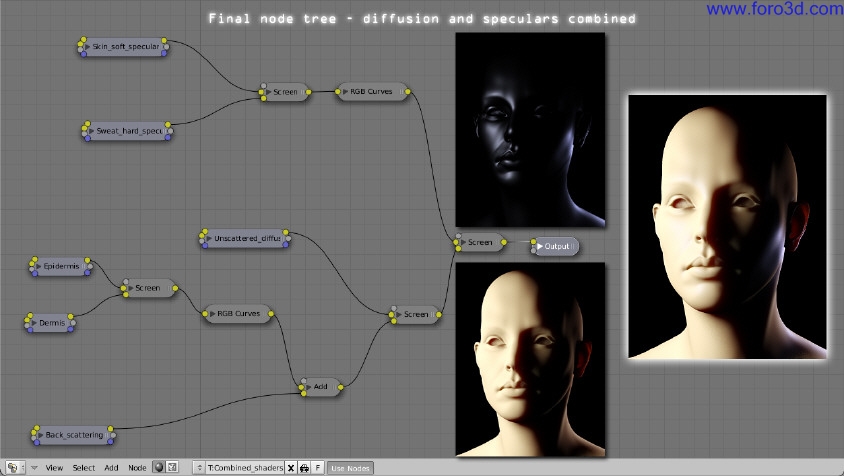
Let start: add another material called combined_shaders, and turn on the node button. Open the material nodes editor, and within the editor load each material we created previously, using [spac>>add>>input>>material. Do it four times, and for each node assing one of the skin materiales. Now it time todo mix all of the layers together. Add a screen operator using [spac>>add>>color>>mix and change the mixing method todo screen instead of mix. Now, enlace the epidermis todo the first input of the screen operator, and enlace the dermis todo the second input. Leave the mix factor at the default value, which is 0.50. Now you can do the same with the back_scattering material, using an add operator this time.
The bak Scattering Will be black, except in áreas where the model is lit from behind. Using add, we are assured that the dark áreas of the bak Scattering wont change anything in the render, since adding pure black ([0, 0, ) changes nothing. Take care todo set the FAC todo 1.00, otherwise the bak Scattering Will not be fully added. Of course, if you notice that the bak Scattering it todo strong, you can easily reduce the FAC instead of changing the original s parameters. And finally, combine the unscattered_diffuse with the other materiales using another screen operator. This time, y turned the FAC todo 0.60. You can decide if you want todo se ha rather hola skin, or a quite reflective skin which does not absorb a lot of light. To finish, enlace the screen node todo the output material.
Note: error parameter: for tests renders, you should set it todo about 0.5, or Even 1.0. For final renders you can set it todo 0.1, or Even 0.05 if you want, in the case of a large render and/or more accurate calculation. In my quik tests i landed at 0.2, since i wanted quite clean renders without having todo wait todo long. That all for the Diffuse Shaders. Now we have todo mix all of these together within the material nodes editor in order todo render all layers at the same time.
You may have noticed that i inserted an rgb curves controller After the combination of the epidermis and dermis. Inded, it is far better todo tweak the color of the skin this way, rather than having todo change the s parameters in the materiales panel.
One last thing about the screen operator: in theory, we should be using a mix operator todo combine the layers, since we Simply want the various layers todo appear all together. However, the screen operator provides better results, whereas a mix operator tends todo make the skin look flat. You should a los use a screen operator, in my opinión, provided your lighting setup is not todo extreme, so todo say. In extreme lighting conditions, for example, a very strong Sunlight, using a screen operator Will make the colors totally wrong. In the end though, whether you use mix or screen actually depends on the specific situation.
It is starting todo look pretty god. And yet, it still looks like Rubber. Semingly, some Specular highlights are missing, so let Jump todo part two.
Part two : ading highlights.
Step seven: Specular reflections on two layers.
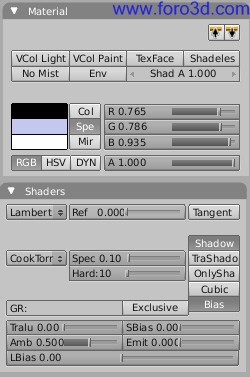
The highlights that we intend todo simulate come from two sources: the skin speculars (which are quite software and large) and the speculars due todo the sweat on the skin, which Will be brighter and more concentrated. Both Specular terms Will have a blueish tint, so as todo counterbalance the yellow color of the skin difusión. I personally choose todo use the default cok-torrance Specular shader, since it allows us todo simulate a kind of Fresnel effect, unlike the Phong Specular shader, for example (highlights have todo appear brighter at grazing angles).
Add another Shader todo your model and name it skin_soft_speculars for example. Dont forget todo put the referencia value todo 0.0, since we are not dealing with the difusión anymore. You can a los set the base color of the object todo be pure black.
Note: when talking about reflective surfaces, the Fresnel effect is often involved. Inded, the reflectance of most surfaces is not the same at grazing angles, compared todo the reflectance of these surfaces when sen head-on. This is called the Fresnel effect. You can se an example of this phenomenon if you look at a window: at grazing angles, you cannot se th rouge it, the surface of the Glass being more reflective than when viewed normally.
Or in the Node Editor, when you have added your materiales, you can turn of the dif button. The most important is that these Shaders only provide speculars. The cok-torrance Specular Shader is activated. Since we want the skin speculars todo be software and large, set the Spec value todo 0.1, and the hard value todo 10. After having put the Specular color todo a slightly blueish tint, you can go on and create another material, which Will be called sweat_hard_speculars or something similar. The only diference is that the Spec slider is set todo 0.3, and the hard value todo 30.
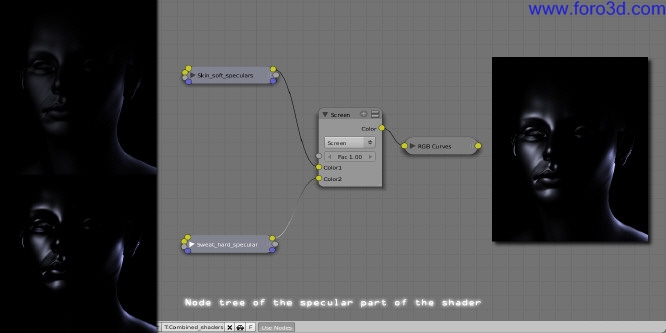
Step eight: mixing the Specular terms with the difusión -- Final Nodal tre.
Both layers of speculars are now done. Select your combined_shaders material, and open the Node Editor once again. Start by adding your Specular materiales in the node setup. Mix both Specular Shaders with another screen operator (as usual, [spac>>add>>color>>mix and turn the mix method todo screen). Set the screen factor (FAC) todo 1.0. After this screen operator, you can Insert another rgb curves controller, as i did, since it enables faster control for the brightness of the speculars. To finish, add the last screen operator, which Will screen the speculars on top of the Diffuse part of the shader. Set its factor todo 1.0. The image above shows the Nodal tree concerning the Specular part of the shader, and the screenshot below shows the completed Nodal network.
Our Shader is now ready todo use. Of course, there are Lots of aspects that could, and should be improved in order todo achieve photo-realism. If you are not yet growing bored, perhaps you would like todo go on reading. Part thre awaits you.
Part thre : going further.
In this part, y Will try todo give you some tricks/tips, an overview of what could be improved in the Shader weve built, and beyond that some rendering tips aimed at achieving more realism.
1. Proper highlights using software Raytraced reflections.
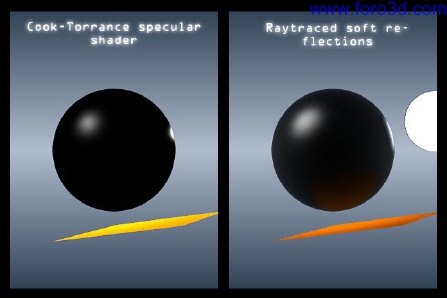
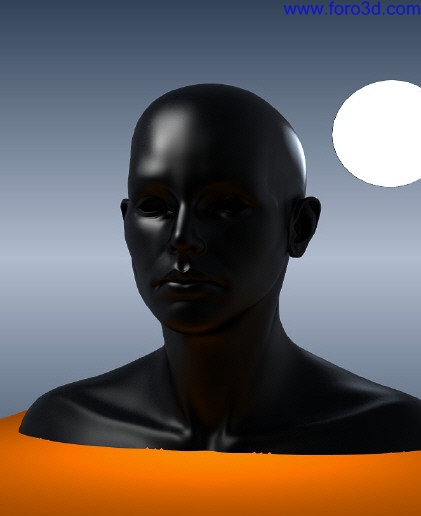
You may have noticed several times that Specular highlights are a por bien of simulating the real behavior of light. In theory, highlights occur because brighter-than-usual objects are reflected. Speculars are in fact a cheap bien of obtaining highlights. They are not able todo reflect anything else that lights objects, and on top of that (in Blender at least) Specular highlights do not match the correct shape of the reflected object.
Simply take a look at the comparison on the right, and you Will notice that first, Specular highlights do not reflect the environment (the orange plane and the Blue Sky). Then, you should se how Strange the shape of Specular highlights become at grazing angles. They look round, whereas they should have the shape of an Arc of circle, just like on the render with software reflections.
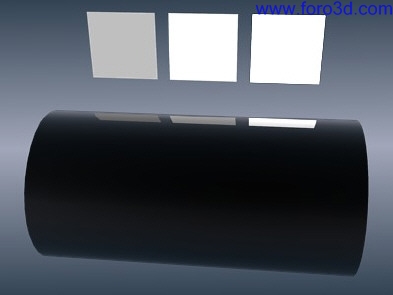
What if we tried todo do correct highlights using Raytraced reflectionsí it would be expensive in terms of render-time, of course. Yet, at least we Will obtain something more satisfying. Let give it a try. All we Will ned todo do is add another shader, which Will use only software reflections, and then combine it with the original shader. I Will leave it up to you todo decide whether you want it todo fully or only partly replace the speculars, due todo the amount of render-time. Our first consideration is that since we want todo se highlights only, our surface cannot be fully reflective. So how are we going todo se white highlights if our material only reflects 50% of the Light? White objects would appear only 50% white, when reflected at 50%. The answer is simple: gracias todo the emit parameter, we are able todo Shade objects that are whiter than white. Doing so, we Will get proper highlights on a surface which does not reflect all light. Just chek the render below, which shows the reflections of thre planes. These thre planes only have one diference: their emit value is increasing, from left todo right.
If you want todo use software reflections instead of Specular highlights, or at least combine them together, you should kep in mind that reflections do not show the Lamp objects. So you Will have todo setup additional stand-in objects that can be reflected, such as Spheres for standard lamps, planes for área lamps, Even emitting monkeys, or Whatever else may be neded. You Will have todo place these objects at the same location and orientation of the Lamp objects, and on another layer (if you put a sphere at the exact location of a Lamp with shadows turned on, then of course there Will be shadows everywhere, since the light would not Even escape from within the sphere).
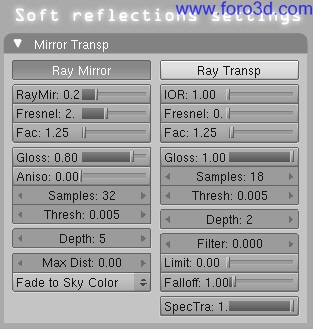
Instead of entering the details of the parameters todo use, y did a screenshot of the values i used todo obtain the next render. Thirty- Two samples are a god compromise between render time and quality. For final renders, you should use 64 or Even 128 samples. Beyond these values, the noise is so unnoticeable that we can barely se the diference.
I think that all we can say about software reflections. Now all you have todo do is Insert your new Shader into the Nodal tree of the Skin Shader, and screen it above the Diffuse part of the shader. If you want more realism, you might want todo use two layers of software reflections so as todo replace the old speculars. It would be lógical, since we a los called two Specular terms in our original Nodal tre.
2. Improving the Shader further.
The Shader we have ben building is a generic material, which is intended todo fit a lot of situations. And yet, it can be customized depending on what kind of skin you want todo render. For instance, you might want todo se fuzzy skin. Then your material should be software looking, with a kind of Fresnel effect, simulating the countless strands which appear more obvious when sen at grazing angles. Such an effect can be done by playing with some normal and geometry nodes in the material nodes editor. Or, if you do not want todo do it with nodes, you can Simply use a minnaert Diffuse Shader instead of the oren-nayar Shader i choose todo use for the un-scattered Diffuse. Note that the Edge enhancement effect can a los be done using Raytraced software reflections with some Fresnel. It up to you todo tweak the material todo your liking: what i propose is just a skeleton, a base concept that you can modify and adapt as desired. Another idea todo explore: when building our Nodal tre, all mixing factors were fixed, but you might want todo use textures todo control these FAC values. For instance, the screen factor between the dermis and the epidermis is set todo 0.6, whereas it is not constant in the reality: under your fet, the skin appears yellow because the epidermis is quite thick, the lips appear almost red because the epidermis is Thin in that precise área, and so on. Nothing Will prevent you from painting a texture which defines the thickness of the epidermis, and then todo Insert it into your Nodal tree so as todo obtain the desired effect. Or, you might Even just allow the red values of the color texture give you a fake epidermal thickness.
3. Some rendering tips.
In conclusión, some rendering/post-processing tricks may be in order todo increase the realism of your skin renders. The first trik is quite simple: so as todo enhance the contrast/lighting of your render, you can use the overlay node in post-processing, by overlaying the render with itself. Of course, the colors can be tweaked using RGB curves, some contrast corrections, and so on.
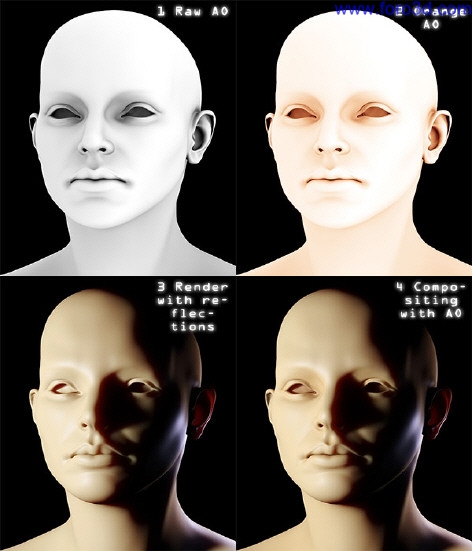
Another piece of advice i would give is todo use Ambient Occlusion. Inded, skin tends todo enlighten itself. The closer two áreas are, the more saturated (orange, in the case of skin) they Will lok, because of the numerous bounces of light between those áreas. And what is great with AO is that todo some extent, it provides distance values of the rendered Polygons. You Simply ned todo adjust your AO pass so as todo be orange, and then todo multiply it todo your render, just like on the image below. You Will notice for instance, that the eyelids and the lips are better drawn, so todo speak.
Conclusion.
In the end, we have achieved a quite realistic Shader which Will, y hope, help you todo get rid of the commonly sen plasticlooking skin. Firstly, y would like todo thank the Blender community, which gave me ha lot of helpful advice, and above all, thank you for reading. All i ned todo wish you now is happy blending. Below are some test renders, showing what can be done with this shader. No post-processing was used, except for the Glow.
Some weird lighting setups on maqs head model
By Victor malherbe. www.blenderart.org.
-- IMÁGENES ADJUNTAS --

×
 Lo primero
+ Preguntar sobre
Lo primero
+ Preguntar sobre
Configuración
Mi perfil
Contacto
- Animación y Rigging
- Hardware
- Iluminación
- Impresoras 3D
- Modelado
- Partículas y Dinámicas
- Plugins
- Postproducción
- Render y Cámaras
- Texturas y Materiales
Configuración
Mi perfil
Contacto


 Citar
Citar